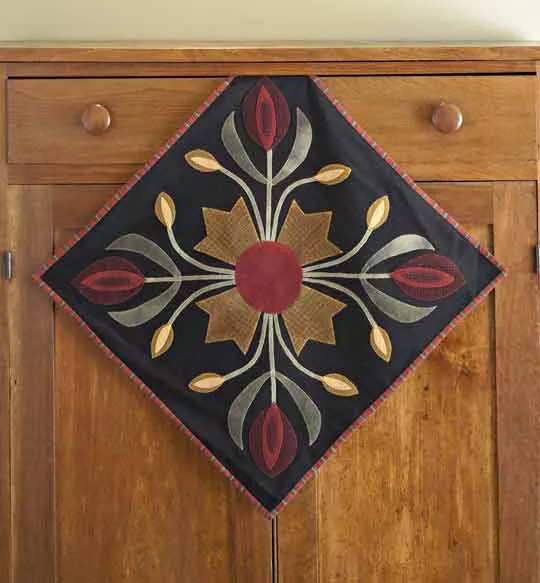
Growing up, I was always drawn to the textures and patterns of various fabrics. My first encounter with wool appliqué was a revelation; the rich textures and vibrant colors of wool brought a unique warmth and depth to my quilting projects. This table topper, designed by Avis Shirer, is a delightful introduction to working with wool, blending the charm of floral designs with the rustic appeal of felted wool.
Creating the Wool Flower Table Topper not only allows you to explore the tactile beauty of wool but also connects you with a rich tradition of textile art. Wool appliqué has been cherished for generations for its durability, vibrant colors, and the comforting warmth it brings to any home décor. This project is perfect for those new to wool and for seasoned quilters looking to try something new.
A Blossoming Tradition: The Art of Wool Flower Table Topper
The Wool Flower Table Topper isn’t just a beautiful piece for your home; it’s a nod to the timeless tradition of wool appliqué. This project, with its intricate flower designs and cozy felted wool, invites both novice and experienced quilters to explore the tactile beauty of wool. The tactile experience of working with felted wool, combined with the satisfaction of creating something both beautiful and functional, makes this project a rewarding journey.
The Wool Flower Table Topper stands out not just for its aesthetic appeal but also for the cultural heritage it represents. Wool has been used in textiles for centuries, valued for its insulating properties and rich textures. In this project, you will create a piece that is both modern and timeless, blending traditional techniques with contemporary design.
Preparing Your Materials: The Essentials for Your Project
To begin your Wool Flower Table Topper, gather the following materials:
Materials
- 23″ square black felted wool (appliqué foundation)
- 8×10″ piece moss green felted wool (stem appliqués)
- 10″ square olive green felted wool (leaf appliqués)
- 14″ square burgundy check felted wool (flower appliqués)
- 8″ square dark red felted wool (flower appliqués, center circle)
- 12″ square dark gold felted wool (bud and flower appliqués)
- 6″ square light gold felted wool (bud appliqués)
- 1/4 yard red stripe (binding)
- 27″ square backing fabric
- Lightweight fusible web
Preparation Tips
- Felting Wool: Machine-wash the wool in a hot-water wash, cold-rinse cycle. Machine-dry on high heat and steam-press to achieve the felted texture. Felting wool enhances its texture and makes it more durable for appliqué work.
- Using Fusible Web: Lay the fusible web, paper side up, over the patterns. Trace each pattern as indicated, leaving 1/2″ between tracings. Cut out the shapes roughly 1/4″ outside the traced lines. Press the fusible-web shapes onto the wrong side of the designated fabrics, let cool, cut out fabric shapes on drawn lines, and peel off paper backings. Fusible webbing helps secure your appliqué pieces before stitching, ensuring precise placement.
Cutting and Assembling: Bringing Your Quilt to Life
Cutting the Fabrics
Follow the steps to cut your wool pieces:
- From moss green wool, cut: 4 each of patterns A, B, and C
- From olive green wool, cut: 4 each of patterns D and D reversed
- From burgundy check wool, cut: 4 each of patterns E and G, and 1 of Pattern L
- From dark red wool, cut: 4 of Pattern F
- From dark gold wool, cut: 1 each of patterns J, J reversed, K, and K reversed, and 8 of Pattern H
- From light gold wool, cut: 4 each of patterns I and I reversed
- From red stripe, cut: 3 — 2-1/2×42″ binding strips
Cutting the fabrics accurately is crucial to the success of your project. Ensure your scissors are sharp and your cutting lines are precise to avoid frayed edges and mismatched pieces.

Full Pattern: Click Here
Assembling the Appliqué Quilt Top
- Positioning the Appliqués: Referring to the Appliqué Placement Diagram, position all appliqués on the 23″ black wool square. Fuse all pieces in place. The placement diagram acts as your guide to ensuring the floral motifs are arranged harmoniously.
- Stitching: Using matching thread, machine-blanket-stitch around each appliqué, working from the bottom layer to the top to complete the quilt top. This stitching method not only secures the appliqués but also adds a decorative touch to the edges of each piece.
Finishing the Quilt
- Layering: Layer the quilt top and backing fabric. Baste around the raw edges to secure the layers. Basting holds the layers together, preventing shifting during the binding process.
- Binding: Bind the edges with the red stripe binding strips to complete your table topper. Binding gives your quilt a polished finish and hides any raw edges.
Additional Tips: Ensuring a Flawless Finish
- Thread Matching: Use thread that matches your wool colors for a seamless look. Matching threads ensure that your stitches blend in, highlighting the beauty of the appliqué rather than the stitching.
- Stitching Practice: Practice your machine-blanket stitch on scrap fabric to ensure consistent stitches. This helps you maintain even stitching and avoid mistakes on your main project.
- Pressing: Regularly press your pieces to keep the fabric smooth and manageable. Pressing as you go eliminates wrinkles and makes assembly easier.
Troubleshooting Common Issues
- Appliqué Shifting: If your appliqué pieces shift while stitching, ensure you are using enough fusible web to secure them. You can also pin them in place for added stability.
- Uneven Edges: If your edges are uneven, use a rotary cutter and ruler to trim them precisely before binding.
Completing the Wool Flower Table Topper is not just about the final product, but also about the journey of exploring new materials and techniques. As you place this beautiful piece on your table, take a moment to appreciate the textures, colors, and the warmth it brings to your home. The joy of creating something with your hands, the careful attention to detail, and the satisfaction of completing a project all contribute to the rewarding experience of quilting.
Remember, every quilt you make is a testament to your creativity and skill. Enjoy the process, and let your Wool Flower Table Topper be a reflection of your love for the art of quilting. Happy quilting!


