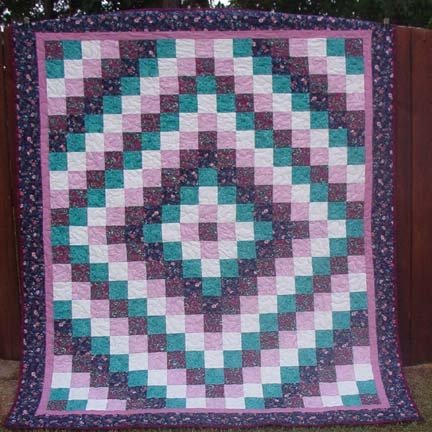
When I first began quilting, it was simply a hobby—a way to pass the time and express creativity. Little did I know it would become a profound means of giving back to the community. The aftermath of Hurricane Katrina was a turning point for many of us. As we watched the devastation unfold, there was an overwhelming urge to help. Quilting became my way of providing comfort and warmth to those who had lost so much. The “Trip Around The World” quilt is one such project, born from a desire to make a difference and connect with others through the craft I love.
A Journey in Every Stitch: The Unique Appeal of the Trip Around The World Quilt
The “Trip Around The World” quilt holds a special place in my heart, not just for its beautiful design but for the story it tells. This quilt is more than just fabric and thread; it’s a testament to the resilience of communities and the power of a shared purpose. The technique used in this quilt, with its intricate patterns and vibrant colors, mirrors the interconnected paths of life, reminding us of our shared journeys and the beauty found in unity.
The Magic of Strips: Simplifying the Complex
One of the most fascinating aspects of the “Trip Around The World” quilt is its construction from strips rather than individual squares. This method not only simplifies the process but also enhances the overall design, creating a seamless flow of colors and patterns. By carefully selecting and arranging the strips, we achieve a stunning visual effect that captures the essence of a global journey.
Materials: What You Need for the Trip
To create your own “Trip Around The World” quilt, you will need the following materials:
- Fabrics:
- (8) 4″ wide strips each of four different fabrics, cut selvage to selvage
- (4) 4″ strips of the 5th fabric, cut selvage to selvage
- OR (4) 4″ strips each of 9 different fabrics
- Yardage:
- For the five fabric version: 1 yard each of the first four fabrics, 1/2 yard of the fifth fabric
- For the nine fabric version: 1/2 yard of each fabric
- 1/2 yard for inner border
- 1 1/4 yards for outer border
- Other Tools:
- Sewing machine
- Rotary cutter and mat
- Seam ripper
- Iron and ironing board

Full Pattern: Click Here
Preparing for Your Journey: Tips and Considerations
Before you dive into the quilting process, here are a few insights and tips to ensure your project goes smoothly:
- Choose Your Fabrics Wisely: The beauty of the “Trip Around The World” quilt lies in the contrast and harmony of its colors. Select fabrics that complement each other while providing enough variation to highlight the pattern.
- Precision Cutting: Accurate cutting is crucial. Ensure your strips are cut evenly to avoid discrepancies in your final quilt dimensions.
- Press as You Go: Properly pressing your seams will make assembly easier and your final quilt look more polished. Alternate the direction of your seam pressing to help the pieces nest together perfectly.
- Stay Organized: Keep your strips and sub-cuts in order. Labeling and grouping them can prevent confusion and mistakes during assembly.
Step-by-Step Instructions
- Cutting the Strips:
- Cut (8) 4″ wide strips each of four different fabrics, and (4) 4″ strips of the fifth fabric.
- Alternatively, cut (4) 4″ strips each of 9 different fabrics.
- Arranging the Strips:
- Lay out your strips in a pleasing order. For the five fabric version, create 8 identical panels. For the nine fabric version, ensure all four panels are identical.
- Stitching the Panels:
- Sew the strips together to form panels. Each panel should consist of 9 strips.
- Press the seams in alternating directions for each strip to facilitate easy nesting.
- Creating the Tubes:
- Fold each panel in half lengthwise, right sides together, and sew along the long edge to create a tube.
- Press the seams again.
- Cutting Sub-Cuts:
- Lay the tubes on your cutting mat and trim one end.
- Cut the tube into 4″ sub-cuts, making sure each sub-cut is identical.
- Opening the Tubes:
- Using a seam ripper, carefully open each sub-cut by ripping a seam in a stair-step pattern, ensuring the pattern flows continuously.
- Assembling the Quilt Top:
- Start with two sub-cuts and stitch them together, aligning the stair-step pattern.
- Continue adding sub-cuts, alternating the direction to create a downhill and uphill pattern.
- Creating the Halves:
- Repeat the process to create two identical halves of the quilt top.
- Join the two halves together with additional sub-cuts to complete the central design.
- Adding Borders:
- Add a 2″ inner border and a 5″ outer border to finish the quilt top.
Additional Tips
- Consistent Seams: Ensure your seam allowances are consistent. This precision will make a significant difference in the final appearance of your quilt.
- Test Your Layout: Before sewing the final pieces, lay out your quilt top to check the arrangement. This step can help you catch any mistakes and ensure your design flows as intended.
- Back It Up: Consider using leftover strips to add a decorative element to the quilt backing. It not only conserves fabric but also adds a unique touch to the quilt.
Conclusion
Creating a “Trip Around The World” quilt is more than a sewing project; it’s a journey filled with creativity, precision, and heartfelt purpose. As you work through each step, remember the impact your quilt can have on someone in need. Reflect on the beauty of the finished piece and the story it tells—of hands joined in craftsmanship, of hope sewn into every seam, and of a world connected through the art of quilting.


