Growing up, I always found solace in the rhythmic hum of a sewing machine. It was during my college years, juggling studies and part-time jobs, that quilting became my creative refuge. One of my fondest memories was creating a quilt for my best friend’s first baby—a star-themed quilt that symbolized dreams and hopes for the new life joining our world. Fast forward to today, and I’m thrilled to share a special project that holds a similar theme and sentiment: the “When You Wish…” baby quilt.
The Magic of Stars in Quilting
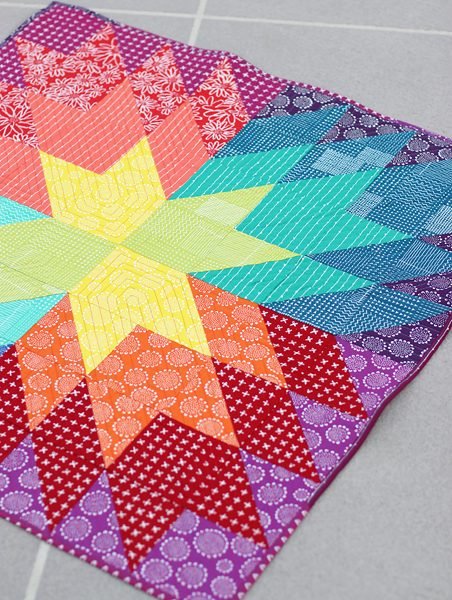
Stars have always been a symbol of dreams and guidance. This quilt pattern, aptly named “When You Wish…” after the famous Disney tune, captures that magical essence. The charm of this project lies in its simplicity and the vibrant colors of Karen Lewis’ Blueberry Park fabrics, making it perfect for beginners and seasoned quilters alike. Let’s dive into the world of this delightful baby quilt, where each stitch is a wish for joy and warmth.
Diving into the Details
The Play of Colors and Simplicity
One of the standout features of the “When You Wish…” quilt is its clever use of color and straightforward design, composed primarily of squares and half-square triangles (HSTs). By dividing the quilt into four quadrants with warm and cool color palettes, you create a visually appealing and balanced piece. The beauty of this quilt lies not just in its pattern but in the story it tells through its colors and the ease with which it comes together.
Materials Needed
To get started on your “When You Wish…” baby quilt, gather the following materials:
Quilt Top:
- 14 Fat Quarters (FQs):
- 1 Yellow
- 1 Grass Green
- 2 Orange
- 2 Jade Green
- 2 Red
- 2 Dark Blue
- 2 Light Purple
- 2 Dark Purple
Binding:
- 1 FQ Purple (and remnants from Light and Dark Purple) OR ½ yard of fabric
Batting:
- 40½” x 40½” square
Backing:
- 1¼ yards of fabric
Preparing to Quilt: Tips and Considerations
Before diving into the steps, take some time to prepare and plan. Audition your fabrics to find a pleasing combination for each quadrant. Remember, the joy of quilting comes from the creative process, so don’t hesitate to mix and match until you find the perfect palette. Keep each quadrant’s fabric together to maintain consistency, unless you prefer a scrappy, eclectic look.

Full Pattern: Click Here
Step-by-Step Instructions and Tips
Step-by-Step Instructions
Cutting Instructions
Yellow FQ:
- Cut 1 strip 5½” x 21″, then subcut 2 squares 5½” x 5½”.
- Cut 1 strip 5″ x 21″, then subcut 2 squares 5″ x 5″.
Grass Green FQ:
- Same as Yellow FQ.
Orange and Jade Green FQs:
- Cut 1 strip 5½” x 21″, then subcut 3 squares 5½” x 5½”.
- Cut 1 strip 5″ x 21″, then subcut 1 square 5″ x 5″.
Red and Dark Blue FQs:
- Cut 2 strips 5½” x 21″, then subcut 5 squares 5½” x 5½” and 1 square 5″ x 5″.
Light Purple and Dark Purple FQs:
- Cut 1 strip 5½” x 21″, then subcut 3 squares 5½” x 5½”.
- Cut 1 strip 5″ x 21″, then subcut 1 square 5″ x 5″.
Binding:
- FQ Purple and Light and Dark Purple remnants: Cut 9 strips 2¼” x 21″ OR
- ½ yard fabric: Cut 5 strips 2¼” x WOF.
Quilt Top Quadrants
- Divide the quilt top into four quadrants as shown:
- Quadrant 1 (Q1) and Quadrant 4 (Q4): ½ Yellow FQ, 1 Orange FQ, 1 Red FQ, 1 Light Purple FQ.
- Quadrant 2 (Q2) and Quadrant 3 (Q3): ½ Grass Green FQ, 1 Jade Green FQ, 1 Dark Blue FQ, 1 Dark Purple FQ.
- Allocate and keep each quadrant’s fabric together to avoid mixing FQs across the quadrants.
HST Construction Method
- Take two 5½” squares and draw a diagonal line on the back of one with a pencil.
- Place the squares right sides together (RST) and sew two seams, a quarter inch on either side of the diagonal.
- Cut along the diagonal line, open the units, and press the seams to the side.
- Trim each unit to 5” square.
Sew Your HST Units
- Q1:
- 2 Yellow/Orange HST units, press toward Orange.
- 4 Orange/Red HST units, press toward Red.
- 6 Red/Light Purple HST units, press toward Light Purple.
- Q2:
- 2 Grass Green/Jade Green HST units, press toward Grass Green.
- 4 Jade Green/Dark Blue HST units, press toward Jade Green.
- 6 Dark Blue/Dark Purple HST units, press toward Blue.
- Q3:
- 2 Grass Green/Jade Green HST units, press toward Grass Green.
- 4 Jade Green/Dark Blue HST units, press toward Jade Green.
- 6 Dark Blue/Dark Purple HST units, press toward Blue.
- Q4:
- 2 Yellow/Orange HST units, press toward Orange.
- 4 Orange/Red HST units, press toward Red.
- 6 Red/Light Purple HST units, press toward Light Purple.
Quilt Top Layout
- Lay out the HSTs and the 5” squares as per the pattern.
- Sew all the rows together, pressing seams in alternate directions.
- Join the rows to complete the quilt top.
Finishing Touches
- Back, baste, and quilt as preferred.
- Join the binding strips and bind the quilt.
Additional Tips
- Quilting Choice: For a fun and colorful finish, use contrasting thread colors like tangerine for warm quadrants and aqua for cool quadrants.
- Binding Technique: A zig-zag stitch for binding is quick and durable, perfect for a baby quilt that will see a lot of use and washing.
- Relax and Enjoy: Embrace the imperfections. Quilting should be a joyful and relaxing experience, so don’t stress over minor discrepancies.
Creating the “When You Wish…” baby quilt is more than just a sewing project; it’s a journey of creativity and love. As you stitch each piece together, you’re weaving dreams and warmth into a quilt that will be cherished. Whether it’s for your own little one or a special gift, this quilt is sure to bring smiles and comfort. Happy sewing!


