As a young girl, I often found myself gazing at the night sky, mesmerized by the myriad of stars twinkling in the darkness. It was a time when my dreams felt as limitless as the universe itself. Those magical nights sparked a lifelong passion for stargazing and an even deeper love for quilting. This fusion of the celestial and the creative has culminated in my latest project: the Star Cluster Mini Quilt. This quilt, with its intricate design and vibrant colors, is a tribute to those nights spent under the stars, dreaming of endless possibilities.
Quilting has always been more than just a craft to me; it’s a way to capture memories and emotions in fabric and thread. The Star Cluster Mini Quilt is a perfect example of this philosophy. Its design, reminiscent of a constellation, represents both the beauty and complexity of the cosmos. I am thrilled to share this project with you, and I hope it inspires you to create your own piece of the night sky.
A Celestial Design: The Star Cluster Mini Quilt
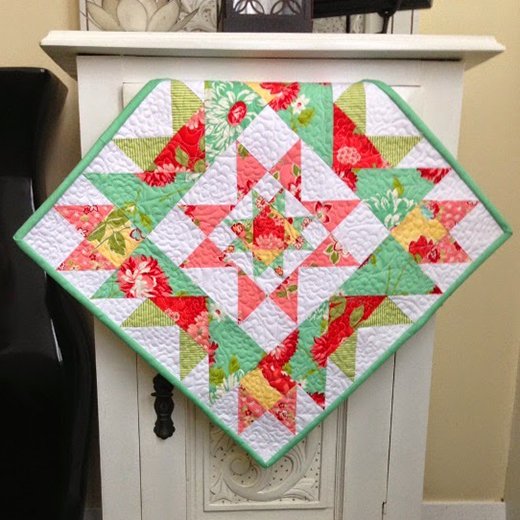
The Star Cluster Mini Quilt is not just a beautiful piece of art; it’s a journey through intricate piecing and vibrant colors that mirror the splendor of the universe. This mini quilt, measuring approximately 16 1/2” square, combines various fabrics and meticulous craftsmanship to create a stunning star pattern. In this article, I will guide you through the process, from gathering materials to the final stitches, ensuring that your Star Cluster Mini Quilt shines as brightly as the night sky.
The Fabric Galaxy: Choosing the Right Materials
Before we embark on our quilting journey, it’s essential to gather all the necessary materials. Here’s what you’ll need to bring your Star Cluster Mini Quilt to life:
Materials:
- White Homespun Fabric: 35cm
- Red Fabric: 15cm
- Yellow Fabric: 7cm
- Aqua Fabric: 15cm
- Pink Fabric: 8cm
- Green Fabric: 8cm
- Backing and Wadding: 50cm square
- Binding Fabric: 15cm
- Neutral Thread for Piecing
- Quilting Thread
Note: Ensure you read all instructions carefully before starting. A 1/4” seam allowance is included in all measurements. Prewashing and ironing the fabrics are recommended for the best results.

Full Pattern: Click Here
Preparing for Takeoff: Initial Tips and Considerations
Before diving into the cutting and sewing, here are a few tips to set you up for success:
- Label Your Pieces: As you cut your fabrics, label each piece according to the cutting guide. This will help you stay organized and make the assembly process smoother.
- Press as You Go: Ironing your pieces after each step ensures crisp seams and accurate piecing.
- Patience is Key: Take your time with each step, especially when sewing the small triangles. Precision will pay off in the final look of your quilt.
Part 3
Step-by-Step Instructions: Assembling Your Star Cluster Mini Quilt
Step 1: Cutting the Fabric
Begin by cutting your fabrics according to the following guide:
- White Homespun:
- 4 x 1 1/2” squares (A)
- 1 x 3 1/4” square cut diagonally twice to yield 4 triangles (B)
- 4 x 2 1/2” squares (F)
- 1 x 5 1/4” square cut diagonally twice to yield 4 triangles (G)
- 8 x 2 7/8” squares cut diagonally to yield 16 triangles (L)
- 1 x 5 1/4” square cut diagonally twice to yield 4 triangles (M)
- 4 x 2 1/2” squares (P)
- Red Fabric:
- 1 x 1 7/8” square (E)
- 1 x 5 1/4” square cut diagonally twice to yield 4 triangles (K)
- Yellow Fabric:
- 2 x 1 7/8” squares cut diagonally to yield 4 triangles (D)
- 4 x 2 1/2” squares (O)
- Aqua Fabric:
- 4 x 1 7/8” squares cut diagonally to yield 8 triangles (C)
- 4 x 4 7/8” squares cut diagonally to yield 8 triangles (J)
- Pink Fabric:
- 4 x 2 7/8” squares cut diagonally to yield 8 triangles (H)
- 4 x 2 7/8” squares cut diagonally to yield 8 triangles (N)
- Green Fabric:
- 4 x 2 7/8” squares cut diagonally to yield 8 triangles (I)
Step 2: Assembling the Center Crystal Star Block
- Arrange the (A-E) pieces as per the diagram.
- Sew a yellow (D) triangle to two alternate sides of the red (E) square, pressing seams towards the yellow triangles.
- Sew the remaining yellow (D) triangles to the other sides of the red (E) square. This unit should measure 2 1/2” square.
- Sew a blue (C) triangle to each of the white (B) triangles along the short side, pressing seams towards the blue triangles to create four flying geese units (1 1/2” x 2 1/2”).
- Attach a flying geese unit to either side of the (D/E) unit, pressing seams towards the center.
- Sew a white (A) square to the short ends of the remaining flying geese units and attach these to the top and bottom of the (D/E) unit to complete the center block (4 1/2” square).
Step 3: Creating the Surrounding Star Blocks
- Arrange the (F-H) pieces around the completed center block.
- Sew a pink (H) triangle to each white (G) triangle to form four flying geese units (2 1/2” x 4 1/2”).
- Attach these units to the sides of the center block, pressing seams towards the center.
- Sew a white (F) square to the ends of the remaining flying geese units and attach them to the top and bottom of the center block to complete the second star block (8 1/2” square).
Step 4: Final Assembly
- Arrange the (I-M) pieces according to the diagram to form four units.
- Sew a green (I) triangle to each white (M) triangle to form flying geese units (2 1/2” x 4 1/2”).
- Add a white (L) triangle to the sides of these units and a red (K) triangle to the bottom, followed by blue (J) triangles on the sides.
- Attach these units to the sides of the second star block.
- Arrange the (L-P) pieces as per the diagram to create four units.
- Sew a white (L) triangle to each pink (N) triangle to form 8 squares (2 1/2” square).
- Combine these squares with white (P) squares and yellow (O) squares as indicated in the diagram to form four cornerstone blocks (4 1/2” square).
- Attach these units to the top and bottom of the quilt top to complete the mini quilt top (16 1/2” square).
Basting and Quilting
- Lay the backing fabric wrong side up on a flat surface and secure with tape.
- Smooth the wadding on top, then position the quilt top right side up.
- Pin the layers together for machine quilting or hand baste for hand quilting.
- Quilt as desired. I chose to free-motion quilt a flower motif.
Binding and Optional Hanging Sleeves
- Trim the excess backing and wadding.
- Optional: Add a hanging sleeve by cutting a strip of fabric 2 1/2” x 14 1/2”, folding, and sewing it to the quilt back.
- Cut two 2 1/2” strips from the binding fabric, sew together, and press in half.
- Attach the binding to the quilt front, mitre the corners, and secure on the back.
- Label and date your Star Cluster Mini Quilt.
Creating the Star Cluster Mini Quilt is a rewarding journey that combines precision, creativity, and a love for the cosmos. As you piece together each triangle and square, you’re not just making a quilt—you’re crafting a piece of the night sky, stitched with love and imagination. I hope this project brings you as much joy as it has brought me and inspires you to explore the endless possibilities of quilting.


