When I was first introduced to the world of quilting, I was immediately captivated by the intricate designs and vibrant colors that came together to create beautiful patterns. One of the first techniques I fell in love with was paper piecing. The precision and creativity involved reminded me of solving a complex puzzle, where each piece fit perfectly to form a stunning picture. Recently, I revisited this technique with a fresh perspective and created the Paper Pieced Pompom quilt block. This design not only challenged my skills but also brought back fond memories of my early quilting days.
The Magic of Paper Piecing
Paper piecing, also known as foundation piecing, is a method that allows for incredibly precise and detailed quilt blocks. It involves sewing pieces of fabric onto a paper pattern, which acts as a guide to ensure each piece is perfectly aligned. This technique is perfect for creating intricate designs like the Paper Pieced Pompom, where precision is key to achieving the desired visual effect. Let’s dive into the details of this captivating project and explore how you can create your own beautiful quilt blocks.
Materials and Preparation
Understanding the Design
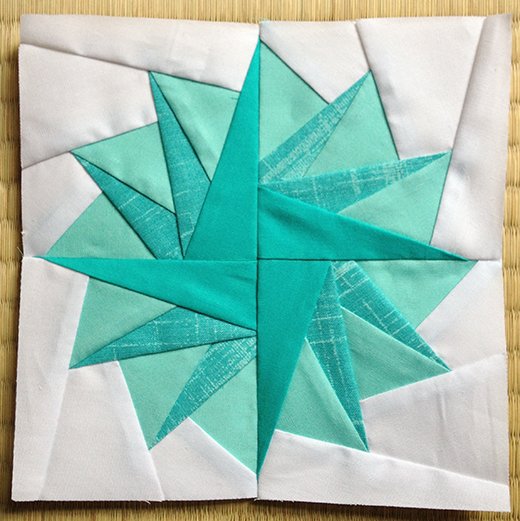
The Paper Pieced Pompom block features a dynamic, star-like pattern with sharp angles and a harmonious blend of colors. The design consists of four smaller blocks pieced together to form a larger, cohesive unit. The interplay of light, mid-range, and dark fabrics creates depth and movement, making this block a true visual delight.
Materials Needed
To create your own Paper Pieced Pompom quilt block, you will need the following materials:
- The Circle Of Geese pattern: This is the foundation of your design. You can download it online.
- Assorted fabric scraps in one color family:
- Light solid
- Mid-range textured solid (such as Sketch or Painter’s Canvas)
- Dark solid
- Neutral fabric scraps for the background
- Printer paper or specialty paper piecing paper
- Sewing machine and standard sewing supplies
- Textas/pencils/crayons for marking the pattern
- Rotary cutter and cutting mat
- Iron and ironing board
Preparing Your Materials
- Download and Print the Pattern: Download the Circle Of Geese pattern and print it at half size (50%) so that each block section finishes at 3 inches. Each completed pompom block will be 6 inches. Print four copies of the clockwise pattern.
- Cut the Templates: Carefully cut out the template pieces, ensuring to leave a 1/4-inch seam allowance around the edges. Note that as the pattern is scaled down, the provided 1/4-inch seam allowance will now be 1/8-inch.
- Color Code the Pattern: Using textas, pencils, or crayons, mark each segment of the pattern to plan your block. Assign colors as follows:
- Segments 1, 4, and 7: Light solid
- Segments 3 and 6: Mid-range textured solid
- Segment 9: Dark solid
- Segments 2, 5, and 8: Light neutral for the background
Getting Ready to Sew
Before starting, ensure your sewing machine is set up with a short stitch length, which will make it easier to tear away the paper later. Gather all your fabric scraps and arrange them by color for easy access during the piecing process. With your materials and tools ready, you are now prepared to embark on creating your Paper Pieced Pompom quilt block.

Full Pattern: Click Here
Step-by-Step Instructions
Step 1: Paper Piecing the Block
- Piece by Piece Assembly:
- Start with the first segment of the pattern. Place your light solid fabric on the back of the paper, ensuring it covers the entire segment with a 1/4-inch seam allowance.
- Sew along the line between segment 1 and segment 2, following the printed lines on the paper.
- Fold the paper back along the seam line and trim the fabric to a 1/4-inch seam allowance.
- Continue Adding Segments:
- Continue this process for each subsequent segment, ensuring the fabric pieces cover their respective segments and include a 1/4-inch seam allowance.
- Use the color-coded markings to guide fabric placement, maintaining the color pattern of light, mid-range, and dark solids.
Step 2: Assembling the Blocks
- Complete All Four Blocks:
- Repeat the piecing process to complete four individual blocks.
- Trim each block to a 1/4-inch seam allowance around the edges.
- Join the Blocks Together:
- Arrange the four blocks to form a larger square, ensuring the points align to create the star-like pattern.
- Sew the blocks together along the solid lines, carefully matching the seams.
- Remove the Paper:
- Once the blocks are sewn together, carefully tear away the paper backing. This will leave you with a beautifully precise fabric block.
Additional Tips
- Use Printer Paper: Regular computer printer paper works well for paper piecing. Just remember to shorten your stitch length and backstitch at the beginning and end of each seam.
- Trim as You Go: After sewing each segment, trim the fabric to a 1/4-inch seam allowance. This reduces bulk and ensures a neat block.
- Accurate Seams: Keep the paper on while piecing the blocks together to help maintain accurate seams and alignments.
Creating the Paper Pieced Pompom quilt block is a rewarding experience that combines precision and creativity. The final product is a stunning quilt block that showcases the intricate beauty of paper piecing. Reflect on the process and appreciate the effort that goes into each stitch, knowing that your hard work has resulted in a beautiful piece of art. I hope this tutorial inspires you to explore the world of paper piecing and create your own unique quilt designs.


