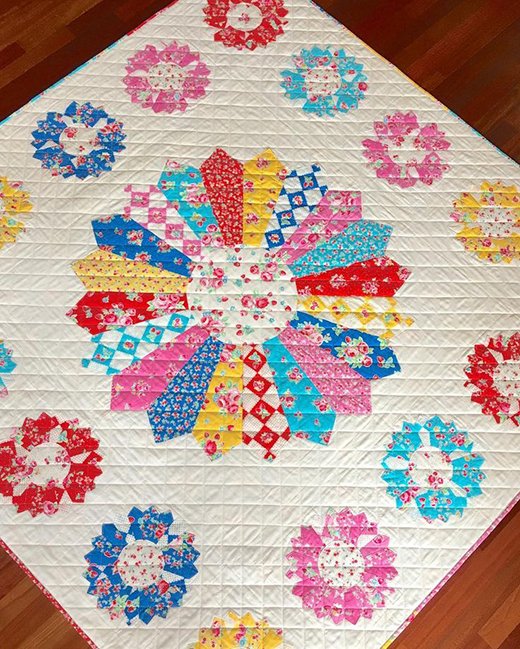
Quilting has been a part of my life for as long as I can remember. One of my earliest memories is of sitting next to my mother as she meticulously pieced together beautiful quilts, her hands working with a speed and precision that I admired and aspired to. She always told me that quilting was not just about the final product but about the journey of creation and the stories stitched into each piece. The Flower Sugar Very Berry Cherry Quilt holds a special place in my heart because it embodies the vibrant colors and playful patterns that I have always loved.
Creating this quilt was an adventure, much like the ones I had with my mother. Each step, from selecting fabrics to stitching the final binding, reminded me of the joy and fulfillment that comes from creating something beautiful with my own hands. This quilt, designed by Lynne Goldsworthy of Lily’s Quilts for Lecien, combines traditional techniques with modern aesthetics, resulting in a piece that is as delightful to make as it is to behold.
Unveiling the Dresden Delight: Exploring the Unique Charm of the Very Berry Cherry Quilt
The Flower Sugar Very Berry Cherry Quilt is a visual feast, bursting with the cheerful essence of summer berries and blossoms. What sets this quilt apart is its use of the Dresden plate pattern, a classic design that radiates elegance and charm. The interplay of bold reds, soft pinks, and refreshing aquas in the fabric creates a vibrant mosaic that captures the eye and warms the heart. This section will dive into the specifics of the Dresden plate technique and how it transforms simple fabric pieces into stunning quilt blocks.
Mastering the Dresden Plate: A Closer Look at the Technique
The Dresden plate technique is both intricate and rewarding, requiring precision and patience. This method involves cutting fabric wedges, sewing them into circular arrangements, and then appliquéing these circles onto the quilt top. The result is a series of beautifully symmetrical, floral-like patterns that add depth and texture to the quilt. Understanding the nuances of this technique will not only help you create the Very Berry Cherry Quilt but also enhance your overall quilting skills.
Materials: Gathering Everything You Need
To create the Flower Sugar Very Berry Cherry Quilt, you’ll need the following materials:
- One FQ bundle of Flower Sugar Very Berry Cherry (23 prints)
- 4 yards for background – Lecien Snow White
- 4 ½ yards for backing – 31512-77
- 80” square batting
- Binding is cut from the FQs
- Two full-size template sheets are included with the pattern
- Darlene Zimmerman EZ Dresden Ruler (template provided if you do not have this ruler)
Notes:
- Read the pattern in full before starting.
- ¼” seams are used throughout except where stated otherwise.
- Press after each seam, pressing seams open or to one side as preferred.
- WOF = width of fabric – a strip of fabric cut from selvage to selvage or from the center cut to selvage if cutting a FQ.
- Before cutting fabrics, check that templates have been printed to the correct size by measuring the dimension lines printed on the template sheets.
Preparing for Your Quilting Journey: Initial Tips and Considerations
Before diving into the step-by-step process, here are some initial tips to ensure your quilting journey is smooth and enjoyable:
- Organization is Key: Lay out all your fabrics and tools before starting. This will save you time and help you stay focused.
- Accurate Cutting: Ensure your templates are printed correctly and use sharp rotary cutters for precise cuts.
- Seam Allowances: Stick to the recommended ¼” seam allowance unless stated otherwise. Consistency is crucial for the pieces to fit together perfectly.
- Pressing Matters: Pressing seams as you go helps keep your quilt top flat and makes the final assembly easier.

Full Pattern: Click Here
Step-by-Step Instructions: Bringing the Flower Sugar Very Berry Cherry Quilt to Life
- Cutting the Fabrics:
- Set aside five 31513 prints (one of each color other than cream), the remaining three pink prints, and the three cream prints.
- From the remaining prints (three blue, three red, three aqua, and three yellow), cut as follows:
- One 2 ½” WOF strip for scrappy binding.
- One 8” WOF strip for large wedge templates and the remainder into two 4” WOF strips.
- One 4” WOF strip cut into fifteen small wedges using the small wedge template or the EZ Dresden Ruler.
- Repeat similar cutting for the three pink prints but cut twenty small wedges in total.
- Cut the 31513 prints into two 4” WOF strips, then cut fifteen small wedges from the blue, red, yellow, and aqua prints, and twenty from the pink print. Fussy cut one large wedge from the remainder.
- Cut a 13” square from cream print 31512, fold in half twice, and use the large circle template to cut a circle, aligning the blue lines with the folds. Mark the red dots by cutting small notches into the seam allowance.
- Cut eight 5 ½” squares from each of the two remaining cream prints, fold in half twice, and use the small circle template to cut circles, marking the seam allowance lines.
- Cutting the Background Fabric:
- From the snow white background fabric, cut:
- Six 12 ½” WOF strips. From these, cut three 12 ½” squares from five strips, and two 2 ½” x 12 ½” strips from the remainder of each.
- One 40 ½” WOF strip, cut into one 40 ½” square.
- Ten 2 ½” WOF strips. Sew these end to end with five shorter 2 ½” strips cut from the first bullet point. Cut into two 40 ½”, four 68 ½”, and two 72 ½” strips.
- From the snow white background fabric, cut:
- Creating the Dresden Plates:
- Fold each wedge in half, right sides together, and sew a seam along the top.
- Trim corners for sharper points, turn inside out, and press flat.
- Sew small wedges into sixteen small Dresden plates (20 wedges per plate), three of each color (blue, red, aqua, and yellow), and four pink.
- Sew large wedges into one large Dresden plate and press seams in one direction.
- Appliqué small Dresden plates to 12 ½” snow white squares.
- Appliqué small cream circles to the center of the Dresden plates.
- Piece the larger cream circle into the center of the large Dresden plate, aligning notches with seams. Press seam allowance towards the center.
- Pin the large Dresden plate to the 40 ½” square and appliqué in place.
- Assembling the Quilt Top:
- Sash two sides of the large Dresden plate with two 2 ½” x 40 ½” snow white strips.
- Sew six small Dresden plates into two strips of three with 2 ½” x 12 ½” snow white strips in between.
- Sew these strips to the sides of the large Dresden plate.
- Sew two 2 ½” x 68 ½” snow white strips to the top and bottom of this piece.
- Sew remaining eight small Dresden plates into two strips of five with 2 ½” x 12 ½” snow white strips in between.
- Sew these strips to the top and bottom of the large Dresden plate.
- Sew two more 2 ½” x 68 ½” snow white strips to the top and bottom of the entire piece.
- Sew two 2 ½” x 72 ½” snow white strips to the sides of the quilt top.
- Finishing the Quilt:
- Cut backing fabric into two equal lengths, remove selvages, sew together, and trim to 80” square.
- Sew binding strips end to end and press wrong sides together to make double fold binding.
- Make a quilt sandwich with the quilt back, batting, and quilt top. Baste together.
- Quilt as desired. Trim the quilt square, removing excess batting and backing.
- Bind the quilt, taking care to miter the corners.
Additional Tips: Enhancing Your Quilting Experience
- Pinning: Use plenty of pins to keep your pieces aligned, especially when sewing curves.
- Stitch Length: Use a shorter stitch length for more secure seams, particularly when appliquéing.
- Pressing Tools: Invest in a good pressing mat and iron. Proper pressing makes a huge difference in the final appearance of your quilt.
- Quilting Gloves: Consider using quilting gloves for better grip and control when quilting.
Creating the Flower Sugar Very Berry Cherry Quilt is a delightful journey that combines vibrant colors, intricate patterns, and traditional techniques. As you step back and admire your finished quilt, take a moment to appreciate the craftsmanship and creativity that went into each stitch. This quilt is more than just a beautiful piece—it’s a testament to your dedication and love for the art of quilting. Let it be a source of pride and joy, and may it inspire many more quilting adventures.


