Growing up near the coast, I was always captivated by the ocean’s vibrant and diverse marine life. The fish, in particular, held a special charm with their myriad colors and graceful movements. When I first encountered the Fish Quilt pattern, it brought back fond memories of those seaside days, inspiring me to capture that underwater beauty in a quilt. This project, blending bright fabrics and precise piecing, felt like a perfect homage to those memories.
My quilting journey has been filled with various projects, each telling a unique story. The Fish Quilt, however, stands out as a vivid canvas that allowed me to play with color and form, reminiscent of a bustling coral reef. Let’s dive into creating this quilt, which is not only a visual delight but also a rewarding endeavor for any quilter.
Dancing Fish: Capturing the Ocean’s Rhythm in Fabric
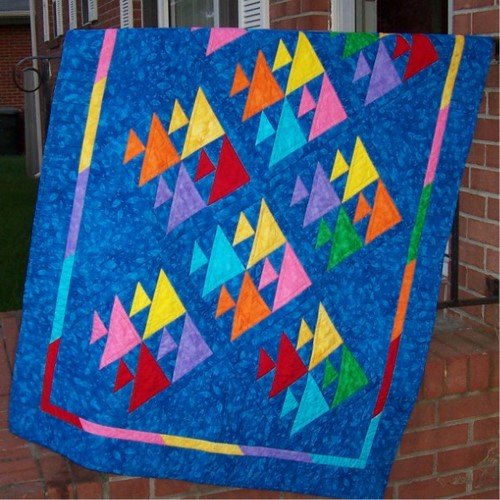
The Fish Quilt is more than just a pattern; it’s a dance of colors and shapes that brings the ocean’s rhythm to life. Each fish block, with its vibrant hues and dynamic angles, mimics the fluid movements of fish gliding through water. The interplay of background and fish fabrics creates a sense of depth and motion, making this quilt a true masterpiece. In this section, we’ll explore the steps to create these lively fish blocks, focusing on the techniques and choices that make each fish unique.
The Anatomy of a Fish Block: Precision and Creativity
Creating the fish blocks requires a blend of precision in cutting and sewing, along with creativity in fabric selection. Each block consists of a combination of half-square triangles and rectangles, meticulously pieced to form the fish’s body and tail. The choice of bright, contrasting fabrics brings these blocks to life, each fish standing out against the background. Let’s delve into the details of constructing these blocks, ensuring each fish swims gracefully within your quilt.
Materials
To create the Fish Quilt, you will need the following materials:
- Fish Fabrics: Assorted bright colors (yardage depends on the number of different fabrics used)
- Background Fabric: Blue or another color that contrasts well with your fish fabrics
- Cut 2 rectangles, 3 x 4 inches, per fish block
- Cut 1 large rectangle, 5.5 x 6.5 inches, per fish block
- Cut 1 square, 3.5 inches, per half-square triangle (HST)
- Cut framing strips: 1.5 x 10.5 inches (sides) and 1.5 x 12.5 inches (top and bottom)
- Template Plastic: For cutting the 5.5-inch square on the diagonal
- Rotary Cutter and Mat
- Ruler
- Sewing Machine
- Thread: Matching or contrasting, as desired
- Iron and Ironing Board
Getting Started: Setting Up for Success
Before we begin piecing the quilt, it’s essential to prepare your materials and workspace. Ensure your fabrics are pre-washed and pressed. Accurate cutting is crucial for this project, so take your time with measuring and cutting each piece. Lay out your fabric pieces in the order they will be sewn, and familiarize yourself with the steps ahead. This preparation will make the sewing process smoother and more enjoyable.

Full Pattern: Click Here
Step-by-Step Instructions
Step 1: Making the Half-Square Triangles (HSTs)
- Cut one background (blue) square and one fish fabric square, each measuring 3.5 inches.
- Draw a diagonal line from one corner to the opposite corner on the back of the fish fabric square.
- Place the fish fabric square and background fabric square right sides together.
- Sew a ¼ inch seam on each side of the drawn line.
- Cut along the drawn line to yield two HSTs.
- Press the seams towards the darker fabric and trim each HST to measure 3 inches square.
Step 2: Constructing the Fish Body
- For each fish block, you will need:
- 2 HSTs
- 2 rectangles of background fabric, each 3 x 4 inches
- 1 large rectangle of fish fabric, 5.5 x 6.5 inches
- Sew each HST to a 3 x 4-inch background rectangle, ensuring the HSTs are oriented correctly to form the fish tails. Press the seams towards the rectangles.
- Sew these two units together, making a tiny clip in the seam allowance to press the seams away from the HST unit without cutting through the seam.
Step 3: Shaping the Fish
- Create a template by cutting a 5.5-inch square on the diagonal using clear template plastic.
- Place the template on the top left corner of the fish fabric rectangle and draw a line from the top left corner through the seam intersection to the bottom left corner.
- Turn the template and draw a line on the other side of the block.
- Sew along both drawn lines, then cut up the center between the sewn lines.
- Press the seam towards the fish fabric. Repeat these steps for all 32 fish blocks (16 times the above steps).
Step 4: Assembling the Fish Block
- Sew four fish units together to form a larger block.
- Add framing strips:
- Sew 1.5 x 10.5-inch background strips to the sides of the block.
- Sew 1.5 x 12.5-inch background strips to the top and bottom of the block.
- You will need a total of 8 framed fish blocks for the quilt.
Step 5: Corner and Setting Triangles
- Cut two 18 ¼ inch squares from the background fabric and cut them into quarters diagonally to make six setting triangles.
- Cut two 9 3/8 inch squares and cut them in half diagonally to make four corner triangles.
Step 6: Assembling the Quilt Top
- Following the quilt layout on the first page of the instructions, sew the fish blocks together with the setting and corner triangles.
- Add the inner multicolored border:
- Use pieced strips from the fish fabrics, cut into 1.5-inch wide strips. You can sew them together with either straight or diagonal seams.
- Add the outer blue border, cut into 3.5-inch wide strips.
Additional Tips
- Choosing Fabrics: Select bright, contrasting colors for the fish fabrics to make each fish stand out against the background. Mixing solids and prints can add an extra layer of visual interest.
- Accurate Cutting: Precision in cutting your fabric pieces is essential for a smooth assembly process. Use a rotary cutter and ruler to ensure straight, clean edges.
- Pressing Seams: Press seams carefully to avoid bulk and ensure the blocks lie flat. Use a pressing cloth if necessary to prevent fabric scorching.
- Assembly Line Sewing: To save time, work on multiple blocks simultaneously. Chain piecing can speed up the process and maintain consistency across blocks.
- Quilting: Choose a quilting pattern that complements the fish design. Waves, bubbles, or other ocean-inspired motifs can enhance the overall theme of the quilt.
Conclusion
Completing the Fish Quilt is a journey that combines creativity, precision, and a love for color. Each step brings you closer to a vibrant quilt that captures the lively spirit of the ocean. As you sew each fish block, you’ll find joy in seeing the quilt come to life. This project not only results in a beautiful quilt but also provides a rewarding experience that celebrates the art of quilting. Embrace the process, enjoy the colors, and let your creativity shine through each stitch.


