Growing up, I found solace in the rhythmic hum of the sewing machine. Each stitch, a tiny step toward something beautiful and personal. The world of quilting became my haven, a place where creativity bloomed and memories were sewn into every piece. One quilt block that has always fascinated me is the Kaleidoscope Compass. Its intricate design and vibrant colors remind me of the colorful kaleidoscopes I adored as a child. This project not only challenges your skills but also allows for a beautiful interplay of colors and patterns.
Exploring the Kaleidoscope Compass: A Dance of Colors and Geometry
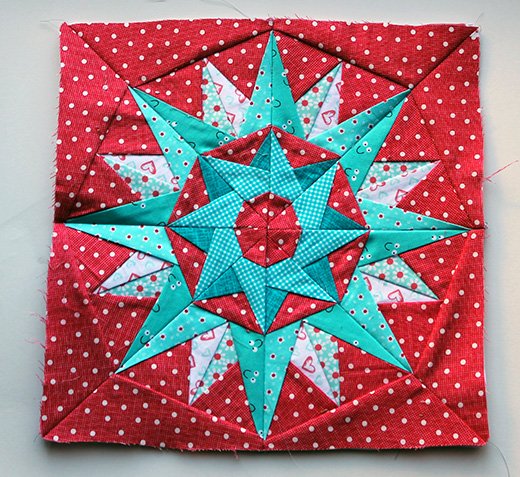
The Kaleidoscope Compass is a mesmerizing quilt block from the Compass Collection. Each piece fits together like a puzzle, creating a stunning visual effect reminiscent of a kaleidoscope’s shifting patterns. This block, which finishes at a perfect 12-inch square, is not just about precise sewing but also about the joy of selecting colors that contrast and complement each other beautifully. The combination of geometric precision and vibrant hues makes this block a standout in any quilt project.
The Art of Contrast: Choosing Your Colors Wisely
One of the most critical elements in creating the Kaleidoscope Compass is the choice of colors. The original design suggests a background of black to make the colors pop, with shades of yellow, orange, pink, purple, dark blue, and light blue. However, the beauty of quilting lies in its flexibility. Feel free to choose your favorite colors, ensuring there is good contrast between them to highlight the intricate design of the block.

Full Pattern: Click Here
Materials: Gather Your Essentials
Before we dive into the step-by-step process, let’s gather all the materials you’ll need for this project:
- Foundation Paper (for paper piecing)
- Sewing machine and matching thread
- Fabric in the following colors:
- Background: Black
- Color 1: Yellow
- Color 2: Orange
- Color 3: Pink
- Color 4: Purple
- Color 5: Dark Blue
- Color 6: Light Blue
- Rotary cutter and mat
- Quilter’s ruler
- Pins
- Iron and ironing board
Preparing for Precision: Tips for a Successful Start
Before starting your Kaleidoscope Compass, here are a few tips to set you up for success:
- Precision Cutting: Ensure your fabric pieces are cut accurately. This will make the paper piecing process smoother and your seams more precise.
- Foundation Paper Piecing: If you’re new to foundation paper piecing, practice on a few small sections first. This technique allows for greater precision but can take a bit of getting used to.
- Color Placement: Lay out your fabric pieces before sewing to visualize the final look. This can help you make any last-minute adjustments to your color choices and placement.
Step-by-Step Instructions: Creating Your Kaleidoscope Compass
- Prepare Your Foundation Paper: Print the foundation paper templates for each section of the Kaleidoscope Compass. You will need four sets of each section.
- Cut Your Fabric Pieces: Using your rotary cutter, cut the fabric pieces slightly larger than each section of the template. This will give you some wiggle room when aligning the fabric on the foundation paper.
- Start Paper Piecing:
- Place the first fabric piece right side up on the unprinted side of the foundation paper.
- Place the second piece right side down on the first piece, aligning the edge with the sewing line. Sew along the line, then fold back the paper and press the fabric open.
- Continue adding fabric pieces in numerical order, sewing along the lines and pressing open each seam.
- Complete Each Section: Once all pieces are sewn onto the foundation paper, trim the sections to the correct size, leaving a 1/4 inch seam allowance around the edges.
- Assemble the Units:
- Sew a left and a right unit together to complete one quarter of the block.
- Repeat for all four quarters.
- Join the Quarters: Sew the four quarters together in a four-patch style to complete the block. Press the seams open to reduce bulk.
Additional Tips: Enhancing Your Quilting Experience
- Seam Allowances: Be consistent with your 1/4 inch seam allowances. This ensures your pieces fit together perfectly.
- Pressing: Press your seams carefully as you go. This helps keep your block flat and makes sewing easier.
- Accuracy: Take your time with each step. Precision in cutting and sewing is key to a successful Kaleidoscope Compass block.
Creating the Kaleidoscope Compass block is a rewarding experience that combines technical skill with artistic expression. As you piece together each section, you’ll see the vibrant patterns emerge, each one unique and beautiful. Take pride in your work, knowing that every stitch is a step toward a stunning quilt that tells a story of creativity and craftsmanship.


