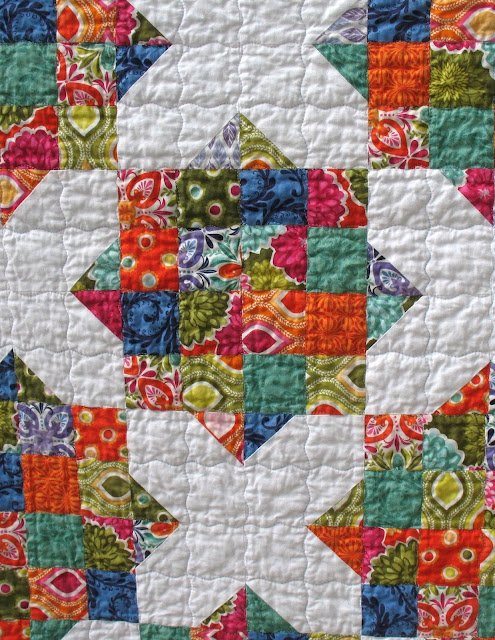
Quilting has always been a journey of discovery for me. Each quilt tells a story, not only through its design but through the process of its creation. The “Arkansas Crossroads Quilt” is one such project that has become my go-to pattern. It’s a blend of simplicity and complexity, creating a stunning visual effect with its combination of 16-patch and “X” blocks. This quilt, made from leftover fabrics from various projects, represents the essence of quilting: turning scraps into something beautiful.
The Magic of Arkansas Crossroads: A Quilt of Many Paths
The “Arkansas Crossroads Quilt” stands out because of its unique design that looks more complicated than it is. The interplay of 16-patch blocks and “X” blocks creates a dynamic and intricate pattern that is both traditional and modern. The use of colorful scraps from Kate Spain’s Terrain collection adds vibrancy and depth to the quilt, making each piece a work of art. In this section, I will walk you through the steps to create your own Arkansas Crossroads Quilt, sharing tips and techniques along the way.
Crafting with Scraps: Selecting Your Fabrics
This quilt is perfect for using up those cherished fabric scraps you’ve been saving. Here’s what you’ll need:
Materials:
- Main Fabric (Kate Spain’s Terrain leftovers):
- 384 squares, 2.5” each (or 4 charm packs)
- Background Fabric (Kona white):
- 96 squares, 4.5” each
- 56 squares, 4.5” each for edges
- 4 squares, 4.5” each for corners
- Other Supplies:
- 192 squares, 2.5” each for “X” blocks
- Warm & White batting
- 2.5 to 3.5 yards of background fabric for sashing and borders
- 2.25 yards of minky backing fabric (midnight blue)
- Aurifil 50wt thread in white and dark cobalt
- Accuquilt 2.5” square die (optional, for cutting squares)
- Rotary cutter, mat, and ruler

Full Pattern: Click Here
Setting Up: Preparing Your Workspace and Fabrics
Before diving into the sewing, it’s important to prepare your fabrics and workspace to ensure a smooth process:
- Wash and Iron Fabrics: Pre-wash your fabrics to prevent shrinkage and color bleeding. Iron them to remove any wrinkles.
- Cutting Your Pieces: Use a rotary cutter or Accuquilt die to cut your squares accurately. Ensure you have all the pieces needed before you start assembling.
- Organize Your Workspace: Keep your tools handy and organize your squares by color and size for easy access.
Starting Strong: Tips for a Successful Quilt
- Color Balance: Lay out your 16-patch blocks with individual squares to balance the colors. This step is both fun and crucial for the final look of your quilt.
- Scant 1/4″ Seam: Use a scant 1/4″ seam allowance to ensure your blocks fit together perfectly. Make a practice block to check your accuracy.
Step-by-Step Instructions
Creating the 16-Patch Blocks
- Assemble the Squares:
- Lay out 16 individual 2.5” squares in a 4×4 grid.
- Sew the squares together in rows, then sew the rows together to form a 16-patch block. Repeat to make 24 blocks.
- Trimming:
- Trim each 16-patch block to 8” x 8” to ensure uniformity.
Creating the “X” Blocks
- Assemble the “X” Pieces:
- Take 4.5” background squares and place a 2.5” square at each corner.
- Sew diagonally across each 2.5” square, trim the excess, and press open to form the “X” shape. Repeat to make 24 blocks.
- Trimming:
- Trim each “X” block to 8” x 8”.
Assembling the Quilt Top
- Laying Out the Blocks:
- Arrange the 16-patch and “X” blocks in a checkerboard pattern. Alternate between the two types of blocks to create the overall design.
- Sewing the Rows:
- Sew the blocks together in rows, then sew the rows together to complete the quilt top. Ensure all seams match up perfectly.
Adding Borders
- Inner Border:
- Cut 4” wide strips from your background fabric.
- Attach the strips to the edges of the quilt top, mitering the corners if desired.
- Outer Border:
- Cut additional 4” wide strips and sew them to the sides of the quilt top. The quilt should now measure approximately 60” x 74”.
Finishing Touches
Quilting and Binding
- Layering:
- Layer your quilt top with batting and backing fabric. Baste the layers together using pins or spray adhesive.
- Quilting:
- Quilt in a wavy line grid pattern using Aurifil 50wt thread. Use white on top and cobalt blue on the bottom. A walking foot with a stitch length of 3.0 to 3.5 is recommended.
- Binding:
- Prepare binding strips from your chosen fabric, fold in half lengthwise, and sew to the edges of the quilt. Fold over and hand stitch to the back.
Additional Tips for Success
- Practice Makes Perfect: Always make a practice block to ensure your seam allowances are accurate.
- Steam and Starch: Be mindful of using steam and starch, as they can distort your blocks. Measure carefully before trimming.
- Enjoy the Process: Quilting should be a joyful and creative experience. Take your time and appreciate each step of the process.
Creating the “Arkansas Crossroads Quilt” is not just about the final product, but also about the journey. Each stitch is a step towards a beautiful, unique quilt that tells a story of creativity and craftsmanship. Whether you keep it for yourself or gift it to someone special, this quilt will be a cherished piece, showcasing the harmony of colors and patterns that you brought together with your own hands.


