Crafting has always been a significant part of my life. I remember the countless hours I spent as a child, piecing together scraps of fabric to create my little masterpieces. Each stitch told a story, each pattern a reflection of my evolving creativity. Years later, when I discovered the art of quilting, it felt like coming home. The intricate designs, the meticulous attention to detail, and the beautiful fusion of colors captivated me.
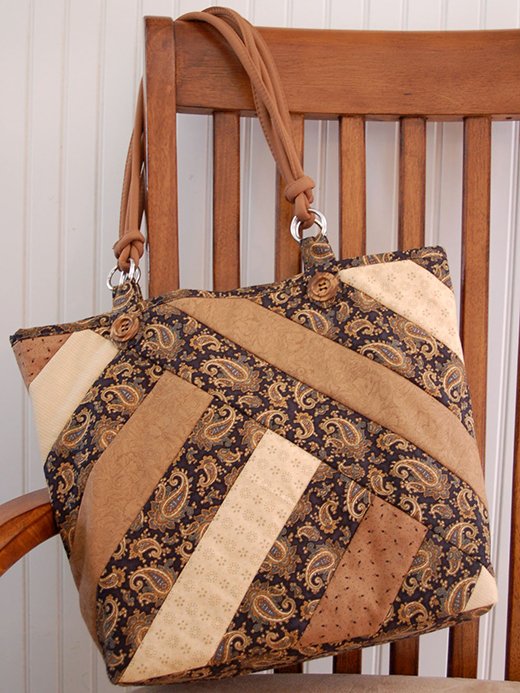
One of my favorite projects is the “Strips for Stripes” quilted tote bag. This Strips for Stripes quilt-as-you-go project is not only a fantastic stash buster but also a perfect gift. Whether you’re an experienced quilter or a beginner, the Strips for Stripes project offers a delightful blend of simplicity and elegance, making it a joy to create.
Strips for Stripes: The Charm of the Strips for Stripes Tote
The “Strips for Stripes” tote bag is a unique blend of practicality and artistry. What makes the Strips for Stripes project truly special is the quilt-as-you-go technique, which allows you to see your progress as you sew. This method not only speeds up the quilting process but also provides a satisfying sense of accomplishment with each completed strip in the Strips for Stripes tote. Additionally, the flexibility to use a variety of prints and colors gives each Strips for Stripes bag its own distinct personality. In this guide, we will walk through the steps to create this charming Strips for Stripes tote, offering tips and insights to ensure your Strips for Stripes project is a success.
The Beauty in the Details: Exploring the Design Elements of Strips for Stripes
One of the most captivating aspects of the “Strips for Stripes” tote is its design versatility. The use of diagonal stripes in the Strips for Stripes tote creates a dynamic visual effect, adding a touch of modernity to the classic quilted bag. The option to incorporate handle tabs and buttons further personalizes the Strips for Stripes bag, making it not just a practical accessory but a statement piece. As we delve into the materials and preparations for the Strips for Stripes project, consider how you might customize your Strips for Stripes bag to reflect your personal style.

Full Pattern: Click Here
Materials and Tools
Here’s a comprehensive list of the materials and tools you’ll need to create your “Strips for Stripes” tote bag:
- Fabric:
- ½ yard of fabric color A (stripes, bag bottom, optional handle tabs)
- ⅜ yard of fabric color B (stripes)
- ⅜ yard of fabric color C (optional)
- ⅜ yard or 2 fat quarters of fabric for back and lining
- Batting:
- ½ yard of quilt batting
- Binding:
- One 1⅜″ x 42″ strip for binding
- Handles and Accessories:
- One set of bag handles
- Four buttons for bag handle tabs (optional)
- Additional Supplies:
- Thread to match fabric
- Scissors
- Chalk marker
- Gridded clear quilter’s ruler
- Rotary cutter and mat (recommended)
- Iron and ironing surface
- Walking foot (optional, BERNINA Walking Foot #50)
- ¼″ presser foot (optional, BERNINA Patchwork Foot #37)
Preparing Your Project: Tips and Considerations
Before diving into the construction of your tote, it’s essential to have all your materials and tools organized. Here are some preparatory tips to help you get started:
- Fabric Selection: Choose fabrics that complement each other. For a cohesive look, consider using a combination of prints and solids. Jelly roll strips are an excellent option for creating a scrappy look with minimal effort.
- Cutting Accuracy: Precision is key in quilting. Use a rotary cutter and a gridded ruler to ensure clean, accurate cuts. This will make piecing your strips together much smoother.
- Workspace Setup: Ensure your workspace is well-lit and clutter-free. Having a dedicated ironing surface nearby will save you time and keep your workflow efficient.
- Practice Makes Perfect: If you’re new to the quilt-as-you-go method, practice on a small piece first. This will help you get a feel for the technique and build your confidence before starting on the actual tote.
Step-by-Step Instructions
Step One: Cutting the Fabric
- From Fabric A:
- Cut four 2½″ x 42″ strips for the stripes.
- Cut one 5½″ x 11½″ rectangle for the bag bottom.
- Cut eight handle tabs (optional).
- From Fabric B:
- Cut four 2½″ x 42″ strips for the stripes.
- From the Back/Lining Fabric:
- Cut two 12½″ x 16½″ rectangles for the back.
- Cut one 5½″ x 11½″ rectangle for the base.
- From Batting:
- Cut two 12½″ x 16½″ rectangles.
- Cut one 5½″ x 11½″ rectangle.
- Binding:
- Cut one 1⅜″ x 42″ strip for binding.
Step Two: Preparing the Batting and Backing
- Place the batting on the wrong side of the back rectangles and line up the edges. Secure with a few pins to prevent the layers from shifting.
Step Three: Creating the Corner Triangles
- Place a quilter’s ruler at a 45° angle at one end of a Fabric A strip. Mark and cut (or rotary cut) two corner triangles.
- Place one corner triangle on the upper left corner of the batting, right side up.
Step Four: Drawing the Seam Lines
- Draw a line on the batting at a 45° angle from the corner of the triangle. The line should be 3” in from the left edge and 1⅜” in from the bottom right.
- Draw a second line ¼” above the 45° line to mark the seam allowance.
Step Five: Attaching the First Strip
- Place a contrasting strip over the corner piece, right sides together, with the inside edge of the strip on the seam allowance line. Ensure the strip is long enough to cover the outside edge when folded down.
- Attach a walking foot (preferred) or ¼ʺ foot to your sewing machine. Stitch through all layers with a ¼ʺ seam allowance.
Step Six: Pressing the Strip
- Turn the strip down and press.
Step Seven: Repeating the Process
- Repeat Steps Five and Six for the remaining strips (Strips 2-9).
- Trim the outside strips even with the back and batting.
Step Eight: Creating the Chevron Pattern
- Using the second batting and backing rectangles, and the remaining strips, create a mirror image so the diagonal strips form a chevron pattern at the side seams. Start with the corner triangle at the upper right corner.
Step Nine: Quilting the Bag Base
- Layer the back, batting, and top rectangles for the bag base.
- Quilt the layers together with straight lines or your favorite quilting technique.
Step Ten: Assembling the Bag
- Sew the bag sides to the bag base.
- Fold the bag in half, right sides together, and stitch the side seams with a ¼ʺ seam allowance.
- Zigzag, overlock, or bind the raw edges to finish the inside seams.
Step Eleven: Finishing the Base
- Refold the bag and stitch the bag base to the bag sides at the corners.
Step Twelve: Binding the Top Edge
- Bind the top edge of the bag using your favorite method.
Step Thirteen: Attaching the Handles
- Attach the bag handles with or without the handle tabs.
- To make tabs (optional):
- Place two handle tab pieces right side together.
- Stitch, leaving an opening for turning.
- Turn the tabs right side out and press. Stitch the openings closed.
- Repeat for a total of four tabs.
- Fold a tab around each handle end.
- Stitch the tabs to the bag.
- Stitch a button to each handle tab (optional).
Additional Tips
- Fabric Coordination: Choose fabrics that not only match but also contrast well enough to make the stripes pop. Mixing prints and solids can give your bag a unique and vibrant look.
- Precision in Cutting: Ensure all your pieces are cut accurately. This will make assembling the bag much easier and give a polished finish.
- Seam Allowances: Keep your seam allowances consistent. Using a ¼″ presser foot can help maintain uniform seams, which is crucial for the overall structure of the bag.
- Pressing: Pressing each strip after stitching is vital. It helps set the seams and keeps your work neat and flat, which is especially important for the quilt-as-you-go method.
- Finishing Touches: Consider adding decorative elements like buttons or fabric flowers to personalize your bag. These small details can elevate the design and make your tote truly one-of-a-kind.
Creating the “Strips for Stripes” tote bag is a delightful journey from start to finish. Each step offers an opportunity to explore your creativity and hone your quilting skills. The end result is not just a practical accessory but a beautiful testament to your craftsmanship. Whether you’re making this tote for yourself or as a gift, the joy of creating something with your own hands is immensely rewarding. Happy quilting!


