Quilting has always been a part of my creative journey. When I first discovered the intricate world of Steampunk design, it was love at first sight. The blend of Victorian elegance with industrial elements inspired me to create something unique and beautiful. That’s how the “Steampunk Sublime” quilt was born. This project combines my passion for quilting with the fascinating aesthetics of Steampunk, resulting in a piece that is both intricate and visually stunning.
As I delved into this project, I wanted to share the joy and challenge of creating something that not only tells a story but also pushes the boundaries of traditional quilting. The “Steampunk Sublime” quilt is a perfect blend of technical precision and artistic expression, and I am thrilled to guide you through the process of making your own.
The Steampunk Influence: A Fusion of Art and Mechanics
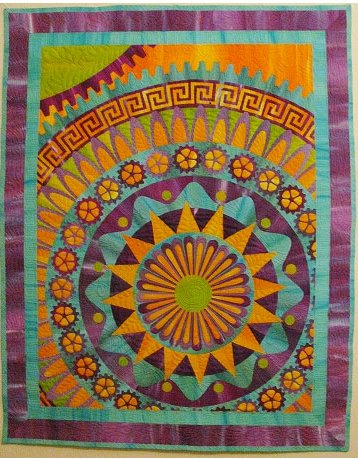
Steampunk, a genre that merges the romance of the Victorian era with mechanical innovation, offers a unique aesthetic that is both nostalgic and futuristic. In the “Steampunk Sublime” quilt, this influence is evident in the intricate gear patterns and ornate details that give the quilt its distinctive character. The central circle, surrounded by layered bands and geometric shapes, mirrors the complexity and elegance of Steampunk design.
Embracing the Challenge: The Art of Fusing Fabric
This quilt is entirely fused together using Wonder-Under® paper-backed fusible web, eliminating the need for traditional stitching until the actual quilting begins. This method not only simplifies the construction process but also allows for greater precision and creativity. The layered design, with pieces numbered and organized by bands, makes the complex pattern more manageable and ensures a seamless assembly.

Full Pattern: Click Here
Gathering Your Materials
To create the “Steampunk Sublime” quilt, you’ll need the following materials:
- 8 yards of Wonder-Under®
- 1 yard of Tru Grid non-woven interfacing
- 1 ½ yards of 40” or wider muslin for the background (will not be seen)
- 2 yards of purple fabric (you can use multiple shades)
- 1 ¼ yards of teal fabric
- ¼ yard of lime green fabric
- 1 yard of orange fabric (you can use multiple shades)
Tools Needed:
- Mechanical pencil
- Chalk pencil
- Scissors for cutting paper
- 4” scissors or similar for cutting fusible/fabric sandwich
- Glass-headed quilt pins
- Steam iron
- Rotary ruler, cutting mat, and cutter (optional, for borders)
- Ironing surface (cover a large table with two layers of batting and one layer of canvas for a good work surface)
Setting Up for Success: Tips and Insights
Before you dive into the project, here are a few tips to ensure a smooth start:
- Organize Your Space: Make sure your work area is well-lit and spacious enough to accommodate the quilt’s components as you assemble them.
- Prepare Your Fabrics: Pre-wash and iron all your fabrics to prevent any shrinkage or distortion later on.
- Print and Cut Templates Carefully: Accuracy is key when creating your templates. Ensure your printer settings are correct, and take your time cutting out each piece.
Creating the Templates
- Printing Templates:
- Slice up Wonder-Under® into 8 ½ by 17 sheets (Wonder-Under® is 17″ wide).
- Print the templates directly onto the Wonder-Under® using an inkjet printer (do not use a laser printer or photocopier).
- Trimming Templates:
- Trim the Wonder-Under® templates, leaving a ¼ inch margin around the edges.
- Save leftover Wonder-Under® for basting the quilt.
- Fusing Templates to Fabric:
- With a dry iron, fuse the Wonder-Under® to the wrong side of the fabric.
- Steam iron the pieces.
- Cutting Fabric Pieces:
- Cut out the fabric pieces along the printed edges, remembering to leave seam allowances.
Assembling the Quilt
- Marking the Center:
- Use Tru Grid to mark a 30×40″ rectangle on the muslin background.
- Creating the Central Circle:
- Trace and cut the central circle (piece 1d) from teal fabric.
- Cut and assemble pieces 1a, 1b, and 1c from their respective fabrics, using seam allowances to create layered petals.
- Assembling the Rings:
- Arrange and fuse the wedges (pieces 2b) to form a hollow ring around the central circle.
- Arrange and fuse the rays (pieces 2a) to create a flower-like pattern around the central circle.
- Building the Quilt Top:
- Continue adding rings and pieces, following the pattern and ensuring each layer is accurately aligned and fused.
Adding Borders
- Preparing Border Strips:
- Prepare strips of teal and purple fabrics with Wonder-Under®.
- Cut strips to size using a rotary cutter.
- Attaching Borders:
- Fuse the teal strips to the quilt’s edges, overlapping slightly to cover seams.
- Add the purple outer border strips, mitering the corners for a clean finish.
Finishing the Quilt
- Quilt Sandwich:
- Layer the quilt top, batting, and backing fabric, smoothing each layer to avoid wrinkles.
- Use leftover Wonder-Under® scraps to baste the quilt layers together.
- Quilting:
- Quilt the layers together, starting from the center and working outward.
- Trim the edges to the final size.
- Binding:
- Use the teal strips to create a fused binding, folding and ironing them to secure the quilt’s edges.
Additional Tips
- Precision is Key: Take your time aligning and fusing each piece. Precision ensures a seamless and professional-looking quilt.
- Experiment with Colors: Don’t be afraid to mix different shades of the same color to add depth and interest to your quilt.
- Stay Organized: Keep your workspace tidy and your materials within reach to maintain efficiency throughout the project.
Creating the “Steampunk Sublime” quilt is a journey of blending traditional techniques with modern aesthetics. As you piece together each intricate part, you’ll find a sense of accomplishment in bringing a unique and beautiful design to life. Enjoy the process, embrace the challenges, and let your creativity shine through every stitch and layer. Happy quilting!


