Quilting has always been a passion of mine, a beautiful blend of art and precision. One of my most cherished memories is the first time I designed a quilt pattern on my own. It was a rainy afternoon, and I was inspired by the intricate designs I had seen in various quilting magazines. That day marked the beginning of my journey into creating unique quilt patterns, and today, I’m excited to share one of my favorite designs: the Starburst Cross Block.
Recently, I had the honor of being asked to create a quilt for the Quilt Market, a significant event in the quilting community. Although I couldn’t attend in person, the opportunity to contribute filled me with joy. The fabric for this project arrived in a beautiful stack of Melissa White fabrics, which, though not my usual pick, were stunning in person. They felt like a blend of vintage charm and modern vibrancy, perfect for my latest quilt design using TouchDraw.
Exploring the Starburst Cross Block
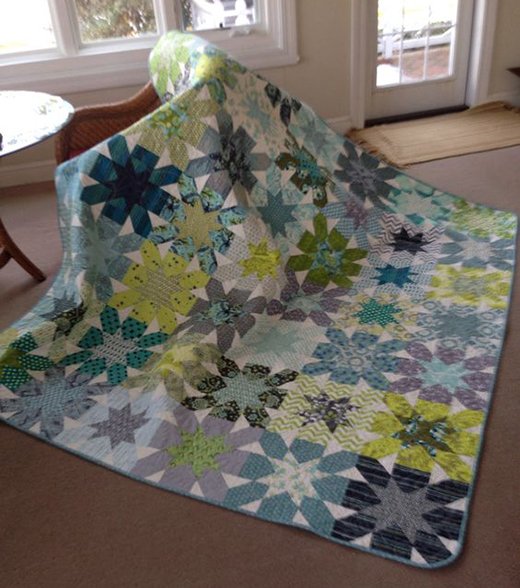
The Starburst Cross Block is a captivating quilt pattern that combines traditional and modern elements. This block measures 12.5″ unfinished and features a striking central star with a cross-like design radiating from it. The interplay of the fabrics creates a dynamic visual effect that is both elegant and bold. It’s an excellent project for quilters looking to challenge themselves with precise piecing and a harmonious color palette.
Materials and Preparation
Materials Needed
To create the Starburst Cross Block, you’ll need the following materials:
- Fabric A (center star):
- (1) 4.5” square
- (8) 2.5” squares
- Fabric B (“cross” fabric):
- (8) 4.5” squares
- Solid/Background Fabric:
- (8) 2.5” squares
Getting Started: Tips and Considerations
Before diving into the project, here are a few tips to ensure a smooth quilting experience:
- Precision Cutting: Accurate cutting is crucial for this block. Use a rotary cutter and a clear quilting ruler to ensure your pieces are the correct size.
- Scant 1/4” Seam Allowance: Always use a scant 1/4” seam allowance to ensure your blocks fit together perfectly.
- Pressing Matters: Press your seams as you go. This will help your blocks lie flat and fit together more accurately.
- Fabric Selection: Choose fabrics with good contrast to highlight the starburst effect. The interplay between Fabric A, Fabric B, and the background fabric will make your block pop.
Now that you’re prepared, let’s dive into the step-by-step instructions to create your very own Starburst Cross Block.
 Full Pattern: Click Here
Starburst Cross Block Quilt Tutorial
A Deeper Look into the Starburst Cross Block
One of the unique aspects of the Starburst Cross Block is how it seamlessly blends simplicity with intricate design. The central star captures your attention, while the cross elements provide a balanced structure that radiates outward. This block is perfect for creating a quilt that is both visually appealing and structurally sound. The use of contrasting fabrics accentuates the pattern, making it a standout piece in any quilt.
Materials and Preparation
Materials Needed
To create the Starburst Cross Block, gather the following materials:
- Fabric A (center star):
- (1) 4.5” square
- (8) 2.5” squares
- Fabric B (“cross” fabric):
- (8) 4.5” squares
- Solid/Background Fabric:
- (8) 2.5” squares
Preparing to Quilt: Essential Tips and Insights
Before you start cutting and piecing your fabrics, here are some insights and tips to help you get ready for the project:
- Fabric Selection: Select fabrics that contrast well with each other. This will help the starburst and cross elements stand out.
- Tools of the Trade: Ensure you have a sharp rotary cutter, a reliable ruler, and a cutting mat. These tools are essential for accurate cutting.
- Scant 1/4” Seam Allowance: Using a scant 1/4” seam allowance is crucial for the pieces to fit together perfectly. Practice a few seams on scrap fabric if you’re not familiar with this technique.
- Pressing Matters: Press your seams open or to the side as you go, depending on what works best for your fabric choices and design. This will help your block lie flat and make the final assembly easier.
- Organize Your Pieces: Lay out your cut pieces in the order they will be sewn. This will help you keep track of your progress and ensure that no piece is misplaced.
With your materials ready and these tips in mind, you are all set to start creating your Starburst Cross Block. Let’s move on to the detailed step-by-step instructions.
Step-by-Step Instructions
Step 1: Marking the Squares
- Take all (8) 2.5” Fabric A squares and (8) 2.5” Solid/Background Fabric squares.
- Using a pencil or fabric marker, draw a diagonal line from one corner to the opposite corner on the back of each square.
Step 2: Creating the Corner Units
- Align (2) marked Solid/Background Fabric squares on opposite corners of (1) 4.5” Fabric B square, right sides together.
- Sew on the marked lines.
- Repeat this process with (3) additional 4.5” Fabric B squares and the remaining (6) 2.5” Solid/Background Fabric squares.
Step 3: Trimming the Corner Units
- Using a rotary cutter, trim each corner unit 1/4” away from the stitched line.
- Press the seams towards the Solid/Background Fabric.
Step 4: Constructing the Side Units
- Align (1) 2.5” Fabric A square on the corner of (1) 4.5” Fabric B square, right sides together.
- Sew on the marked line, then trim and press.
- Repeat this process for the adjacent corner of the same 4.5” Fabric B square.
- Repeat for the remaining (3) 4.5” Fabric B squares.
Step 5: Assembling the Block
- Arrange the (4) corner units, (4) side units, and (1) 4.5” Fabric A square in (3) rows of (3) units.
- Sew the rows together, ensuring the seams align correctly to form the final Starburst Cross Block.
Additional Tips for Success
- Chain Piecing: To save time, use chain piecing techniques where possible. This involves sewing multiple pieces in a continuous line without cutting the thread between each piece.
- Accurate Cutting: Double-check your measurements before cutting your fabric. Accuracy is key to ensuring all pieces fit together perfectly.
- Consistent Seam Allowance: Maintain a consistent scant 1/4” seam allowance throughout the project to avoid discrepancies in block size.
- Pressing Techniques: Use a hot iron and steam to press seams flat. This helps to reduce bulk and ensure a smooth finish.
- Block Layout: Lay out all your pieces before sewing the final assembly. This allows you to see the overall design and make any necessary adjustments.
Completing the Starburst Cross Block is a rewarding experience that combines precision and creativity. As you step back and admire your finished block, take pride in the meticulous work and artistic vision that went into creating it. This block not only adds beauty to your quilt but also showcases your skills as a quilter. Keep experimenting with different fabric combinations and enjoy the process of bringing your quilt to life.


