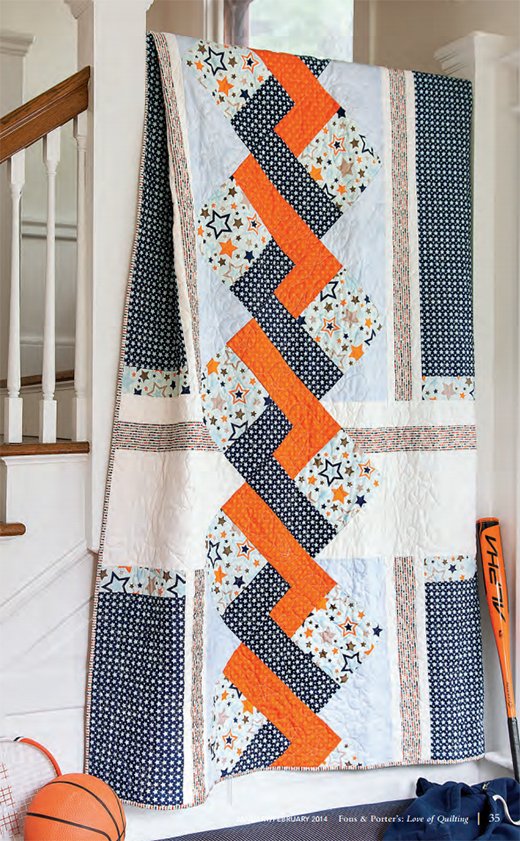
Creating quilts has always been more than a pastime for me—it’s a heartfelt journey filled with creativity and love. One of my most memorable quilting projects was the “Star-Crossed” quilt. I recall the first time I saw its intricate faux braid design; it instantly reminded me of the starry skies I often gazed at during my childhood summers. The quilt’s design seemed challenging at first glance, but as I delved deeper, I discovered that its construction was delightfully straightforward.
The “Star-Crossed” quilt is a perfect blend of simplicity and elegance. The design, which features a stunning faux braid pattern, appears intricate yet is surprisingly easy to assemble. This project holds a special place in my heart, not only because of its beauty but also because it symbolizes how perseverance and passion can transform a seemingly daunting task into a rewarding achievement.
Star-Crossed Quilt: A Journey of Elegance and Ease
The faux braid technique used in the “Star-Crossed” quilt is a wonderful example of how complex-looking patterns can be achieved through simple steps. This method involves using basic shapes and straightforward assembly techniques to create a visually striking design. The quilt’s aesthetic appeal lies in its use of contrasting fabrics and precise cutting, which come together to form a cohesive and elegant pattern.
Choosing the Perfect Palette: Fabric Selection and Preparation
The beauty of the “Star-Crossed” quilt is greatly enhanced by the thoughtful selection of fabrics. For this project, we will be using a variety of prints and solids that bring depth and contrast to the design. Here is a comprehensive list of the materials you will need:
- 2½ yards navy print
- 1½ yards white solid
- 1½ yards gray stripe
- 1 yard light blue print
- 1 yard multicolor print
- ½ yard orange print
- 5½ yards backing fabric
- Full-size quilt batting
To begin, ensure that your fabrics are pressed and cut accurately. The precise cutting of fabric pieces is crucial for the success of the faux braid pattern.

Full Pattern: Click Here
Preparing to Quilt: Insights and Initial Considerations
Before diving into the step-by-step instructions, it’s important to set up your workspace and prepare your materials. Make sure you have a clean, flat surface for cutting and assembling your blocks. Use a rotary cutter and a self-healing mat for precise cuts. Organize your fabrics according to the cutting diagram and keep your sewing machine ready with a new needle and matching thread.
Step-by-Step Instructions
- Creating the Blocks:
- Right Blocks: Lay out 1 multicolor print A square, 1 navy print B rectangle, and 1 orange print C rectangle as shown in the block diagrams. Join the pieces to complete 1 Right Block. Make a total of 6 Right Blocks.
- Left Blocks: Similarly, create 6 Left Blocks using 1 multicolor A square, 1 orange print B rectangle, and 1 navy print C rectangle in each.
- Half Blocks: Cut 1 Left Block in half diagonally from the lower right to the upper left to make 2 Half Blocks.
- Cutting and Piecing Setting Triangles:
- From the white solid, cut V, X, and U shapes. Join the white V rectangle, gray stripe W rectangle, and white X rectangle to create setting triangle units. Cut the pieced square in half diagonally to make 2 Setting Triangle Units.
- Join 1 Setting Triangle Unit and 1 light blue print U triangle to make a Setting Triangle.
- Repeat to create additional Setting Triangles with the remaining pieces.
- Assembling Block Sections:
- Lay out the Right and Left Blocks, Half Blocks, Setting Triangles, and T and U triangles as shown in the block section diagram. Join them into diagonal rows, and then join the rows to complete the block section.
- Constructing the Quilt Top:
- For the Left Side: Arrange and join navy print D rectangle, multicolor print E rectangle, white F rectangles, gray stripe G rectangle, and other pieces as shown in the side diagrams. Repeat to complete the Right Side.
- Attach the Block Section to the Left and Right Sides as indicated in the Quilt Top Assembly Diagram. Trim the block section even with the sides to complete the quilt top.
- Finishing the Quilt:
- Prepare the backing fabric by dividing it into two lengths and joining narrow panels to each side of the wider panel.
- Layer the backing, batting, and quilt top. Baste and quilt as desired. The quilt shown features an allover star and loop design.
- Finally, join the gray stripe strips to make the binding and attach it to the quilt.
Additional Tips
- Accuracy in Cutting: Ensure all pieces are cut accurately to maintain the integrity of the design.
- Seam Allowances: Maintain a consistent ¼” seam allowance throughout to ensure blocks fit together properly.
- Pressing Seams: Press seams open or to the side as indicated to reduce bulk and create a flat quilt top.
Creating the “Star-Crossed” quilt is a gratifying experience that beautifully marries simplicity with sophistication. As you stitch each piece together, reflect on the journey from raw fabric to a completed quilt, and appreciate the craftsmanship and creativity involved. This quilt not only serves as a cozy addition to your home but also as a testament to the joy of quilting.


