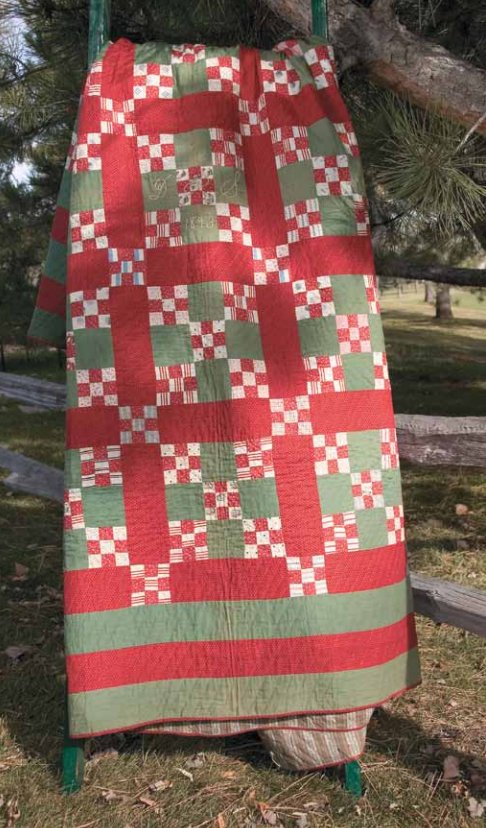
As a passionate quilter, I’ve always been fascinated by the stories and history embedded in antique quilts. One of the most captivating quilts I’ve come across is the 1893 Double Nine-Patch Quilt. This quilt, dated over a century ago, features an intriguing assortment of antique novelty prints and the embroidered initials D.P.S., though the original creator remains unknown. The meticulous craftsmanship and vibrant patterns inspired me to recreate this piece, allowing a glimpse into the past through each stitch.
The Double Nine-Patch Quilt is more than just a beautiful piece; it represents the legacy of quilting as an art form and a means of storytelling. By recreating this quilt, I hope to honor the unknown maker and share the joy of bringing history to life through fabric and thread.
The Historical Significance of the Double Nine-Patch Quilt
The Double Nine-Patch pattern holds a special place in the quilting world. It is a classic design that combines simplicity with elegance, making it a favorite among quilters for generations. The original 1893 quilt showcases matching nine patches in opposite corners of each Double Nine-Patch Block, adding a harmonious balance to the design. This thoughtful arrangement of fabrics and colors is a testament to the skill and creativity of the quilt maker.
In this reproduction project, we’ll stay true to the spirit of the original quilt by using an assortment of ivory, red, green, and red/black prints. These colors and patterns were carefully chosen to reflect the antique charm and historical accuracy of the original piece.
Materials and Preparations: Gathering Your Supplies
Before diving into the quilt-making process, it’s crucial to gather all the necessary materials. Here’s a detailed list of what you’ll need for this project:
Materials:
- 7 assorted ivory prints (for nine patches) – ⅜ yard each
- Red print (for nine patches) – 1⅜ yards
- Green solid (for blocks and borders) – 2⅞ yards
- Red/black print (for sashing, border, binding) – 3⅜ yards
- Backing fabric – 7½ yards
- Batting – 90˝ x 90˝
Cutting Instructions:
- Ivory prints: Cut 5 strips 1½˝ x width of fabric (WOF) from each print.
- Red print: Cut 28 strips 1½˝ x WOF.
- Green solid:
- Cut 4 strips 3½˝ x 84˝ on the lengthwise grain.
- Cut 4 strips 3½˝ x 72˝ on the lengthwise grain.
- Cut 100 squares 3½˝ x 3½˝.
- Red/black print:
- Cut 4 strips 3¼˝ x 78˝ on the lengthwise grain.
- Cut 5 strips 2½˝ x 70˝ on the lengthwise grain (for binding).
- Cut 60 strips 3½˝ x 9½˝.
Preparing the materials ahead of time will make the quilting process smoother and more enjoyable. Ensure you have all the pieces accurately cut and organized before you begin assembling your quilt.

Full Pattern: Click Here
Step-by-Step Instructions: Bringing the Quilt to Life
Piecing the Blocks
- Sewing Strips:
- Referring to Diagram I-A, sew 2 matching ivory 1½˝ x WOF strips to the sides of a red 1½˝ x WOF strip. Make 2 of each fabric combination (14 total). Press in the direction of the arrows.
- From each strip set, cut 23 segments 1½˝ wide. Repeat the process using 2 red strips with 1 ivory strip (Diagram I-B). Press and cut 23 segments 1½˝ wide from each set.
- Creating Nine Patches:
- Referring to Diagram I-C, assemble nine patches using the matching 1½˝ segments. Make 161 total nine patches.
- Forming Double Nine-Patch Blocks:
- Arrange and stitch 5 nine patches together with 4 green 3½˝ squares to make a Double Nine-Patch Block (Diagram II). Ensure the corners match as desired. Make 25 total blocks.
Quilt Top Assembly
- Stitching Rows:
- Stitch 6 sashing rows, alternating 6 nine patches with 5 red/black print 3½˝ x 9½˝ strips.
- Stitch 5 block rows, alternating 6 red/black print 3½˝ x 9½˝ strips with 5 blocks each.
- Alternating sashing and block rows, sew the rows together.
- Adding Borders:
- Stitch green 3½˝ x 72˝ strips to the sides; trim even with the top and bottom. Stitch remaining green 3½˝ x 72˝ strips to the top and bottom; trim even with the sides.
- Sew red/black print 3¼˝ x 78˝ strips to the sides; trim even. Sew remaining 78˝ strips to the top and bottom; trim.
- Stitch green 3½˝ x 84˝ strips to the sides; trim even. Sew remaining green strips to the top and bottom; trim.
Quilting and Finishing
- Quilting:
- Layer, baste, and quilt your quilt. An X is quilted in each small nine-patch square, while the remaining area is covered with parallel diagonal lines.
- Binding:
- Bind the quilt with red/black print strips cut at 2½˝ x 70˝.
Additional Tips: Enhancing Your Quilting Experience
- Precision Cutting: Ensure your strips and squares are cut accurately to maintain the consistency of the blocks.
- Pressing Matters: Pressing the seams in the correct direction is crucial for the blocks to align perfectly.
- Chain Piecing: This technique can save time and keep your sewing process efficient.
- Consistent Seam Allowance: Maintain a consistent ¼˝ seam allowance throughout the project to ensure the blocks fit together properly.
Recreating the 1893 Double Nine-Patch Quilt is a rewarding experience that connects us to the rich heritage of quilting. Each stitch is a tribute to the artistry and dedication of quilters from the past. As you complete your quilt, take a moment to appreciate the intricate patterns and the story it tells. This quilt is not just a beautiful piece for your home but also a piece of history preserved through your hands.


