Growing up in a small town surrounded by the vibrant colors of fall, I was always captivated by the beauty of the changing seasons. The rich hues of red, orange, and gold would paint the landscape, transforming everyday scenery into a breathtaking masterpiece. This seasonal spectacle inspired my love for quilting, as I found a way to capture the essence of autumn in my creations. Today, I’m excited to share with you a project that holds a special place in my heart – the Maple Leaf Centerpiece.
This quilt not only symbolizes the beauty of fall but also represents my journey in quilting. The Maple Leaf Centerpiece is a perfect project for both beginners and seasoned quilters, allowing you to bring a touch of autumn into your home. Whether you have an AccuQuilt GO! Baby or not, I’ll guide you through each step, ensuring you can create this beautiful piece with ease.
Crafting the Essence of Autumn: The Maple Leaf Centerpiece
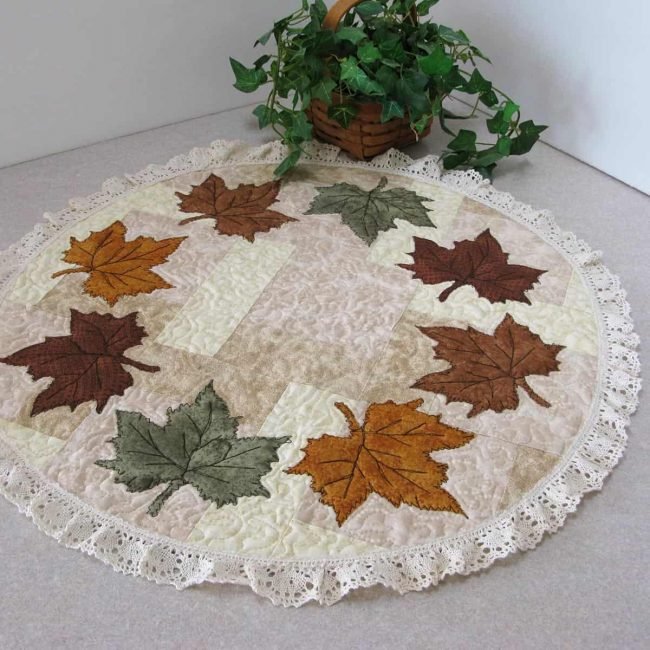
The Maple Leaf Centerpiece is more than just a quilting project; it’s a way to embrace the season’s spirit and bring its beauty indoors. This project combines neutral tones with the iconic maple leaf design, creating a stunning visual effect. The centerpiece serves as a perfect decoration for your table, adding warmth and charm to your home. Through this tutorial, we’ll explore not only the technical aspects of creating this piece but also the creative process that makes quilting so fulfilling.
The Foundation of a Beautiful Quilt: Materials and Preparation
Before we dive into the quilting process, let’s gather all the necessary materials. Here’s what you’ll need for the Maple Leaf Centerpiece:
Materials
- Neutral/tan fabric scraps
- Heat & Bond Lite
- Backing fabric
- Warm & Natural batting
- Dark brown thread for applique
- Cream thread for stippling
- Cotton cluny lace (optional for finishing)
- AccuQuilt GO! Baby (optional)
- Fall Medley die (optional)
- Maple leaf template (if not using AccuQuilt)
- Basic sewing supplies (rotary cutter, scissors, sewing machine, etc.)
With your materials in hand, you’re ready to embark on this quilting adventure. It’s essential to start with a clear workspace and a well-organized plan. As we proceed, I’ll provide tips and insights to help you navigate each step smoothly.
Setting the Stage: Initial Considerations
Before we begin cutting and sewing, take a moment to visualize your finished centerpiece. Think about the arrangement of your blocks and how the colors will come together. This planning phase is crucial as it sets the foundation for your project. If you’re using an AccuQuilt GO! Baby, prepare your fabric strips and dies. If not, ensure you have your maple leaf template ready.
One of the joys of quilting is seeing how different fabrics and patterns interact. Don’t be afraid to experiment with your scraps and layout until you find a combination that speaks to you. Now, let’s move on to the step-by-step instructions and bring this beautiful centerpiece to life.

Full Pattern: Click Here
Step-by-Step Instructions
Step 1: Cutting Your Fabric
Start by cutting your neutral/tan fabric scraps into the following pieces:
- 9 squares measuring 5 inches each.
- 9 rectangles measuring 2.5 inches by 5 inches.
- 9 rectangles measuring 2.5 inches by 7 inches.
Step 2: Assembling the Blocks
- Piece Assembly:
- Take a 5-inch square and sew a 2.5-inch by 5-inch rectangle to one side using a 1/4 inch seam allowance.
- Next, sew a 2.5-inch by 7-inch rectangle to the resulting piece, forming an L-shaped block.
- Repeat:
- Create a total of 9 blocks using this method.
Step 3: Arranging and Sewing the Blocks
- Layout:
- Arrange the 9 blocks in a 3×3 grid. Play with the layout until you’re satisfied with the arrangement.
- Join the Blocks:
- Sew the blocks together, carefully matching the seams. This will form a square approximately 20 inches across.
Step 4: Creating the Circle
- Folding:
- Fold the square in half and then fold it in half again, forming a smaller square.
- Drawing the Circle:
- Using a compass or the pin-and-string method, draw a circle that fits within the folded square. My circle measures approximately 18 inches in diameter.
- Cutting:
- Carefully cut along the drawn line with a rotary cutter to form a perfect circle.
Step 5: Preparing the Maple Leaves
- Using AccuQuilt (if available):
- Fuse a strip of Heat & Bond Lite to your fabric and cut maple leaves using the Fall Medley die on the AccuQuilt GO! Baby.
- Manual Method:
- If you don’t have the die cutter, print out the provided maple leaf template, trace it onto your fabric with Heat & Bond Lite, and cut out the leaves.
Step 6: Appliqueing the Leaves
- Placement:
- Arrange the maple leaves on your circular piece as desired and fuse them in place with an iron.
- Stitching:
- Use dark brown thread to applique the leaves onto the fabric. A free-motion stitch, blanket stitch, or satin stitch works well.
Step 7: Layering and Quilting
- Layering:
- Place the backing fabric right side down, add the batting on top, and then place your pieced top with the appliqued leaves on the batting.
- Quilting:
- Quilt the layers together using a stipple free-motion quilting pattern with cream thread. This will add texture and stability to your centerpiece.
Step 8: Finishing the Edges
- Trimming:
- Trim any excess fabric and batting from the edges to neaten your work.
- Edge Finishing:
- Use a zig-zag stitch or serge around the edges to secure them. For a more polished look, you can sew cotton cluny lace around the edges.
Step 9: Binding (Optional)
- If you prefer a bound edge, prepare bias binding and sew it around the edge of the centerpiece instead of using a zig-zag finish.
Additional Tips
- Fabric Choices: Using a variety of neutral tones in your blocks adds depth and interest to the final piece. Don’t hesitate to mix and match different fabrics from your scrap pile.
- Applique Technique: If you’re new to applique, practice on a scrap piece first to get comfortable with your chosen stitch.
- Quilting Patterns: Feel free to experiment with different quilting patterns. Stippling is just one option; you can use straight lines, waves, or any design that complements your centerpiece.
Creating the Maple Leaf Centerpiece is a rewarding experience that not only enhances your quilting skills but also brings the beauty of autumn into your home. Each step in this process allows you to express your creativity and craftsmanship. As you admire your finished centerpiece, take a moment to appreciate the journey you’ve undertaken and the beautiful piece you’ve created. Whether it adorns your dining table or serves as a seasonal accent, this quilted centerpiece is a testament to your talent and dedication. Keep exploring, keep creating, and let the spirit of quilting continue to inspire you.


