Full Pattern: Click Here
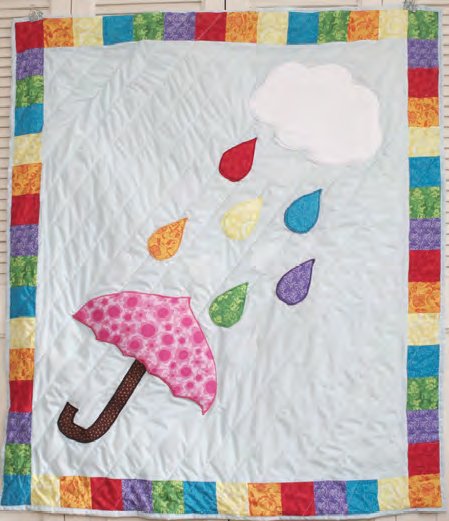
Quilting has always been a form of storytelling for me. When I was younger, I remember rainy afternoons spent inside, creating small, colorful patchworks to pass the time. The rain tapping against the windows was a gentle reminder of the world outside, while the colorful fabrics in my hands were a vivid escape to a world of imagination. The “Rainbow Showers Quilt” captures that blend of nature and creativity beautifully, bringing to life the colors of the rainbow amidst the gentle theme of a rainy day.
Embracing the Magic of Rainbows: The Rainbow Showers Quilt
Creating the Rainbow Showers Quilt is more than just sewing pieces of fabric together. It’s an enchanting journey where each color tells a story, and every stitch brings a burst of joy. This project is perfect for beginners who are looking to dive into the world of quilting with a vibrant and whimsical design that not only brightens up a room but also adds a touch of handmade charm.
Materials and Preparation
Gathering Your Rainbow of Materials
Before we dive into the step-by-step instructions, it’s important to gather all the necessary materials. Here’s what you will need to create your Rainbow Showers Quilt:
Fabrics Needed
- Fat Quarters (one each): Red, Orange, Yellow, Blue, Green, Purple, Pink, Brown, White
- Sky Blue Fabric: 3 yards
Materials Needed
- Pellon® TP971F Fusible Thermolam® Plus: 1/2 yard
- Pellon® 542 Stick-N-Washaway™: 1/2 yard
- Pellon® 805 Wonder-Under: 1/2 yard
- Pellon® 2520 Lutradur®: 1/8 yard
- Pellon® Legacy Wool Batting: Crib size
- Embroidery Thread: Variegated rainbow hue
- Thread: 9 coordinating colors
- Marking Pen
- Pencil
- Iridescent Glitter Fabric Paint
- Sponge Paint Brush
- Freezer Paper
Tools Needed
- Sewing Machine and related supplies
- Iron
- Yardstick/Ruler
Preparing to Begin: Tips and Considerations
Starting a quilt can be overwhelming, but with a few tips, you can set yourself up for success:
- Organize Your Space: Make sure you have a clean, large working area where you can lay out your fabrics and tools.
- Read Through Instructions: Before you start cutting or sewing, read through all the instructions to understand the overall process.
- Test Your Materials: Practice using any unfamiliar materials, like the Pellon® products, on scrap fabric to get a feel for how they work.
Creating Your Rainbow Showers Quilt
Step-by-Step Instructions
Cutting the Fabric
- Fat Quarters: Cut the following 3 1/2” squares from each color:
- Red: 9 squares
- Orange: 10 squares
- Yellow: 10 squares
- Blue: 9 squares
- Green: 9 squares
- Purple: 9 squares
- Main Fabric (Sky Blue): Cut the following rectangles:
- Front Panel: 33 1/2” x 39 1/2”
- Backing: 41“ x 47”
- Batting: Cut a 39” x 45” piece from the Pellon® Legacy Wool Batting.
Creating the Templates
- Large Raindrops: Cut one each from red, orange, yellow, blue, green, purple fabrics, six from Pellon® Wonder-Under®, twelve from Pellon® Fusible Thermolam, and six slightly larger pieces from Pellon® Stick-N-Washaway.
- Small Raindrops: Cut six from Pellon® Lutradur®.
- Cloud: Cut one from white fabric, two from Pellon® Fusible Thermolam®, one from Pellon® Wonder-Under®, and one slightly larger piece from Pellon® Stick-N-Washaway.
- Umbrella Top: Cut one from pink fabric, two from Pellon® Fusible Thermolam®, one from Pellon® Wonder-Under® and one slightly larger piece from Pellon® Stick-N-Washaway.
- Umbrella Handle: Cut one from brown fabric, one from Pellon® Fusible Thermolam®, one from Pellon® Wonder-Under®, and one slightly larger piece from Pellon® Stick-N-Washaway.
Assembling the Border Blocks
- Lay Out Blocks: Arrange the squares in the following order (red, orange, yellow, blue, green, purple) around the center rectangle of the quilt. The top and bottom borders will have 12 squares each, and the side borders will have 16 squares each.
- Sew the Borders:
- With right sides together, use a 1/4” seam allowance to sew two strips of twelve squares for the top and bottom borders.
- Sew two strips of sixteen squares for the side borders.
- Press the seams toward the center of the border strips.
- Attach the Borders:
- Sew the top and bottom strips to the center quilt rectangle using a 1/4” seam allowance. Press the seams toward the border squares.
- Sew the side strips to the center quilt rectangle using a 1/4” seam allowance. Press the seams toward the border squares.
Adding the Applique
- Prepare Applique Pieces: Trim the Thermolam® Plus and Wonder-Under® pieces slightly smaller than the applique pieces (approximately 1/4”).
- Fuse Applique Layers:
- Following the manufacturer’s instructions, fuse a layer of Thermolam® Plus to the wrong side of each fabric shape.
- Fuse a second layer.
- Fuse a layer of Wonder-Under® (paper side up).
- Place and Fuse Applique: Peel off the paper and position the applique pieces on the quilt’s center rectangle. Place the cloud 3” from the right side border and 2” below the top border. Fuse the applique pieces to the right side of the quilt.
- Stick-N-Washaway™: Peel the paper backing off the Stick-N-Washaway™ and stick pieces over the appliques on the wrong side of the fabric.
- Satin Stitch: Using coordinated thread colors, satin stitch around each applique. Rinse away Stick-N-Washaway™ as directed on the package and dry the fabric.
Assembling the Quilt
- Layering:
- Lay the backing fabric right side down.
- Place the batting on top.
- Position the quilt top right side up so there is 1” of backing fabric visible on all sides.
- Pinning: Pin all layers together along the front, keeping the fabric smooth without ripples or bunching.
- Binding:
- Fold the backing fabric inward 1/2” on all sides, pressing it in place with an iron.
- Fold inward again to cover the raw edges of the quilt top, creating a binding. Pin in place.
- Corners:
- At each corner, pull the fabric outward to a point, then fold the pointed end under the folded edge of one side.
- Fold the corner on a diagonal and temporarily pin down. Repeat for all corners.
- Sewing the Border: Sew the border in place 1/8” from the folded edge around the entire quilt.
Quilting
- Marking Lines: Starting at the top left corner, measure 2” down and mark a diagonal line. Repeat every 2” along the entire quilt front, avoiding the appliques.
- Stitching: Stitch along the marked lines, except for the area between the cloud, raindrops, and umbrella, which will be done in rainbow thread.
- Rainbow Thread: Using rainbow thread, start just under the cloud applique and sew along the remaining quilting lines.
Adding Lutradur Appliques
- Painting:
- Place Lutradur appliques on the plastic side of freezer paper.
- Dab the sponge brush into the iridescent glitter fabric paint and dab it over each raindrop applique, covering them completely.
- Let the paint dry for five minutes, then peel the Lutradur® from the freezer paper and allow it to fully dry.
- Pinning and Tacking: Pin the raindrops between the appliqued raindrops and tack them into place with a few stitches at the top.
Creating the Rainbow Showers Quilt is a delightful project that combines vibrant colors and playful elements to create a stunning piece that brightens any space. As you complete this quilt, take a moment to appreciate the beauty of each color and the joy that each stitch brings. This quilt is not only a reflection of your creativity but also a testament to the magic that can be created with fabric and thread. Enjoy the process, and may your Rainbow Showers Quilt bring a splash of happiness and color to your home.


