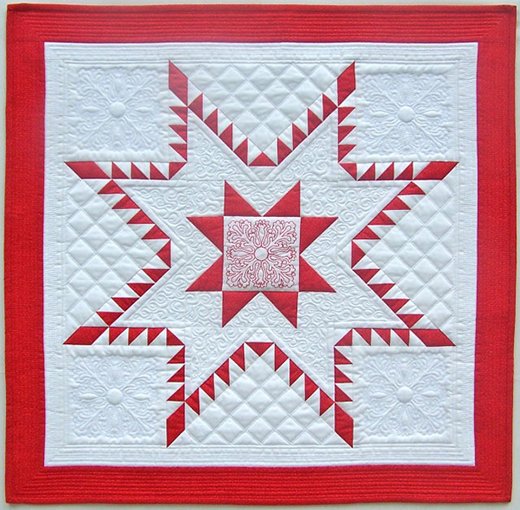
The Aurora Feathered Star quilt block is a masterpiece that brings together intricate design and meticulous craftsmanship. My journey into quilting has always been driven by a love for complex patterns and vibrant colors. The first time I saw the Aurora Feathered Star, I was mesmerized by its elegance and complexity. This block not only tests your quilting skills but also rewards you with a stunning piece that can be a focal point in any quilt.
A Symphony of Precision: The Aurora Feathered Star
Creating an Aurora Feathered Star quilt block is like composing a symphony where every piece of fabric plays its part to create a harmonious whole. This tutorial, designed by Nancy Mahoney, walks you through the process step-by-step, ensuring that even the most intricate details are covered. Whether you’re an experienced quilter or looking to challenge yourself, this block will elevate your quilting game and result in a breathtaking finished product.
Detailed Insight and Preparation
The Elegance of Precision in Quilting
The Aurora Feathered Star block stands out due to its precise geometric shapes and the interplay of colors. The combination of white and red prints creates a striking contrast that highlights the detailed star pattern. This project requires careful cutting and piecing, making it a rewarding endeavor for those who appreciate the art of precision in quilting.
Materials
To create the Aurora Feathered Star quilt block, you’ll need the following materials:
- 1-1/8 yard of white print for block and inner border
- 1 yard of red print for block and outer border
- 1 yard of fabric for backing
- 32″ x 32″ square of batting
- 7″ x 9″ rectangle of OESD Wash Away Embroidery Stabilizer
- White or cream Mettler 50-wt thread for patchwork
- White Mettler 60-wt thread for quilting
- Red Isacord thread for machine embroidery
- Monofilament for quilting
- Sewing Machine (BERNINA 780 used in this tutorial)
- Patchwork foot #37/#37D or #97/#97D
- Machine embroidery foot #26
- Free-motion quilting foot #24
- Walking foot #50
- Sharp 80/12 needle for patchwork
- Embroidery needle for machine embroidery
- Quilting needle 75/11 for quilting
- Twin needle 80/12 for quilting
- Straight Stitch plate
- 5mm or 9mm Stitch plate
- Medium hoop for machine embroidery
- Oval hoop for machine embroidery
- 6″ square ruler with diagonal line
- Disappearing fabric marker or pencil
Cutting the Fabrics
From the white print, cut:
- (3) squares, 9″ x 9″
- (4) squares, 1-7/8″ x 1-7/8″; cut once diagonally to yield 8 half-square triangles (label as A1)
- (4) squares, 2″ x 2″; cut once diagonally to yield 8 half-square triangles (label as B1)
- (4) squares, 6-1/8″ x 6-1/8″ (label as D)
- (1) square 11-1/4″ x 11-1/4″; cut twice diagonally to yield 4 quarter-square triangles (label as E)
- (4) squares, 4-7/8″ x 4-7/8″; cut once diagonally to yield 8 half-square triangles (label as F)
- (4) rectangles, 2-1/2″ x 4-1/2″ (label as G)
- (4) squares, 2-1/2″ x 2-1/2″ (label as H)
- (1) rectangle, 7″ x 9″ (label as I)
- (4) inner-border strips, 1-1/2″ x width of fabric
From the red print, cut:
- (3) squares, 9″ x 9″
- (8) squares, 2-1/2″ x 2-1/2″ (label as H)
- (1) strip, 1 ½” x width of fabric
- (4) outer-border strips, 2-1/2″ x width of fabric
- (3) binding strips, 2-1/4″ x width of fabric

Full Pattern: Click Here
Step-by-Step Instructions and Final Touches
Step-by-Step Instructions
Making Triangle Squares
- Layer and Cut:
- Layer 1 white 9″ square and 1 red square right sides facing up with raw edges aligned. Cut the squares in half diagonally.
- Cut 2-1/4″-wide strips, measuring from the center cut. Do not discard the small triangles!
- Assemble Strip Sets:
- Separate and rearrange the strips, alternating the colors. Using a 1/4″-wide seam allowance and offsetting the strips as shown, join one set of strips, ensuring the lower edge and one adjacent side have straight edges. Press the seam allowances toward the darker fabric.
- Cut Units:
- Beginning at the lower left corner, align the 45° line on the square ruler with the seam line. Each unit will require 4 cuts. The first and second cuts are along the side and top edges of the ruler. Remove the unit from the strip set.
- Rotate the segment and align the cut edges with the required measurement on both sides of the ruler and the 45° line on the seam. Cut the remaining 2 sides of the unit.
- Repeat:
- Make a total of 6 strip sets. Cut (28) 1-1/2″ x 1-1/2″ units and label as A. Cut (36) 1-5/8″ x 1-5/8″ units and label as B.
Making the Feathered Star Units
Unit A:
- Cut Diamonds:
- Fold the red 1-1/2″-wide strip in half, wrong sides together. Using a ruler marked with a 45° line, trim the end of the strip at a 45° angle. Measure 1-5/8″ from the freshly cut edge to cut 2 diamonds. Cut a total of 4 C diamonds and 4 reversed C diamonds.
- Assemble Diamonds:
- Sew a red C diamond and a white A1 triangle together to make a diamond unit. Sew a red CR diamond and a white A1 triangle together to make a reversed diamond unit. Press seam allowances toward the diamonds. Make 4 of each unit.
- Create Feather Rows:
- Join 1 diamond unit and 3 A triangle-square units to make a short feather-row. Join 1 reversed diamond unit and 4 A triangle-square units to make a long feather-row. Make 4 of each unit.
- Trim Diamonds:
- Each triangle-square unit should measure 1″ from seam to seam. On each diamond, measure 2-7/8″ from the seam line to the tip of the diamond; trim off the tip of the diamond.
- Assemble Unit A:
- With right sides together, sew a short feather-row to a white D square. Sew a long feather-row to an adjacent side of the square. Press all seam allowances toward the square. Make a total of 4 A units.
Unit B:
- Create Feather Rows:
- Join 4 B triangle-square units and 1 white B1 triangle to make a short feather-row. Join 5 B triangle-square units and 1 white B1 triangle to make a long feather-row. Press all seam allowances toward the dark triangles. Each triangle-square unit should now measure 1¹/8″ from seam to seam. Make 4 of each unit.
- Partial Seam Technique:
- With right sides together, sew a short feather-row to a white E triangle stopping about 1″ from the end of the feather-row with a backstitch. Sew a long feather-row to an adjacent side of the triangle, stopping about 1″ from the end of the feather-row with a backstitch. Press all seam allowances toward the triangle.
- Complete Unit B:
- Sew 2 white F triangles to the unit as shown. Make 4 B units.
Making the Sawtooth Star Block
- Embroidery Setup:
- Attach the embroidery module. Install an embroidery needle and an embroidery foot. Thread the machine with red thread. Select an embroidery design. For the BERNINA 780, select BD554 and reduce the size to 92 x 92 mm, or 84% of the original. Refer to the manual for your machine for help setting up your machine.
- Embroider the Design:
- Place the white I rectangle on top of the stabilizer. Place the layered rectangles in a medium hoop. Embroider the design.
- Follow the manufacturer’s instructions for removing the stabilizer. Center the design, then trim the white rectangle to measure 4-1/2″ x 4-1/2″.
- Create Flying Geese Units:
- Draw a diagonal line from corner to corner on the wrong side of each red H square. Layer a marked square on one end of a white G rectangle, right sides together. Sew on the marked line and trim the excess corner fabric leaving a ¹/4″ seam allowance. Press the seam allowances toward the resulting triangle. Repeat for the opposite end of the rectangle to make a flying-geese unit. Make 4 units.
- Assemble the Block:
- Lay out the flying-geese units, 4 white H squares, and the embroidered square. Join the pieces into rows and then join the rows to complete the block. Make 1 block.
Completing the Block
Arrange 4 A units, 4 B units, and the Sawtooth Star block in 3 rows as shown. Join the units in rows, sewing the partial seam last. Join the rows, completing the partial seams last.
Assembling the Quilt
- Add Inner Borders:
- Measure the center of the star block from side to side. Cut two white inner-border strips to this length and sew them to opposite sides of the block.
- Measure the center of the star block from top to bottom, including the side borders. Cut two white inner-border strips to this length and sew them to the top/bottom of the block to complete the inner border.
- Add Outer Borders:
- Repeat steps 1 and 2, using the red outer-border strips to attach the outer border.
Quilting
- Prepare for Quilting:
- Layer the quilt top, batting, and backing; baste. Use a walking foot, quilting needle, and monofilament to stitch-in-the-ditch. Change to white thread and stitch straight lines in the inner border. Use a free-motion foot to quilt a tiny swirl design in the large white star.
TIP: Reduce the top tension when using monofilament. Set the tension to 1.5 on your machine. Be sure to return the tension to the normal setting when using regular thread.
- Quilt the Triangles:
- To quilt a diagonal grid in the large white triangles, mark lines using a removable marker.
- Install a twin needle, walking foot, and white thread. Use the marked lines as a guide to stitch the grid. TIP: Use a 5mm or 9mm stitch plate when using a twin needle.
- Embroidery in Squares:
- Attach the embroidery module. Install an embroidery needle and foot. Thread the machine with white thread. Select an embroidery design; for the BERNINA 780, select BD554 and increase the size to 115 x 115 mm, or 105% of the original.
- Mark the center of the white square with a removable marker. Center the white square in an oval hoop and stitch the embroidery design in the center of each white square.
- Quilt the Borders:
- Use a walking foot, quilting needle, and red thread to quilt straight lines in the outer borders.
Finishing the Aurora Feathered Star Quilt Block
- Trim and Bind:
- Trim the backing and batting even with the quilt top. Stitch the red binding strips together end to end using diagonal seams. Fold and press the resulting long strip in half lengthwise with wrong sides together. Stitch to the quilt front, matching raw edges and mitering the corners.
- Fold the binding to the back of the quilt and hand stitch the folded edge to the quilt back.
The Aurora Feathered Star quilt block is a testament to the beauty of precision and intricate design in quilting. This block not only showcases your skill but also becomes a captivating centerpiece in any quilt. As you complete each step, you contribute to a tradition of craftsmanship and creativity that transcends time. Enjoy the process and take pride in the stunning result of your hard work.


