Quilting has always been a profound part of my life, a tradition that brings together creativity, patience, and a sense of accomplishment. I remember when I first started quilting, the myriad of colors and patterns that could be combined to tell a unique story fascinated me. Each quilt became a canvas, reflecting not just artistic expression but also cultural heritage and personal milestones. This project, the “Warrior” quilt, embodies the spirit of resilience and beauty, making it a special piece for anyone who loves the art of quilting.
The “Warrior” quilt is not just a project; it’s a journey through intricate designs and vibrant fabrics. Inspired by the strength and grace symbolized in its patterns, this quilt represents more than just a decorative piece. It’s a tribute to the warriors in our lives, the ones who face challenges with courage and determination. Join me as we embark on creating this beautiful and meaningful quilt, one step at a time.
The Warrior’s Spirit: Exploring the Significance of the Quilt
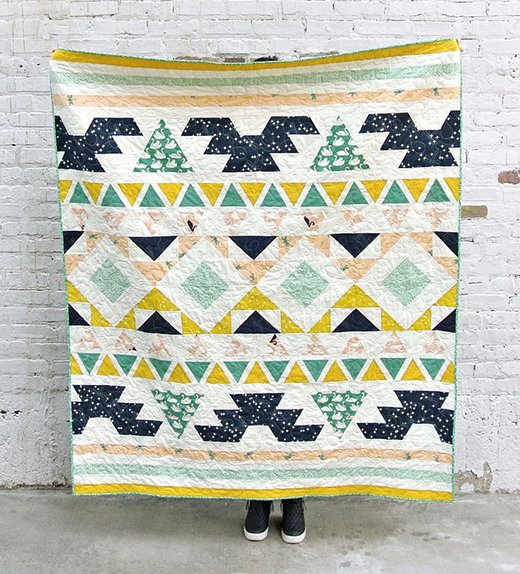
The “Warrior” quilt pattern by Suzy Quilts is more than a beautiful arrangement of fabrics; it’s a reflection of strength and perseverance. The design, featuring a combination of dynamic shapes and harmonious colors, symbolizes the journey of a warrior—steadfast and resilient. Using organic fabrics from the Swan Lake collection, this quilt not only supports sustainable practices but also adds an extra layer of love and care to your creation. Each piece of fabric and every stitch weaves together a story of bravery and hope, making this quilt a perfect homage to the warrior spirit within us all.
Crafting the Perfect Design: Techniques and Inspiration
Creating the “Warrior” quilt involves mastering specific quilting techniques that bring out the best in the design. From selecting the right fabrics to precisely cutting and sewing the templates, each step is crucial in achieving the desired look. This quilt uses a variety of fabrics, including solids and prints, which blend together to form a cohesive and striking pattern. Understanding the significance of each fabric and its placement in the quilt is essential. Let’s delve into the materials and preparation needed to start this inspiring project.

Full Pattern: Click Here
Materials: Gathering What You Need
To create the “Warrior” quilt, you will need the following materials:
- Solid Marigold: 1/2 yd.
- Firefly Dots Mint: 1/2 yd.
- Dragonflies Shell: 1/2 yd.
- Wink Dusk: 3/4 yd.
- Bevy Pond/Shell: 1/4 yd. or 1 Fat Quarter (FQ)
- Solid Pond: 1/4 yd. or 1 FQ
- Wink Marigold: 1/4 yd. or 1 FQ
- Solid Dusk: 1/4 yd. or 1 FQ
- Bevy Shell/Dusk: 1/4 yd. or 1 FQ
- Solid Cream: 2 1/2 yds.
- Backing: 4 yds.
- Binding: 3/4 yd.
These fabrics will form the foundation of your quilt, bringing together the vibrant colors and patterns that define the “Warrior” quilt’s unique design.
Preparation and Initial Insights
Before diving into the quilt-making process, it’s essential to prepare your materials and understand the basics of the pattern. Familiarize yourself with the cutting instructions and the layout of each row. Take time to carefully cut out each template, ensuring precision to avoid any discrepancies in the final assembly. Additionally, consider pre-washing your fabrics to prevent any shrinkage after the quilt is completed. This preparation phase is crucial in setting the stage for a smooth and enjoyable quilting experience.
Step-by-Step Instructions
Let’s dive into the detailed instructions for making the “Warrior” quilt. Follow these steps carefully to create a stunning and meaningful piece.
Step 1: Cutting the Fabric
- Solid Marigold:
- Cut 3 strips of 2″ x Width of Fabric (WOF).
- Cut 22 pieces using Template 7.
- Firefly Dots Mint:
- Cut 3 strips of 2″ x WOF.
- Cut 2 squares of 8 3/4″.
- Dragonflies Shell:
- Cut 3 strips of 2″ x WOF.
- Cut 2 squares of 8 3/4″.
- Wink Dusk:
- Cut 18 pieces using Template 1.
- Cut 6 pieces using Template 2.
- Bevy Pond/Shell:
- Cut 4 pieces using Template 9.
- Solid Pond:
- Cut 20 pieces using Template 7.
- Wink Marigold:
- Cut 2 squares of 8 3/4″.
- Solid Dusk:
- Cut 2 squares of 8 3/4″.
- Bevy Shell/Dusk:
- Cut 20 pieces using Template 7.
- Solid Cream:
- Cut 12 strips of 2″ x WOF.
- Cut pieces using Templates 3, 4, 5, 6, and 8.
- Sub-cut 10 strips of 1 1/4″ x WOF into 44 pieces of 1 1/4″ x 5 1/2″.
- Cut 8 squares of 8 3/4″.
- Binding:
- Cut 7 strips of 2 1/4″ x WOF.
Step 2: Assembling Row A
- Place the 3 – 2″ x WOF strips of Solid Marigold right sides together and sew to create 1 long strip. Trim down to 2 – 2″ x 56 1/2″ strips.
- Tip: Sew seams on a 45˚ angle to make them visually blend.
- Repeat Step 1 for each of the 3 – 2″ x WOF strips of Firefly Dots Mint and Dragonflies Shell.
- For Solid Cream, instead of 2 – 2″ x 56 1/2″ strips, make 8 – 2″ x 56 1/2″ strips. You will need 6 strips for Row A. Set the remaining 2 aside for Row C.
- Assemble 2 identical Row A as seen in the diagram.
- Sew a Template-3 Solid Cream trapezoid to each side of 6 Template-1 Wink Dusk trapezoids. Leave a 1/4″ overhang, press seams to the side, and trim the dog ears.
Step 3: Assembling Row B
- Sew a Template-4 Solid Cream trapezoid to both sides of a Template-2 Wink Dusk trapezoid for a total of 6 units.
- With 4 Template-1 Wink Dusk trapezoids, 4 Template-5, and 2 Template-6 Solid Cream trapezoids, make 2 units as illustrated.
- With 8 Template-1 Wink Dusk trapezoids, 4 Template-5, and 4 Template-6 Solid Cream trapezoids, make 4 units. Arrange them with Template-5 trapezoids on alternating sides.
- Assemble the units created to make 2 full trapezoid units and 4 broken trapezoid units.
- Complete Row B by sewing in this order: broken trapezoid unit, Template-9 Bevy Pond/Shell, full trapezoid unit, Template-9 Bevy Pond/Shell, broken trapezoid unit. Ensure each piece overhangs by 1/4″ and leave dog ears to be snipped at the end.
- Trim both rows down to 56 1/2” wide.
- Tip: Fold the rows in half. Line up the center fold on a cutting mat at the 28 1/4″ marker. Trim both edges at the same time.
Step 4: Assembling Row C
- Sew 11 Template-7 Solid Marigold triangles to 10 Template-7 Solid Pond triangles with 1 1/4″ x 5 1/2″ strips in between. Press seams toward the triangles, and trim as you sew.
- Repeat Step 1 to make a second identical row.
- Using the same technique, sew together 2 rows of 11 Template-8 Solid Cream trapezoids and 10 Template-7 Bevy Shell triangles.
- Sew remaining 3 – 1 1/4″ x WOF strips of Solid Cream together. Sub-cut to make 2 – 1 1/4″ x 56 1/2″ strips.
- Sew 1 – 1 1/4″ x 56 1/2″ strip to the base of a row of Marigold and Pond triangles.
- Line up the bases of the Bevy Shell triangles with the bases of the Solid Pond triangles. Pin and sew rows together. Square up the sides of the row with a ruler and trim excess.
- From Row A Step 3, take the 2 – 2″ x 56 1/2″ Solid Cream strips and sew one to the top of the Marigold and Pond row.
- Repeat Steps 1 – 7 to make a second identical row.
Step 5: Assembling Row D
- Place 1 – 8 3/4″ Solid Cream square on top of each Firefly Dots Mint, Wink Marigold, Solid Dusk, and Dragonflies Shell square for a total of 8 pairs of squares.
- On the backside of the Solid Cream squares, draw two guidelines diagonally, one horizontally and one vertically.
- For each pair, sew a 1/4″ from the guidelines.
- Cut along the guidelines.
- Press the seams toward the colored fabric and trim dog ears. Each half-square triangle should be 4″ unfinished, so trim as needed.
- After Step 5, there are 16 half-square triangle units in each of the 4 colors. Arrange them as illustrated. Line up the seams, pin, and sew together to complete Row D.
- Tip: Press the seams in each row in the opposite direction to help the seams nestle into each other and alleviate bulk.
Additional Tips
- Precision Cutting: Ensure all your fabric pieces are cut accurately. Any deviations can cause misalignment in the final assembly.
- Seam Allowances: Always maintain a consistent 1/4″ seam allowance throughout the project.
- Pressing: Press your seams carefully to avoid bulk and ensure the quilt lies flat.
- Layout: Lay out your pieces before sewing to visualize the final pattern and avoid mistakes.
- Binding: Take your time to create a neat binding for a professional finish.
Conclusion
Creating the “Warrior” quilt is a rewarding experience that combines technical skill with artistic expression. As you stitch together each piece, reflect on the strength and resilience the pattern represents. The final product is not just a quilt, but a symbol of perseverance and beauty. Display your quilt proudly, knowing that it embodies the spirit of a warrior—steadfast, courageous, and full of grace.


