Quilting has always been a journey of discovery and creativity for me. When I first started quilting, I was amazed at how each quilt could tell a story and bring joy to others. One of the first patterns I fell in love with was the lattice quilt. Its structured elegance and timeless appeal made it an instant favorite. Over the years, I’ve experimented with various designs and techniques, but the lattice quilt remains a special part of my quilting repertoire.
The project we’re embarking on today is inspired by the classic beauty of the lattice quilt. This pattern, reminiscent of the ones my family used to cherish, combines traditional charm with a modern twist. Whether you’re an experienced quilter or just starting, this quilt offers a delightful challenge and a rewarding outcome. Let’s dive into the creation of the Grandma’s Lattice Quilt and explore its intricate beauty together.
Happiness Sewn: The Grandma’s Lattice Quilt
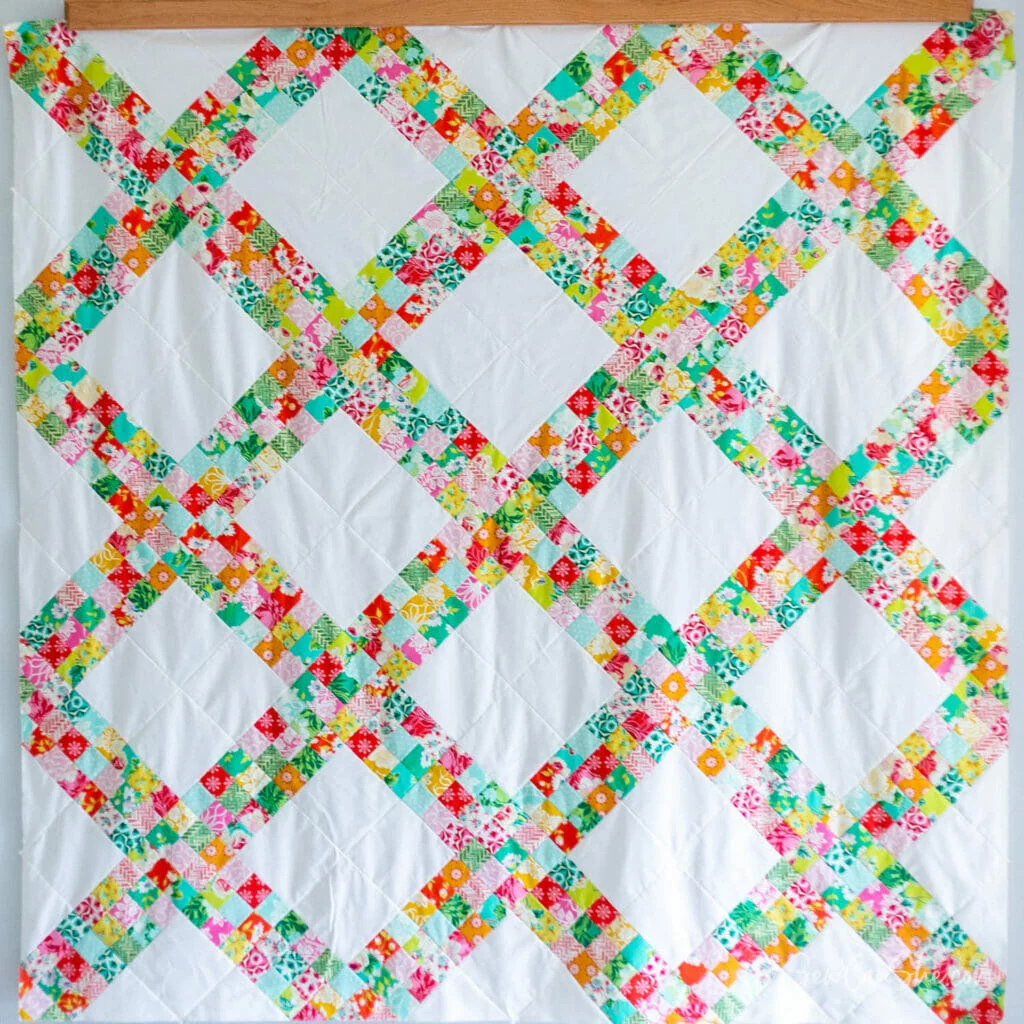
Grandma’s Lattice Quilt is more than just a sewing project; it’s a bridge between generations. This quilt captures the essence of traditional patchwork while incorporating contemporary fabrics and techniques. The design, with its lattice-like appearance, creates a beautiful interplay of colors and patterns, making it a versatile piece for any home. Using both jelly roll strips and fat quarters, this quilt is not only beginner-friendly but also a wonderful way to use up those beloved fabric scraps you’ve been saving for a special project.
The Art of Strip Piecing
One of the standout features of Grandma’s Lattice Quilt is the use of strip piecing. This technique simplifies the process of creating patchwork squares, making it faster and more efficient. By sewing strips of fabric together before cutting them into smaller pieces, you can achieve a cohesive and beautifully coordinated quilt top without the tedious task of piecing individual squares. This method is especially great for those who love to see quick progress in their quilting projects.
Materials
To create your own Grandma’s Lattice Quilt, you’ll need the following materials:
- 2 1/4 yards of background fabric (40-42” wide)
- 1 jelly roll strip bundle + 9 more strips (for a total of 51 strips, each 2 1/2” x 42”) OR:
- 15 fat quarters of coordinating cotton quilting fabric OR:
- 3 3/4 yards TOTAL of different coordinating cotton fabrics, cut into 2 1/2” x 42” strips (if you are cutting your own strips, aim for a variety of fabrics for a scrappy patchwork look)
- 5 yards of backing fabric
- 3/4 yards for the binding
- A piece of batting at least 81’’ x 81’’
Preparing to Quilt: Essential Tips
Before we start piecing our quilt, it’s important to prepare and organize our materials. Here are some tips to set you up for success:
- Selecting Fabrics: Choose fabrics that complement each other in color and pattern. For a cohesive look, consider a fabric collection or coordinating prints. For a more eclectic, scrappy appearance, mix and match different prints and colors.
- Cutting Accuracy: Ensure all your strips and squares are cut accurately. This precision will make assembling the quilt top much easier and ensure that your points and seams match up nicely.
- Pressing Matters: Press your fabric strips and blocks carefully. Use a hot iron and steam to set your seams and keep everything flat. This will make your quilt top look polished and professional.
- Organization: Keep your cut pieces organized by grouping similar fabrics together. This will help you maintain a balanced distribution of colors and patterns throughout your quilt.

Full Pattern: Click Here
Step-by-Step Instructions
Creating the Nine-Patch Blocks
- Organize Your Strips:
- Start by sorting all your fabric strips into sets of three that look good together. If you’re using a jelly roll, you can use the strips as they are or cut them in half for more variety.
- Sew the Strips Together:
- Place two fabric strips right sides together and sew along one long edge with a scant 1/4” seam allowance.
- Open the strips and press the seam allowances to one side.
- Add a third strip to the set, sewing along one long edge again with a scant 1/4” seam allowance.
- Press all seam allowances in the same direction.
- Sub-Cut the Strip Sets:
- Sub-cut each strip set into 2 1/2” wide pieces. If your strip sets are 21” long, you should get 8 pieces from each strip set. If they are 42” long, you should get 16 pieces.
- You will need a total of 270 pieces.
- Assemble the Nine-Patch Blocks:
- Select three sub-cut pieces that look good together. Sew these three pieces together with a scant 1/4” seam allowance to make a nine-patch block.
- Press the seams to one side or open, as desired.
- Repeat this process to make a total of 90 nine-patch blocks.
Assembling the Quilt Blocks
- Layout the Quilt Blocks:
- Each Grandma’s Lattice Quilt Block will require five nine-patch blocks and four 6 1/2” x 6 1/2” background fabric squares.
- Arrange the nine-patch blocks and background squares in a pleasing manner, creating a 3×3 grid with the nine-patch blocks forming a cross shape and the background squares filling the corners.
- Sew the Rows:
- Sew the squares together in three rows. Use a scant 1/4” seam allowance.
- Press the seams in alternating directions for each row to reduce bulk.
- Join the Rows:
- Sew the three rows together to complete an 18 1/2” x 18 1/2” block.
- Repeat to make a total of 18 quilt blocks.
Preparing the Blocks for Assembly
- Cutting the Blocks:
- Take 4 of the quilt blocks and cut them in half diagonally to create triangle pieces.
- Take 1 of the quilt blocks and cut it into quarters diagonally to create corner pieces.
Assembling the Quilt Top
- Layout the Quilt Top:
- Arrange the full blocks in diagonal rows as shown in the Quilt Assembly Diagram.
- Place the half-block triangle pieces along the edges.
- Place the quarter-block triangle pieces at the corners.
- Sew the Rows Together:
- Start sewing the blocks and triangle pieces together in diagonal rows. When sewing a triangle piece to a block, align the square corners and start sewing there. Note that the triangles are slightly smaller than the blocks.
- Sew all the rows together to finish the quilt top.
- Trim the edges to square the quilt if necessary.
Finishing the Quilt
- Prepare the Backing Fabric:
- Cut the backing fabric in half and sew the pieces together to make a backing piece that is at least 81 1/2” x 81 1/2”.
- Create the Quilt Sandwich:
- Lay the backing fabric right side down.
- Place the batting on top of the backing.
- Place the quilt top right side up on top of the batting.
- Baste the layers together using your preferred method (fusible batting or pin basting).
- Quilting:
- Quilt the quilt top as desired. You can use straight-line quilting, free-motion quilting, or any pattern that complements your design.
- Binding:
- Cut 8 strips of binding fabric 2 1/2’’ wide by the width of the fabric.
- Sew the strips together end-to-end using diagonal seams to create one long binding strip.
- Bind the quilt using your preferred method. I like to bind my quilts by machine for durability and efficiency.
Additional Tips
- Pressing Seams: Consistent pressing helps your quilt blocks lay flat and fit together perfectly. Always press before joining pieces.
- Color Distribution: When arranging your blocks, step back and view your layout from a distance to ensure a balanced distribution of colors and patterns.
- AccuQuilt Friendly: If you have an AccuQuilt fabric cutter, use the 2 1/2” strip die (55017) and the 6” finished square die (55000) to speed up the cutting process.
Creating Grandma’s Lattice Quilt is a journey through tradition and modern design. This quilt, with its charming lattice pattern, is sure to become a cherished piece in your home. Reflect on the process and the skills you’ve honed along the way. Each stitch is a testament to your creativity and dedication. I hope you enjoy every moment of making this beautiful quilt and feel proud of the finished product. Happy quilting!


