I’m in the market for some uncommon quilting designs. Those quilty designs that jump out at you for reasons you can’t always put your finger on and can be difficult to replicate later in your own quilts. I’m just about to start a project with a ton of negative space to fill, and I’m knee-deep in Pinterest research to create the perfect quilting plan.
In my research to develop my perfect version of negative space quilting, I came across a style of quilting that’s new to me, officially known as Grid Quilting. I’ve gathered a collection of grid quilting ideas to get you started with this unique technique, and today I’m excited to share what I came up with!
What is Grid Quilting?
Believe it or not, it’s not always as simple as just quilting in two directions across your quilt to make a grid. You can use grid quilting to take it a step further and use the grid lines as a structured way to free motion quilt. Using the grid lines as boundaries, you can quilt the open areas between your grid lines to keep things perfectly scaled and spaced. This technique can be used in a variety of ways to achieve different effects, so I’ve put together 9 great grid quilting ideas for you to try on your next quilt!
Supplies for Grid Quilting
Depending on your design of choice, you’ll need a variety of different things:
- Walking foot
- Marking tools for straight line quilting
- Free motion foot (optional but recommended)
- Quilt or practice swatch
Choosing a Quilting Grid
Before getting too far, you’ll need to decide what type of grid you want to use. Different grids will give you different size areas to fill in with your quilting and will provide slightly different looks. The only real difference between the grids is the angles of the lines and the orientation:
- Traditional square grid
- Square grid on point
- Diamond grid (60 degrees is a common favorite)
Depending on your quilt top design, you may find yourself leaning towards one type of grid over another. Maybe you have a very block-heavy quilt with borders and sashing that creates a strong grid naturally in the quilt top design. Instead of trying to line up a quilted square grid with the lines of your blocks, opting for a diamond grid will keep you from having to stress about alignment. Or maybe you are working in some negative space and need a modern geometric filler. Using a square grid is simple, straightforward, and gives that negative space quilting some serious wow-factor without being fussy in the angles.

Full Tutorial: Click Here
9 Grid Quilting Ideas for Beginners
1. Checkerboard
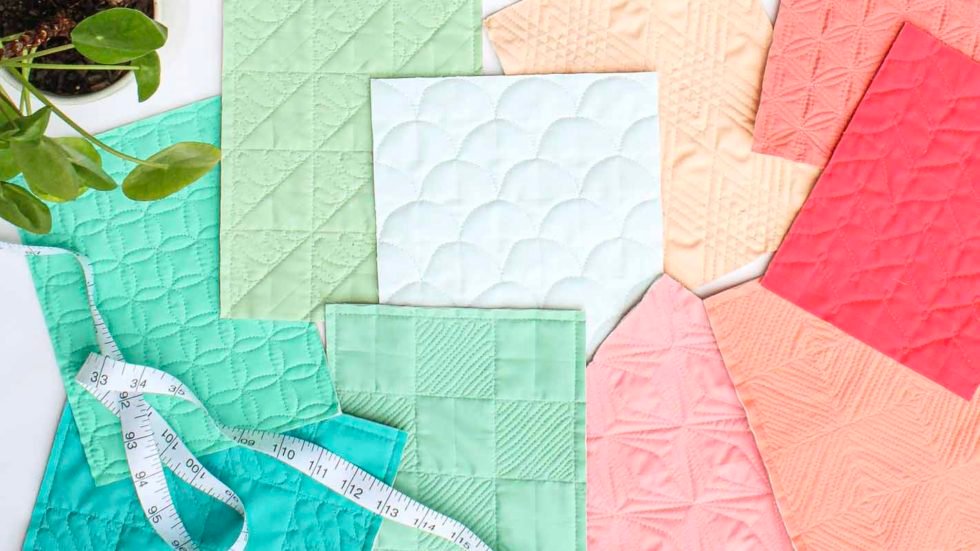
This design is best used on a square grid but looks great on either a straight grid or an on-point grid. Quilt your grid first and then quilt down every other square. This is most commonly done by matchstick quilting back and forth across the square, but you can use whatever design you like. Moving across the grid is typically done by working on the diagonal.
2. Ribbon Candy
The checkerboard design involves quite a few stitches, so if you prefer something less tedious, try the ribbon candy design. It provides a fun, whimsical feel and can be done in half the time. The trick is to make sure you quilt into the corners and edges of the grid squares to maintain the pattern’s integrity.
3. Loop de Loop
Once you’ve quilted your grid, try adding a third line on the 45-degree angle to split each grid cell into half-square triangles. Fill one side of the triangle using a loop de loop design, leaving the opposite side unquilted. This creates a checkerboard effect that can be adapted with different designs.
4. Herringbone
This builds off the checkerboard pattern. Quilt zig-zag lines across one cell of the grid, then work your way into the adjacent cell and zig-zag in the opposite direction. The opposing zig-zags create a fun herringbone effect.
5. Diamonds
Start with a square grid on point and use the “Touch, Don’t Touch, Touch” method. Quilt from one corner to the next, stopping just inside the corner to avoid touching the grid line. Repeat this process to create echoed diamonds across your quilt.
6. Running Arcs
Start with a 60-degree diamond grid and add horizontal lines to create equilateral triangles. Quilt arcs that start and end at the intersections of each cell. Repeat the process to fill in the texture.
7. Deco Lines
With a 60-degree grid, quilt three echo lines diagonally through five cells, then zig-zag back the opposite way. Overlap your rows to create a deco-era geometric design. This design can be done with just a walking foot.
8. Fishbone
Fishbones are perfect for grid quilting. Start your fishbone at the intersection of four cells and loop across the vertical lines, ensuring consistency by following the grid.
9. Scallop
Mark a square grid on the quilt top. Quilt scallops from one intersection to the next, using the grid to keep the height and width uniform. This creates a consistent free-handed scallop look.
Ways to Incorporate These Grid Quilting Ideas
All Over Quilting
Grid quilting can be used as a standalone quilting design across your entire quilt. Quilt your grid first, then fill it in row by row. This structured design gives you room to experiment while ensuring a cohesive look.
Filler Designs
Use grid quilting ideas as filler designs in a custom quilting plan. Smaller grid sizes provide denser quilting designs that pair well with featured motifs.
Getting Creative
Grid quilting ideas are not limited to these designs. Experiment with different grids and filler designs, pairing multiple designs for secondary patterns. Grids add structure to your quilting, providing lines to color in and follow.
Grid quilting is a versatile and creative technique that adds structure and visual interest to your quilts. Whether you’re a beginner or an experienced quilter, these 9 grid quilting ideas offer a variety of ways to enhance your quilting projects. So grab your supplies, choose a grid, and start quilting!


