The holiday season always brings a sense of warmth and joy into our homes, and nothing encapsulates this feeling quite like a handcrafted quilt
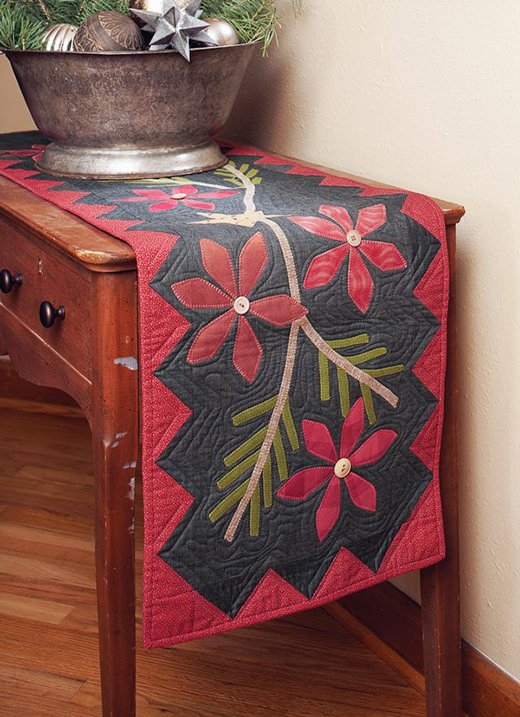
The Poinsettia and Pine table runner, with its muted colors and soft felted wool, is a perfect project to add a festive touch to your holiday decor.
I remember my first holiday season as a quilter, eagerly piecing together fabrics to create something special for my family.
This table runner takes me back to those cozy moments, filled with anticipation and creativity.
Quilting during the holidays is a tradition that brings a sense of accomplishment and festivity. The Poinsettia and Pine table runner, with its folksy charm, embodies the spirit of the season. It’s not just about making a decorative piece; it’s about crafting memories that will last for years to come. Let’s dive into this delightful project and create a holiday favorite together.
Holiday Charm: The Unique Appeal of Poinsettia and Pine
The beauty of the Poinsettia and Pine table runner lies in its simple yet elegant design. The combination of red, gray, and green felted wool appliqués against a dark gray background creates a cozy and inviting look. This project is perfect for both seasoned quilters and beginners looking to add a handmade touch to their holiday decorations. The muted colors and traditional patterns evoke a sense of nostalgia, making it a cherished addition to any holiday table.
Mastering Appliqué: Techniques and Design Insights
The Poinsettia and Pine table runner features beautiful appliqué work that brings the festive design to life. Appliqué can seem daunting at first, but with the right techniques and a bit of patience, you’ll find it to be a rewarding and enjoyable process. The use of fusible web makes it easier to position and secure the appliqué pieces, while machine blanket-stitching adds a neat and durable finish.
Materials
To create the Poinsettia and Pine table runner, you’ll need the following materials:
- Red Shirting: 3/4 yard for border and binding
- Solid Dark Gray Fabric: 1-1/2 yards for background and border
- Assorted Red Prints: Three 1/8-yard pieces for poinsettia appliqués
- Green Felted Wool: 8×20″ rectangle for pine needle appliqués
- Gold Print Fabric: 6×12″ rectangle for star appliqués
- Tan Felted Wool: 4×20″ rectangle for pine branch appliqués
- Backing Fabric: 23×63″
- Batting: 23×63″
- Fusible Web: 1 yard
- Off-White Buttons: Six, 5/8″ diameter
Preparing Your Workspace: Tips and Considerations
Before starting your project, ensure you have a well-organized and comfortable workspace. Pre-wash and press your fabrics to prevent any shrinkage or color bleeding. Have your cutting tools, sewing machine, and appliqué supplies ready. It’s also helpful to have an iron and ironing board nearby for pressing seams and fusing appliqué pieces.
When choosing your fabrics, consider how the colors and patterns will complement each other. The combination of red, gray, and green creates a classic holiday look, but feel free to experiment with different shades and textures to make the table runner uniquely yours.

Full Pattern: Click Here
Step-by-Step Instructions
Cutting the Fabrics
- From red shirting, cut:
- Four 2-1/2″ x 42″ binding strips
- Sixty-eight 2-1/2″ squares
- From solid dark gray, cut:
- One 12-1/2″ x 52-1/2″ rectangle
- Thirty-two 2-1/2″ x 4-1/2″ rectangles
- From each assorted red print, cut:
- Twelve pieces of Pattern A (poinsettia leaves)
- From green wool, cut:
- Four pieces of Pattern B
- Nine pieces of Pattern C
- Six pieces of Pattern D
- Two pieces of Pattern E
- From gold print, cut:
- Two pieces of Pattern F (stars)
Assembling the Quilt Top
- Marking and Sewing Flying Geese Units:
- With a pencil, draw a diagonal line on the wrong side of sixty-four red shirting 2-1/2″ squares.
- Align a marked square with one end of a solid dark gray 2-1/2″ x 4-1/2″ rectangle (Diagram 1). Sew on the marked line. Trim excess fabric, leaving a 1/4″ seam allowance. Press open the attached triangle.
- Align a second marked square with the opposite end of the dark gray rectangle (Diagram 2). Stitch, trim, and press as before to make a Flying Geese unit. The unit should measure 2-1/2″ x 4-1/2″. Repeat to make thirty-two Flying Geese units.
- Creating Border Strips:
- Join thirteen Flying Geese units to make a long border strip. Press seams open. Repeat to make a second long border strip.
- Join two red shirting 2-1/2″ squares and three Flying Geese units to make a short border strip. Press seams open. Repeat to make a second short border strip.
- Sew the long border strips to the long edges of the solid dark gray 12-1/2″ x 52-1/2″ rectangle. Add the short border strips to the remaining edges to complete the quilt top. Press all seams toward the dark gray rectangle.
Appliquéing the Quilt Top
- Preparing the Appliqué Pieces:
- Center and fuse a 3″ x 18″ rectangle of fusible web to the tan wool 4″ x 20″ rectangle. Cut the fused rectangle to make:
- Three 3/8″ x 16-1/2″ branch appliqués
- Three 3/8″ x 9″ branch appliqués
- Center and fuse a 3″ x 18″ rectangle of fusible web to the tan wool 4″ x 20″ rectangle. Cut the fused rectangle to make:
- Positioning and Fusing Appliqué Pieces:
- Referring to the Quilt Assembly Diagram, position the green wool B, C, D, and E pine needle appliqués on the quilt top. Arrange the tan wool branch appliqués over the centers of the needles. Place the red print A leaves on the quilt top in sets of six matching leaves. Arrange the gold print F stars, covering the ends of two branches with one of the stars. Fuse all pieces in place.
- Securing the Appliqué Pieces:
- Using matching thread, machine-blanket-stitch around each appliqué piece. Alternatively, you can wait until the quilt top is layered for finishing before sewing around the appliqués, quilting and appliquéing simultaneously.
Finishing the Quilt
- Layer and Quilt:
- Layer the quilt top, batting, and backing; baste the layers together.
- Quilt as desired. For the featured quilt, gray thread was used to free-motion quilt the solid dark gray background, echo-quilting around the appliqué shapes. Additionally, outline quilting 1/4″ from the seam lines in the border adds a refined touch.
- Adding Buttons and Binding:
- Hand-sew an off-white button in the middle of each poinsettia.
- Bind the quilt with the red shirting binding strips, securing the edges and giving the quilt a polished finish.
Additional Tips
- Felted Wool Preparation: To felt wool, machine-wash it in a hot-water-wash, cold-rinse cycle. Machine-dry on high heat and steam-press. This process makes the wool denser and easier to work with.
- Using Fusible Web: Follow the manufacturer’s instructions carefully when applying fusible web. This ensures that the appliqué pieces adhere properly to the quilt top.
- Pressing Matters: Proper pressing of seams and appliqué pieces helps maintain the quilt’s shape and gives it a professional look.
The Poinsettia and Pine table runner is a charming project that brings the festive spirit of the holidays into your home. As you work through each step, from cutting and piecing to appliquéing and quilting, you’ll create a beautiful and functional piece that embodies the warmth and joy of the season. This table runner is sure to become a beloved part of your holiday decor, bringing cheer and handmade love to your celebrations. Happy quilting!


