Ever since I was a young girl, I’ve been captivated by the magic of creating something beautiful out of simple pieces of fabric. My journey into quilting began with a small, patchwork project that sparked a lifelong passion for this timeless craft. Over the years, I’ve experimented with countless designs, but few have brought as much joy and satisfaction as the Pippi Quilt. This charming, vibrant quilt holds a special place in my heart, not only because of its delightful aesthetic but also due to its seamless blend of simplicity and elegance.
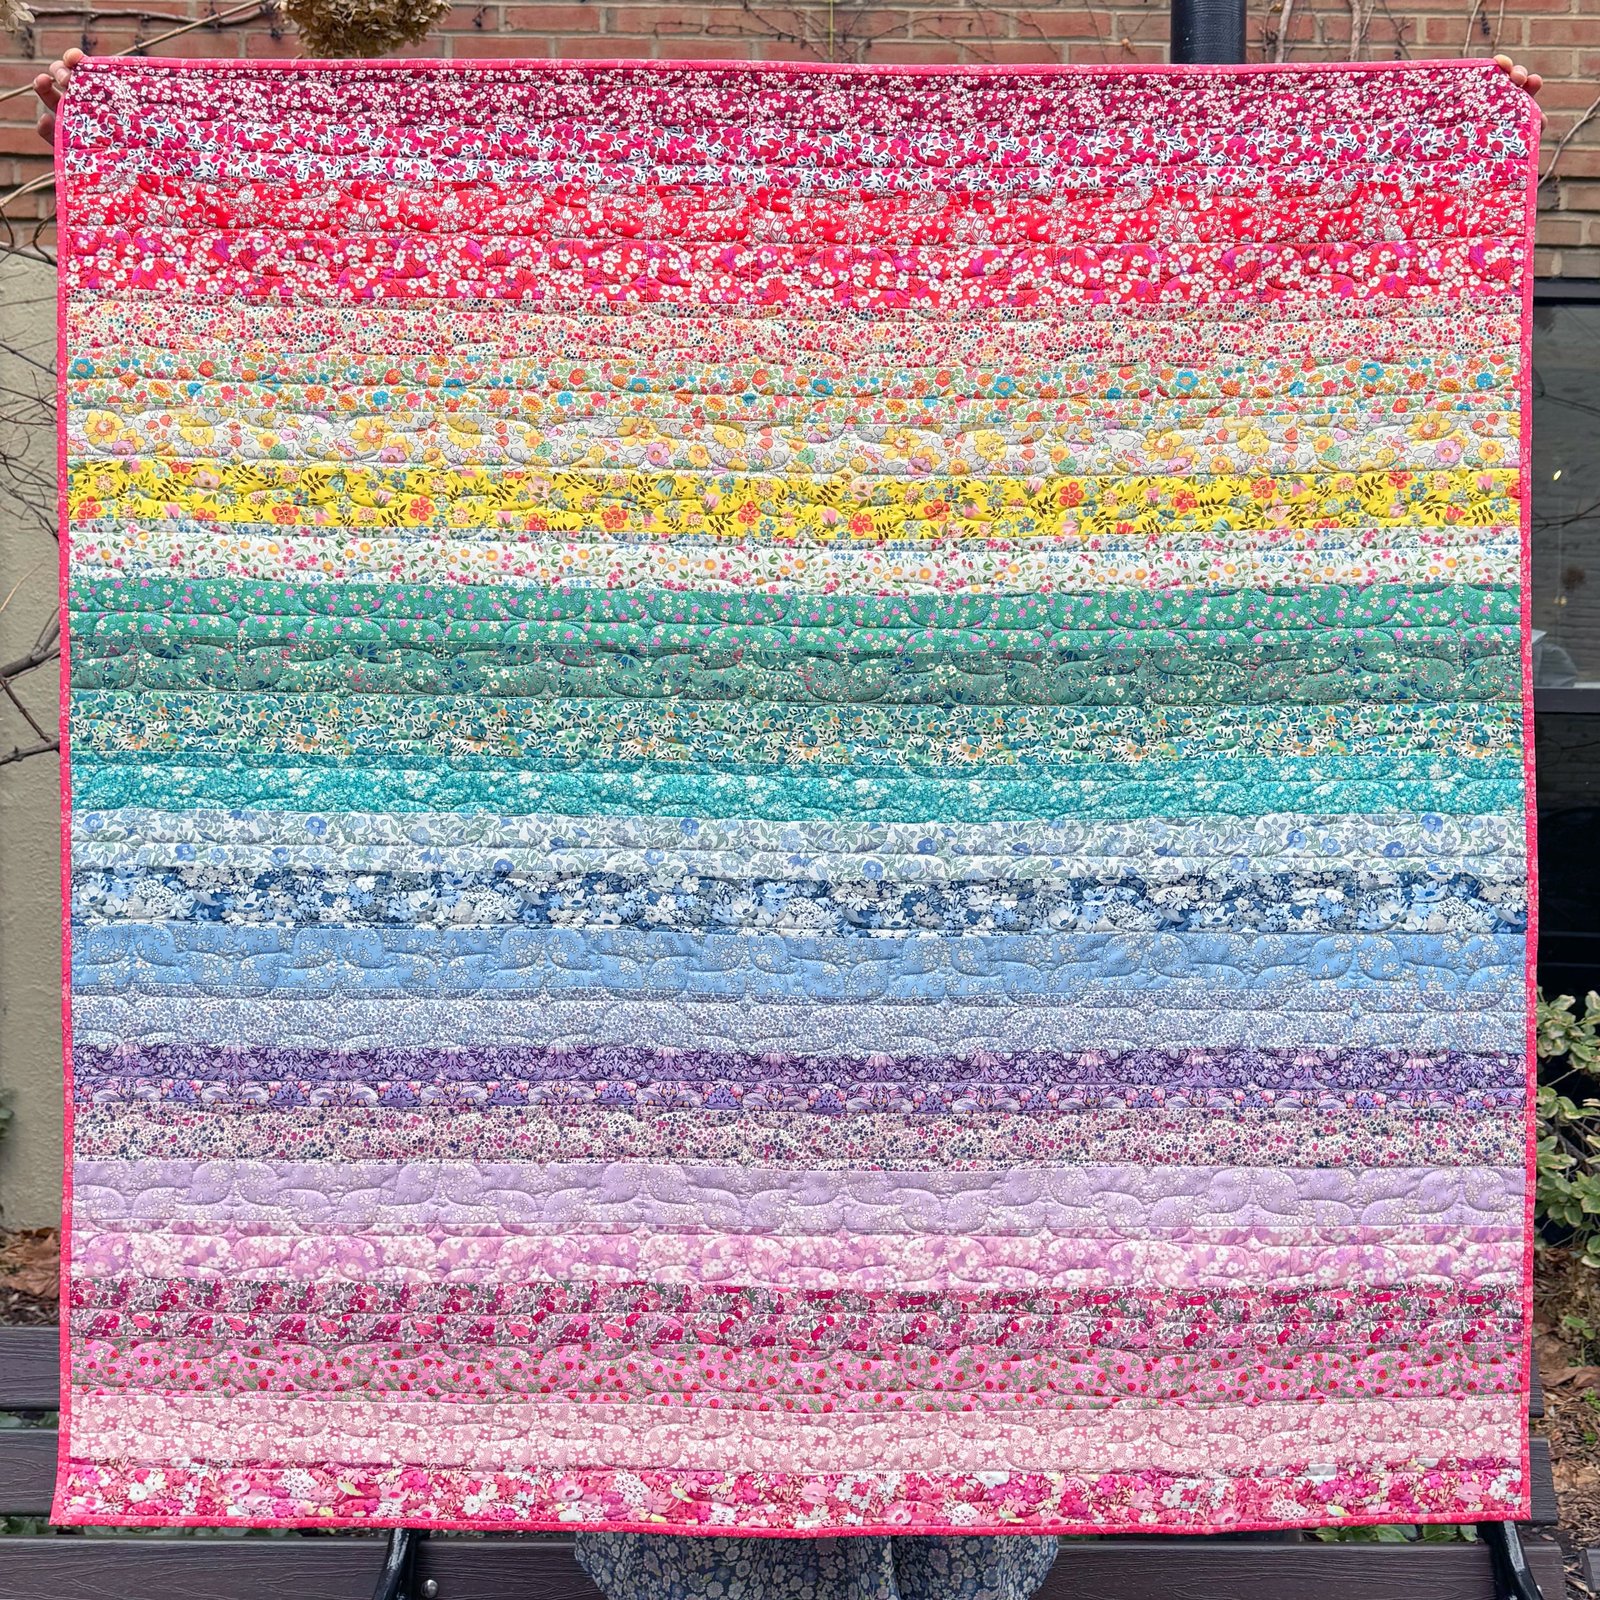
The Pippi Quilt is more than just a quilt; it’s a celebration of color and creativity. Designed by DuckaDilly, this baby quilt is a fantastic project for both beginners and seasoned quilters. Its unique gradient pattern and the exquisite Liberty Tana Lawn fabric make it a truly standout piece. Today, I’ll guide you through the steps to create your own Pippi Quilt, sharing tips and insights to ensure your quilting journey is as enjoyable and rewarding as mine has been.
Experience the Magic of Gradient Quilting with the Pippi Quilt
One of the most captivating aspects of the Pippi Quilt is its gradient design. This technique, where colors flow seamlessly from one to another, creates a visually stunning effect that is both dynamic and soothing. The Pippi Quilt utilizes a pre-arranged jelly roll of Liberty Tana Lawn strips, ensuring that even novice quilters can achieve a professional-looking gradient without the hassle of color coordination. By keeping the strips in their original order, you maintain the integrity of the design and achieve a flawless transition between hues.

Full Pattern: Click Here
Precision and Technique: Mastering the Basics
Before diving into the assembly of the Pippi Quilt, it’s crucial to understand the importance of precision and technique. Proper preparation and attention to detail will ensure your quilt not only looks beautiful but also holds together well over time. From cutting the strips to stitching the seams, every step requires care and patience. In this section, I’ll provide you with essential insights and tips to help you start your project on the right foot.
Materials Needed
To create the Pippi Quilt, you’ll need the following materials:
- Rotary cutter, cutting mat, and quilting ruler: These tools are essential for accurately cutting your fabric strips and trimming the quilt top.
- Sewing machine: Ensure your machine is in good working order, with a clean bobbin and properly threaded needle.
- Iron and ironing board: Pressing your seams and fabric strips is crucial for achieving a neat and professional finish.
- Scissors: A good pair of fabric scissors for trimming threads and small adjustments.
- Thread for piecing: AuriFil 50 wt cotton thread is recommended for its strength and smooth finish.
- Good sewing machine needles: Schmetz Microtex Sharp 70/10 needles are ideal for working with the delicate Liberty Tana Lawn fabric.
- Batting: Necessary for the final quilt assembly, providing warmth and structure.
- Pins or Wonderclips: Clover Extra Fine Patchwork Pins are excellent for securing fabric layers without causing distortion.
Additional Fabric Requirements:
- Backing Fabric: 44 in / 112 cm or 54 in / 136 cm, depending on your preference.
- Binding Fabric: 0.5 yd / 0.5 m for a neat and finished edge.
- Liberty Tana Lawn Strips: Your kit includes a jelly roll with (25) 2.5” strips, pre-arranged in gradient order. It’s important to keep these strips in their original sequence for the best visual effect.
Preparing to Quilt: Insights and Initial Tips
Before you begin, take a moment to familiarize yourself with the materials and the steps involved. Here are a few initial considerations to ensure a smooth quilting process:
- Organization: Lay out your jelly roll strips in the order they arrived. This helps maintain the gradient effect and ensures an even distribution of colors.
- Workspace: Set up a comfortable and well-lit workspace. Ensure you have ample space for cutting, sewing, and pressing your fabric.
- Testing Your Equipment: Before starting, test your sewing machine with a scrap piece of fabric to confirm that the tension and stitch length are appropriate.
- Patience and Precision: Take your time with each step. Accurate cutting, sewing, and pressing will significantly impact the final look of your quilt.
Step-by-Step Instructions
Creating the Pippi Quilt is a delightful process that combines precision with creativity. Follow these detailed steps to complete your quilt top:
- Trim the Selvages
- Lay out your strips on a cutting mat.
- Using a rotary cutter and quilting ruler, trim off the selvages from each strip to ensure a clean edge.
- Sew Together 5 Strips
- Begin with the first strip in your jelly roll.
- Align the strips edge to edge and sew them together with a ¼ inch seam allowance.
- Sew five strips together in one continuous piece. Repeat this process until you have five groups of five strips each.
Tip: Alternate the sewing direction for each strip to prevent any distortion and keep your quilt straight.
- Press the Seams
- After sewing each group of strips, press the seams in one direction. This will make the final assembly easier and neater.
- Trim Each Section
- Trim each sewn section to a uniform width of 52 inches. This ensures that all sections align perfectly during the final assembly.
- Join the Sections
- Carefully sew the five sections together, maintaining the order of the strips to preserve the gradient effect.
- Use a ¼ inch seam allowance and press the seams in the same direction as before.
- Final Press
- Press the entire quilt top, ensuring all seam allowances lie flat and in the same direction.
- Final Trim
- Give your quilt top a final trim to 50.5 inches by 50.5 inches to ensure clean, even edges.
Additional Tips
- Maintaining the Gradient: Keep the strips in the order they arrive in the jelly roll to maintain the intended gradient effect. This creates a smooth transition of colors across your quilt.
- Seam Consistency: Consistent ¼ inch seams are crucial for ensuring that all pieces fit together perfectly. Use a seam guide if necessary.
- Pressing Matters: Proper pressing can make a significant difference in the final appearance of your quilt. Press, don’t iron, to avoid stretching the fabric.
- Use Quality Tools: Investing in good-quality tools like a rotary cutter, sharp needles, and high-quality thread can make the quilting process smoother and more enjoyable.
- Patience is Key: Take your time with each step. Rushing can lead to mistakes, which might be difficult to fix later.
Creating the Pippi Quilt is a rewarding experience that combines the joy of quilting with the beauty of a gradient design. Each step, from cutting the strips to the final press, brings you closer to a finished piece that is both practical and visually stunning. As you admire your completed quilt, take pride in the craftsmanship and creativity that went into every stitch. This quilt isn’t just a project; it’s a testament to your skill and dedication.


