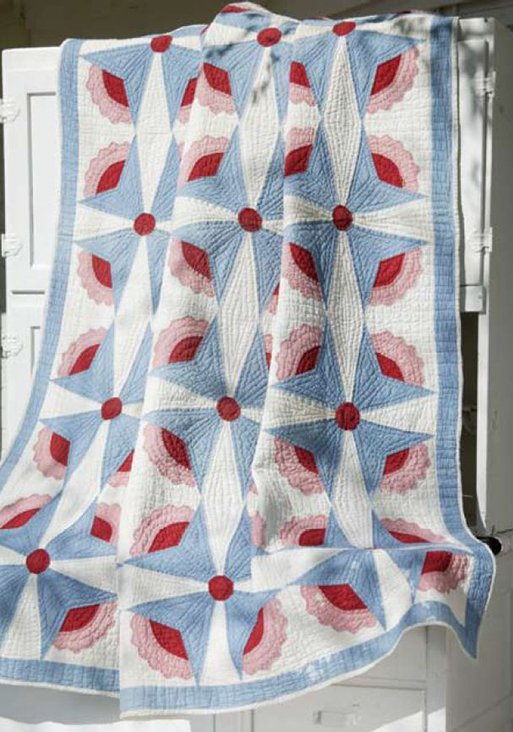
Quilting has always been a thread that weaves through the fabric of my life. I remember the thrill of selecting fabrics and the calming rhythm of stitching them together to create something unique and beautiful. This passion for quilting started when I was a young girl, and it has grown into a lifelong journey of creativity and craftsmanship. One of the quilts that holds a special place in my heart is the “Bull’s Eye” quilt. Its intricate design and the balance between hand appliqué and machine piecing make it a delightful challenge for any quilting enthusiast.
The Bull’s Eye quilt is not just a project; it’s a celebration of quilting’s rich heritage. Each block is a testament to the skill and patience that quilting demands, and the final product is a stunning work of art that captures the eye and the imagination. In this guide, I will share with you the step-by-step process of creating your own Bull’s Eye quilt, providing tips and insights along the way to help you achieve a beautiful and rewarding result. Let’s embark on this quilting journey together and bring the timeless elegance of the Bull’s Eye quilt to life.
Bull’s Eye Quilt: A Journey Through Time and Technique
The Bull’s Eye quilt is more than just a beautiful design; it represents a journey through the rich history of quilting. Each block, meticulously hand-appliquéd and pieced together, tells a story of craftsmanship and dedication. The striking secondary patterns of octagons and elongated stars add a layer of complexity and visual excitement, making this quilt a true masterpiece.
The Heart of the Bull’s Eye: Understanding the Design Elements
One of the unique aspects of the Bull’s Eye quilt is the way it plays with shapes and colors to create a dynamic and engaging design. The combination of hand appliqué and machine assembly allows for a precise and polished finish while still preserving the charm of handmade craftsmanship. In this section, we’ll delve into the specific design elements that make the Bull’s Eye quilt stand out.
Materials
Before we begin, let’s gather all the materials you’ll need for this project:
- White solid (background and binding): 5⅝ yards
- Pink solid (appliqué): 1⅛ yards
- Red solid (appliqué): 1 yard
- Blue solid (blocks and border): 5 yards
- Backing (piece lengthwise): 4⅛ yards
- Batting: 70˝ x 84˝
Cutting Instructions (cut in order listed):
- White solid: 8 strips 2½˝ x width of fabric (binding), 80 each of Templates A and E
- Pink solid: 80 of Template B
- Red solid: 80 of Template C, 20 of Template F
- Blue solid: 2 strips 2˝ x 78˝ (cut on lengthwise grain), 2 strips 2˝ x 66˝ (cut on lengthwise grain), 80 each of Templates D and D reversed (Dr)

Full Pattern: Click Here
Preparing to Begin: Tips for Success
Before diving into the step-by-step instructions, here are a few tips to help you prepare for this project:
- Organization is Key: Keep your templates and fabric pieces organized. Label them according to their template letters to avoid confusion.
- Precision Matters: Accurate cutting and piecing are crucial for this quilt. Take your time to ensure each piece is cut and sewn precisely.
- Practice Appliqué: If you’re new to hand appliqué, practice on some scrap fabric first. This will help you get comfortable with the technique before working on the actual quilt pieces.
- Use Quality Tools: Sharp scissors, a rotary cutter, and a reliable sewing machine will make the process smoother and more enjoyable.
Step-by-Step Instructions
Piecing the Blocks
- Appliqué Curved Edges: Referring to Diagram I, appliqué the curved edge of Template B fabric to Template A fabric, aligning the straight raw edges. Similarly, appliqué Template C fabric to Template B fabric. Make 80 units.
- Stitching the Templates: Stitch Template D and Dr fabrics together, starting and stopping at the match points (Diagram II). Aligning the match points, set in the appliquéd unit. Make 80 corner units.
- Assembling the Blocks: Referring to Diagram III, stitch Template E fabric to each of the 4 corner units, stopping seams at the block center match points. Stitch 2 units together to make 2 half blocks, then stitch the half blocks together. Make 20 complete blocks.
- Adding the Center Appliqué: Appliqué Template F circle to the center of each block to complete the Bull’s Eye Block (Diagram IV). Make 20 blocks in total.
Quilt Top Assembly
- Sewing the Rows: Sew 5 rows of 4 blocks each. Then sew the rows together.
- Adding the Border: Stitch blue 78˝ strips to the sides; trim even with the top and bottom. Stitch the remaining blue strips to the top and bottom; trim even with the sides.
Quilting and Finishing
- Layering and Basting: Layer the quilt top with batting and backing, then baste together.
- Quilting: Hand outline stitch each block patch. Add concentric lines of quilting inside the patches. Fill the white corner patches with crosshatching and extend the quilting lines across the border strips.
- Binding: Bind the quilt with the white solid strips.
Additional Tips
- Consistent Stitching: Maintain a consistent stitch length for a polished finish, especially when hand quilting.
- Relax and Enjoy: Take breaks and enjoy the process. Quilting is a labor of love, and each stitch brings you closer to a beautiful finished product.
- Experiment with Colors: Feel free to experiment with different color combinations to make the quilt truly your own.
Conclusion
Creating the Bull’s Eye quilt is a rewarding experience that combines traditional techniques with modern design elements. As you complete each step, you’ll not only be crafting a beautiful quilt but also connecting with the rich heritage of quilting. Reflect on the journey, appreciate the intricate details, and take pride in the stunning quilt you’ve created. Happy quilting!


