When I first started quilting, I was fascinated by the stories that quilts can tell. Each piece of fabric, each stitch, holds a part of the quilter’s journey. One of my most memorable projects has been the Indigo Quilt. The rich, deep blues reminded me of the night skies of my childhood, gazing up at the stars and dreaming big dreams. This quilt, with its intricate patterns and vibrant hues, has a special place in my heart because it encapsulates those moments of wonder and creativity.
Unveiling the Indigo Quilt: A Dance of Colors and Patterns
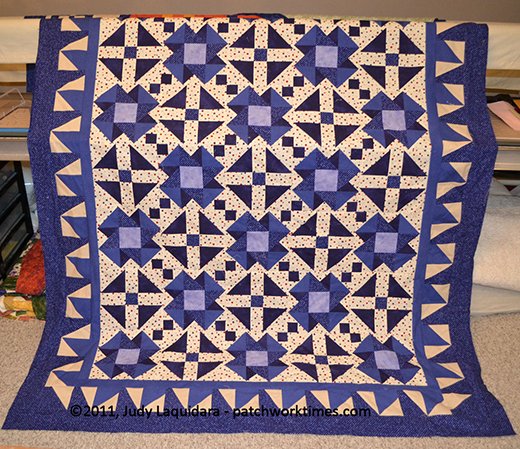
The Indigo Quilt is more than just a collection of fabric pieces; it is a harmonious blend of different shades of blue, creating a dynamic and visually captivating piece. Each block and border tells a story of precision and artistry, making this quilt a true masterpiece. Let’s dive into the details and create this beautiful quilt together, step by step.
The Beauty of Indigo: Fabric Selection and Preparation
The fabric requirements for the Indigo Quilt are carefully chosen to create a harmonious blend of light, medium, and dark indigo shades. Here’s what you’ll need:
- Background (Fabric 1): 2-1/2 yards
- Light indigo used in the center of the “A” Blocks (Fabric 2): 1/4 yard
- Light/Medium indigo (Fabric 3): 5/8 yard
- Dark/Medium indigo (Fabric 4): 1-3/4 yards
- Very Dark Indigo (Fabric 5): 2-5/8 yards
These fabrics will come together to create a visually striking quilt that showcases the depth and richness of indigo tones.

Full Pattern: Click Here
Cutting the Fabrics: Precision is Key
Before you start assembling the blocks, it’s crucial to cut your fabrics accurately. Here are the cutting instructions for each block and the borders:
Blocks A, B, and C
For Blocks A, B, and C, the difference is simply that some of the corners are half square triangles without the smaller square in the corner. Follow these guidelines for cutting:
- Half Square Triangles: Use Fabrics 1 and 3, cut to finish at 3-1/2”.
- Corner Squares: Cut Fabric 5 into 2” squares.
- Surrounding Triangles:
- Cut a Fabric 1 square 2-3/8”, then cut it on the diagonal once to yield 2 triangles.
- For Fabric 5, cut a square 3-7/8”, then cut it on the diagonal once to yield two triangles.
Block D
Block D requires slightly unusual measurements to avoid all points meeting when the blocks are sewn together. Here’s what you need:
- Half Square Triangles: Finish at 3-5/8” (easily achieved using Triangulations™ software).
- Remaining Pieces:
- Fabric 1: Cut 4 rectangles measuring 2-1/4” x 4-1/8”.
- Fabric 3: Cut 1 square measuring 2-1/4”.
Border Measurements
- Border #1 (Fabric 4):
- Sides: 2” x 63-1/2”
- Top & Bottom: 2” x 48-1/2”
- Border #2 (Pieced):
- Sides: 22 blocks
- Top & Bottom: 18 blocks
- Border #3 (Fabric 5):
- Sides: 3-1/2” x 74-1/2”
- Top & Bottom: 3-1/2” x 62-1/2”
The border blocks are 3-1/2” x 4-1/2” unfinished, with the corner squares being 4-1/2” unfinished. A total of 80 pieced blocks, along with the four corner blocks, are needed for the border.
Assembling the Indigo Quilt: Step-by-Step Instructions
Step 1: Making the Blocks
- Block A: Make 8.
- Block B: Make 6.
- Block C: Make 4.
- Block D: Make 17.
For each block type, use the specified fabrics and ensure your half square triangles and corner pieces are cut and sewn accurately. The unique measurements for Block D help to create a seamless pattern without points meeting awkwardly.
Step 2: Assembling the Border
- Piecing the Border Blocks: Use the provided measurements to cut and piece 80 border blocks and 4 corner blocks. These blocks can be paper pieced for precision.
- Attaching the Borders:
- Start with Border #1 using Fabric 4.
- Add the pieced Border #2.
- Finish with Border #3 using Fabric 5.
Step 3: Final Assembly
- Sew all the blocks together to form the quilt top.
- Attach Border #1, followed by Border #2, and finish with Border #3.
- Ensure all seams are pressed and the quilt top is smooth.
Conclusion: Reflecting on Your Indigo Quilt Journey
Creating the Indigo Quilt is more than just a sewing project; it is a journey of artistic expression and personal growth. Each step, from selecting the fabrics to piecing the blocks and adding the final touches, is a part of a larger narrative that you have crafted with your hands and heart.
As you wrap yourself in the warmth of your Indigo Quilt, let it remind you of the night skies that inspired its creation, and the dreams that guided each stitch. Quilting is an art that weaves together stories, memories, and emotions, creating a tangible representation of your journey.
The Indigo Quilt stands as a beautiful testament to your creativity and perseverance. It is not just a quilt, but a piece of your history, a work of art that will be cherished for years to come. Keep quilting, keep dreaming, and keep creating pieces that tell your unique story.


