Hello, fellow quilters! I’m Alice, and today I want to share a delightful project that combines my love for both quilting and baking – the Blueberry Pie Quilt. This particular quilt holds a special place in my heart. Years ago, I discovered the log cabin technique, and it quickly became my favorite because of its simplicity and versatility. I remember the first quilt I made using this method; it was a chaotic blend of colors and fabrics, but it sparked my passion for creating structured yet visually stunning quilts.
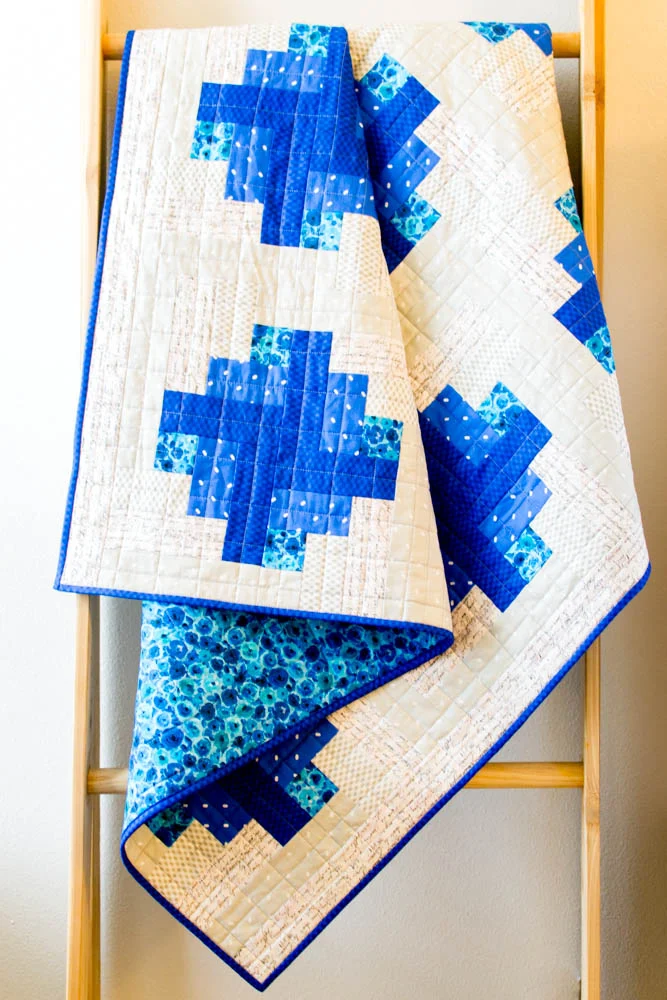
The Blueberry Pie Quilt brings together the classic log cabin design with a fun, modern twist. It’s not just a quilt but a nod to the cozy, homely feel of a freshly baked pie cooling on the kitchen counter. This quilt, with its two-toned blocks, resembles the sweet, patterned top of a pie, making it a charming addition to any home.
The Sweet Slice: A Deeper Look at the Blueberry Pie Quilt
What makes the Blueberry Pie Quilt truly unique is its inspiration drawn from everyday life. When I was experimenting with the log cabin technique, I noticed that the two-toned blocks reminded me of pie slices. By using fabrics from the Sweet Caroline collection, the quilt took on the appearance of a delicious blueberry pie. This playful and creative approach not only makes the quilt visually appealing but also adds a layer of warmth and familiarity. It’s a wonderful project that showcases how everyday inspirations can lead to beautiful creations.
Materials Needed
Before we dive into the project, let’s gather all the necessary materials. Here’s what you’ll need to make your own Blueberry Pie Quilt:
- 1 1/4 yard of fabric 1 (Tac Tac Dot – Taupe)
- 1/4 yard of fabric 2 (Packed Floral – Blue)
- 1/2 yard of fabric 3 (Diamond Check – Taupe)
- 1/2 yard of fabric 4 (Tic Tac Dot – Light Navy)
- 1 yard of fabric 5 (Calligraphy – Taupe)
- 3/4 yard of fabric 6 (Diamond Check – Dark Navy)
- A rectangle of batting at least 58’’ x 70’’
- 3 1/4 yards of backing fabric
- 1/2 yard of binding fabric
Prepping Your Workspace: Tips and Considerations
Before we start cutting and sewing, it’s essential to prepare your workspace for efficiency and comfort. Ensure your cutting mat is clean and your rotary cutter blade is sharp. If you have an AccuQuilt Go, it can speed up the cutting process significantly. Arrange your fabrics in the order they will be used, and keep your sewing machine, iron, and pressing mat within easy reach. Remember, a well-organized workspace can make the quilting process much more enjoyable and productive.

Full Pattern: Click Here
Step-by-Step Instructions
Now, let’s dive into the detailed instructions for creating your Blueberry Pie Quilt. Follow these steps closely, and you’ll have a beautiful quilt in no time!
1. Cutting the Fabric
- Fabric 1: Cut 15 strips, each 2 1/2’’ x WOF (width of fabric).
- Fabric 2: Cut 3 strips, each 2 1/2’’ x WOF.
- Fabric 3: Cut 6 strips, each 2 1/2’’ x WOF.
- Fabric 4: Cut 6 strips, each 2 1/2’’ x WOF.
- Fabric 5: Cut 12 strips, each 2 1/2’’ x WOF (4 are for the borders).
- Fabric 6: Cut 8 strips, each 2 1/2’’ x WOF.
2. Making the Blocks
- Step 1: Sew a Fabric 1 strip to a Fabric 2 strip with a 1/4’’ seam allowance. Press the seam toward the darker fabric. Repeat to make 3 sets.
- Step 2: Sub-cut each strip set into units that are 2 1/2’’ wide by 4 1/2’’ tall.
- Step 3: Without cutting the Fabric 3 strips, sew 6 of the 2 1/2’’ x 4 1/2’’ units to one of the Fabric 3 strips. Placement is crucial – ensure the strips are close together with the long Fabric 3 strip on the bottom and the darker fabric on the cut piece toward you. Repeat to sew all 48 units to the 6 Fabric 3 strips.
- Step 4: Open and press the units away from the strip, so that the seam is toward the darker fabric. Sub-cut each unit apart to make 48 larger units.
- Step 5: Sew 8 of the new units to a Fabric 4 strip, aligning them as in Step 3. Press the seam toward the darker fabric, which is the strip this time. Cut the 48 units apart.
- Step 6: Continue adding pieces to each quilt block unit in the same way, following the pattern: Fabric 1 (final strip), press all seams toward the darker fabric except the last one.
3. Assembling the Quilt Top
- Step 7: Lay out the blocks in the desired arrangement, ensuring the pattern resembles a pie. Sew the blocks into rows, and then sew the rows together.
- Step 8: Measure the height of your quilt top in the center and along each side edge. Use the middle measurement to piece together 2 border strips for the sides of the quilt.
4. Finishing the Quilt
- Step 9: Sandwich your quilt top with the batting and backing. Quilt as desired. For a neat finish, use a walking foot for straight-line quilting in a grid pattern.
- Step 10: Bind the quilt using your preferred method. An all-machine binding method can be quick and efficient, especially for larger quilts.
Additional Tips
- Accurate Cutting: Ensure your strips are cut precisely to maintain the uniformity of the blocks. A rotary cutter and a clear ruler can help achieve clean cuts.
- Pressing: Always press your seams toward the darker fabric to avoid shadowing on the lighter fabric. Pressing after each step keeps the blocks flat and easy to work with.
- Layout Planning: Before sewing the blocks together, lay them out on a flat surface to ensure the design aligns as intended. This step can help you visualize the final quilt and make any necessary adjustments.
- Quilting Design: Choose a quilting design that complements the pie theme. Straight-line quilting is a great choice for this pattern, but feel free to get creative with free-motion quilting if you prefer.
- Binding: If you’re new to binding, practice on a smaller project first. Machine binding can be quicker, but hand-binding gives a traditional finish.
Completing the Blueberry Pie Quilt is a rewarding experience that combines classic quilting techniques with a playful, modern design. As you sew each block and see the pie pattern emerge, you’ll find joy in the process and pride in the finished product. Whether you’re making this quilt for yourself or as a gift, it’s sure to bring warmth and charm to any space.
Remember, quilting is as much about the journey as it is about the finished quilt. Take your time, enjoy the process, and don’t be afraid to add your unique touch. Happy quilting!


