Quilting has always been more than just a craft for me; it’s a journey through memories and creativity. I vividly remember the first quilt I ever made. It was a simple design, but it held so much meaning because it was a gift for my best friend’s baby shower.
The joy and satisfaction I felt from creating something beautiful and heartfelt sparked a lifelong passion. Today, I want to share a special quilt project, A Quilt for Claire, which brings together beautiful fabrics and a straightforward design, perfect for both beginners and seasoned quilters.
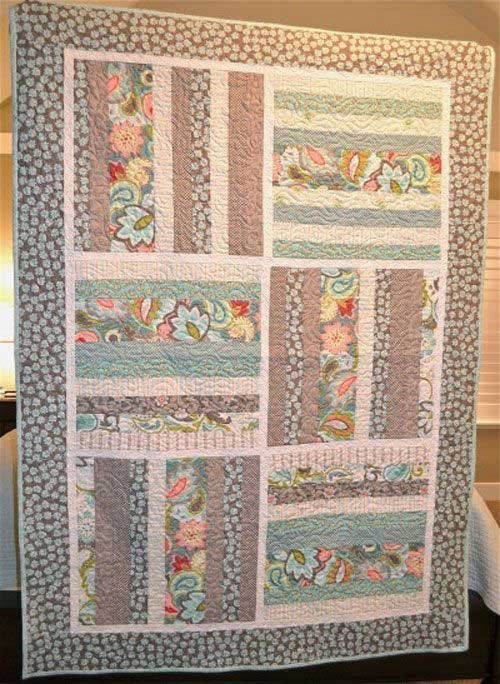
The project we’re diving into is called A Quilt for Claire, and it features the stunning Verona fabric line. This quilt, measuring 52” x 74”, combines a charming mix of coordinating fat quarters with sashing and borders that highlight the intricate patterns of the fabrics. Let’s explore this delightful quilt, A Quilt for Claire, and create something truly special together.
A Quilt for Claire: Inspire Your Quilting Passion
One of the most exciting aspects of quilting is choosing the fabrics. For A Quilt for Claire, we’re using the Verona fabric line, known for its vibrant colors and intricate patterns. The combination of these fabrics creates a visually appealing and cohesive design. Each fabric tells a story, and when combined, they create a beautiful tapestry that is both unique and timeless.
Selecting coordinating fabrics is crucial for the overall look of your quilt. The Verona line offers a delightful array of patterns and colors that complement each other perfectly. The fat quarters, along with the sashing and border fabrics, come together to form A Quilt for Claire that is both harmonious and eye-catching. This thoughtful selection process is what sets this project apart and makes it a joy to create.
Understanding the Layout: The Heart of the Quilt
The layout of A Quilt for Claire is straightforward yet elegant. The design consists of six blocks, each made from a combination of the eight coordinating fat quarters and the 5” x 21” strips. The arrangement of these blocks, along with the sashing and border, creates a quilt that is not only beautiful but also balanced in its design.
The key to A Quilt for Claire’s charm lies in the alternating fabric patterns and directions. This not only adds visual interest but also ensures that the quilt has a dynamic and engaging appearance. The careful placement of the sashing pieces between the blocks and around the edges ties everything together, resulting in A Quilt for Claire that is both structured and free-flowing.

Full Pattern: Click Here
Materials: Gather Your Supplies
Before we dive into the step-by-step instructions, let’s make sure we have all the necessary materials. For A Quilt for Claire, you’ll need the following:
- 8 Coordinating fat quarters: These will form the main blocks of your quilt.
- 1/2 Yard coordinating fabric: This fabric will be cut into strips to complement the fat quarters.
- 1 Yard coordinating fabric for border: This will frame your quilt beautifully.
- 1/2 Yard cream fabric for sashing: Used to separate and highlight the blocks.
- 3-1/2 Yards for backing: Provides a neat and finished back to your quilt (optional but recommended).
- 1 Yard for binding: To finish the edges of your quilt neatly.
Now that we have our materials ready, let’s prepare to bring this beautiful quilt to life.
Preparing to Quilt: Insights and Tips
Before starting any quilting project, it’s essential to prepare your fabrics and tools properly. Here are a few insights and tips to ensure a smooth quilting experience:
- Pre-wash Your Fabrics: Pre-washing your fabrics helps prevent any shrinkage or color bleeding after the quilt is completed. This step is especially crucial if you’re working with bright or dark colors.
- Press Your Fabrics: Ironing your fabrics before cutting ensures precise cuts and helps your pieces fit together better. A well-pressed fabric is much easier to work with.
- Accurate Cutting: Take your time with the cutting process. Using a rotary cutter and a clear ruler will help you achieve straight, accurate cuts, which are crucial for the quilt’s overall look.
- Organize Your Pieces: Keep your cut pieces organized by grouping them according to the step they’ll be used in. This will save you time and make the assembly process much smoother.
Step-by-Step Instructions: Bringing Your Quilt to Life
Step 1: Cutting the Fabrics
- Fat Quarters: Cut the eight coordinating fat quarters into six pieces each, measuring 2.5” x 21”.
- Coordinating Fabric: Cut the half yard of coordinating fabric into six pieces, each measuring 5” x 21”.
- Sashing Fabric: Cut the cream fabric into four strips measuring 1.5” x 41” and nine pieces measuring 1.5” x 21”.
- Border Fabric: Cut the yard of coordinating fabric into seven strips measuring 5” x 41”. Cut one of these pieces in half to get two pieces measuring 5” x 20.5”.
Step 2: Assembling the Blocks
- Lay out the blocks so that three of the six blocks use the same four fat quarters. The remaining three blocks will use the other four fat quarters. Disperse the six 5” x 21” pieces between the six blocks.
- Sew the strips of fabric together as desired, ensuring each block has nine pieces. Press the seams in the same direction for a neat finish.
- Trim each block to measure 20” square.
Step 3: Laying Out the Quilt
- Arrange the blocks so that the fabric patterns and directions alternate, adding visual interest and balance.
- Sew the 1.5” x 21” sashing pieces between the block pairs and on the sides of the block pairs. Trim any excess fabric.
Step 4: Adding Sashing and Borders
- Sew the 1.5” x 41” sashing pieces between the three quilt sections, and along the top and bottom of the quilt. Trim any excess fabric.
- Sew together two border pieces for each side of the quilt. Attach the long side pieces, and trim any excess. Sew the two 5” x 20.5” pieces to the remaining border pieces for the top and bottom of the quilt.
Step 5: Finishing the Quilt
- Quilt as desired, following your preferred quilting pattern or technique.
- Bind the edges of the quilt using the 1 yard of fabric reserved for binding, ensuring a neat and professional finish.
Additional Tips: Perfecting Your Quilt
- Consistent Seams: Ensure your seams are consistent throughout the project to keep your blocks and sashing aligned properly.
- Use Pins or Clips: To keep your pieces in place while sewing, use pins or fabric clips, especially when attaching sashing and borders.
- Quilting Techniques: Explore different quilting techniques, such as straight-line quilting or free-motion quilting, to add texture and dimension to your quilt.
Conclusion: Reflecting on Your Quilting Journey
Completing A Quilt for Claire is not just about creating a beautiful quilt; it’s about the journey and the joy of making something with your own hands. Each step, from selecting the fabrics to sewing the final stitch, is a testament to your creativity and dedication. Take a moment to admire your work, appreciate the effort you’ve put in, and enjoy the satisfaction of completing a project that’s both beautiful and meaningful.


