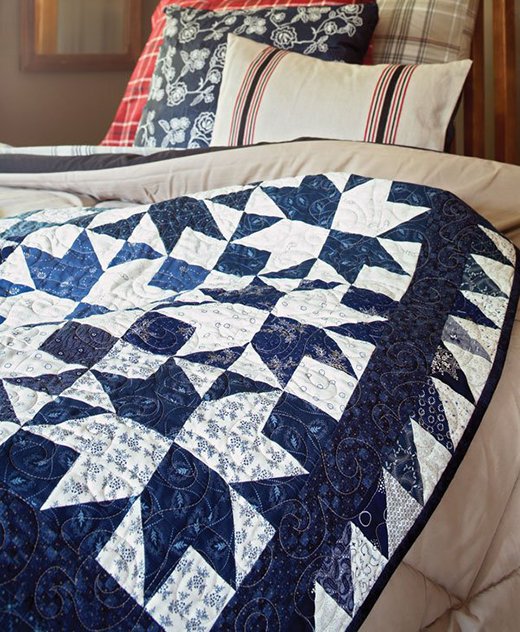
I remember the first time I saw the Cold Snap quilt pattern. It was a chilly winter afternoon, and I was looking for a project that would capture the beauty of the season while keeping me cozy indoors. The classic blue-and-white color scheme immediately reminded me of frosty mornings and icy crystals glittering in the sunlight. Quilting has always been a way for me to bring the beauty of nature into my home, and this project was no exception.
Quilting, to me, is about more than just stitching fabric together. It’s about creating something that evokes emotion and tells a story. The Cold Snap quilt does just that, with its sharp points and crisp lines mimicking the intricate patterns of ice crystals. Join me as we create this stunning quilt, perfect for snuggling up on cold winter days.
Capturing Winter’s Essence: The Beauty of the Cold Snap Quilt
The Cold Snap quilt is more than just a cozy blanket; it’s a piece of art that captures the essence of winter. The sharp points and cool blue tones bring to mind the serene beauty of a snow-covered landscape. This project combines traditional quilting techniques with a modern aesthetic, making it a perfect addition to any home.
The Magic of Precision: Techniques and Design Elements
One of the most striking features of the Cold Snap quilt is its precise points and clean lines. This is achieved through careful cutting and meticulous piecing, particularly using the chain piecing method. This technique not only ensures accuracy but also makes the process more efficient, allowing you to focus on the joy of creating.
Materials
To create the Cold Snap quilt, you’ll need the following materials:
- Assorted White Prints: 2-5⁄8 yards total for blocks and outer border
- Assorted Blue Prints: 2-5⁄8 yards total for blocks and outer border
- Dark Blue Print: 1 yard for inner border and binding
- Backing Fabric: 3-1⁄2 yards
- Batting: 63×71″
- Finished Quilt Dimensions: 56-1⁄2×64-1⁄2″
- Finished Block Dimensions: 8″ square
Preparing to Quilt: Tips and Initial Considerations
Before you start cutting and piecing, it’s important to prepare your materials and workspace. Pre-wash and iron your fabrics to prevent any shrinkage or color bleeding. Make sure you have a clean, well-lit space to work in, with all your tools and supplies within reach. Setting up your sewing machine with a fresh needle and a full bobbin will also help ensure smooth stitching.
When selecting your fabrics, think about the overall look you want to achieve. The contrast between the white and blue prints creates a crisp, icy effect that is central to the Cold Snap quilt’s charm. Don’t be afraid to mix different shades and patterns within the blue and white palette to add depth and interest to your quilt.

Full Pattern: Click Here
Step-by-Step Instructions
Cutting the Fabrics
- From assorted white prints, cut:
- 168 pieces measuring 2-7⁄8″ squares (42 sets of 4 matching squares)
- 168 pieces measuring 2-1⁄2″ squares (42 sets of 4 matching squares)
- 56 pieces measuring 2-7⁄8″ squares for the outer border
- 4 pieces measuring 2-1⁄2″ squares for the outer border
- From assorted blue prints, cut:
- 168 pieces measuring 2-7⁄8″ squares (42 sets of 4 matching squares)
- 168 pieces measuring 2-1⁄2″ squares (42 sets of 4 matching squares)
- 56 pieces measuring 2-7⁄8″ squares for the outer border
- From dark blue print, cut:
- 12 strips measuring 2-1⁄2″ x 42″ for the inner border and binding
Assembling the Blocks
- Pair and Mark Squares:
- Gather one set of white print pieces (four 2-7⁄8″ squares and four 2-1⁄2″ squares) and one set of blue print pieces (four 2-7⁄8″ squares and four 2-1⁄2″ squares).
- Draw a diagonal line on the wrong side of each white print 2-7⁄8″ square using a pencil. To prevent fabric from stretching, place 220-grit sandpaper under the squares while drawing the lines.
- Sew and Cut Triangle Units:
- Layer a marked white print 2-7⁄8″ square on top of each blue print 2-7⁄8″ square. Sew together with two seams, stitching 1⁄4″ on each side of the drawn line (Diagram 1).
- Cut the pairs apart along the drawn line to create two triangle units. Press each unit open, pressing the seam towards the blue triangle to make a triangle-square (Diagram 2). Each triangle-square should measure 2-1⁄2″ square. Repeat to make eight matching triangle-squares.
- Construct Units A and B:
- Sew together two triangle-squares, a blue print 2-1⁄2″ square, and a white print 2-1⁄2″ square in pairs (Diagram 3). Press seams toward the squares. Join pairs to make a Unit A, which should measure 4-1⁄2″ square. Repeat to make two Unit A blocks.
- Repeat the process with the same pieces in a different arrangement to create two Unit B blocks (Diagram 4).
- Assemble the Star Blocks:
- Sew together Unit A and Unit B blocks in pairs, pressing seams towards Unit B. Join these pairs to form a star block (Diagram 5). Each star block should measure 8-1⁄2″ square. Repeat steps 1 through 4 to create a total of 42 star blocks.
- Make Outer Border Triangle-Squares:
- Use the remaining assorted white and blue print 2-7⁄8″ squares to create 112 additional triangle-squares. Set these aside for the outer border.
Assembling the Quilt Center
- Layout and Sew Blocks:
- Lay out the 42 star blocks in seven horizontal rows according to the placement diagram.
- Sew the blocks together within each row, pressing seams in one direction and alternating directions between rows. Join the rows to complete the quilt center, which should measure 48-1⁄2″ x 56-1⁄2″.
Adding the Borders
- Attach Inner Border:
- Cut and piece the dark blue print 2-1⁄2″ x 42″ strips to create:
- Two strips measuring 2-1⁄2″ x 56-1⁄2″ for the inner border
- Two strips measuring 2-1⁄2″ x 52-1⁄2″ for the inner border
- Sew the longer strips to the long edges of the quilt center, and the shorter strips to the remaining edges. Press seams towards the inner border.
- Cut and piece the dark blue print 2-1⁄2″ x 42″ strips to create:
- Assemble and Attach Outer Border:
- Sew together 30 triangle-squares to form a long outer border strip measuring 2-1⁄2″ x 60-1⁄2″. Repeat to create a second long strip.
- Sew together 26 triangle-squares and two white print 2-1⁄2″ squares to create a short outer border strip measuring 2-1⁄2″ x 56-1⁄2″. Repeat to create a second short strip.
- Attach the long outer border strips to the long edges of the quilt center, and the short strips to the remaining edges. Press seams towards the inner border.
Finishing the Quilt
- Layer and Quilt:
- Layer the quilt top, batting, and backing. Baste the layers together.
- Quilt as desired. The featured quilt was stitched with beige thread in an allover curlicue design.
- Bind the Quilt:
- Use the remaining dark blue print 2-1⁄2″ x 42″ strips to bind the quilt, securing the layers and giving it a finished edge.
Additional Tips
- Chain Piecing Efficiency: Utilize chain piecing to speed up the process and ensure accuracy. This method involves continuously sewing pieces together without cutting the thread between them, making it both time-efficient and precise.
- Consistent Seam Allowances: Maintaining a consistent 1⁄4″ seam allowance throughout will ensure your blocks align properly and your quilt lays flat.
- Pressing Techniques: Proper pressing is crucial for a crisp, professional-looking quilt. Press seams in one direction or open, as specified, to reduce bulk and help your blocks align perfectly.
The Cold Snap quilt is a beautiful testament to the elegance of winter, combining traditional techniques with a fresh, modern design. As you piece together each star block and see the icy crystals take shape, you’ll find joy in the process and pride in the finished product. This quilt is sure to become a cherished addition to your home, offering warmth and beauty on the coldest days. Happy quilting!


