When I first stumbled upon the Four-Patch Surprise quilt pattern, I was immediately transported back to a cozy afternoon in my home studio, surrounded by fabric swatches and the soothing hum of my sewing machine. The traditional Four-Patch and Pinwheel blocks reminded me of my early quilting days, where each piece I stitched was a new adventure in creativity. These patterns, so familiar yet always fresh in their combinations, have a special place in my heart and now I get to share them with you in this wonderful project.
Quilting, for me, has always been about blending the old with the new. The Four-Patch Surprise quilt embodies this philosophy perfectly. By taking classic blocks and arranging them in unexpected ways, we create something that feels both timeless and innovative. Let’s embark on this journey together and create a quilt that is as surprising as it is beautiful.
Unveiling the Magic: The Art of Unexpected Combinations
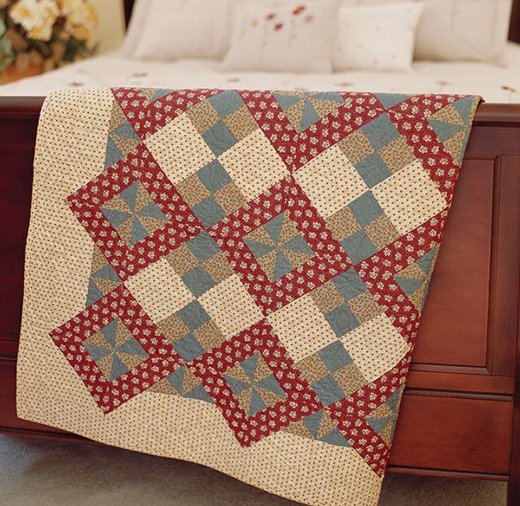
The charm of the Four-Patch Surprise lies in its unique blend of traditional patterns and contemporary layout. This project isn’t just about making a quilt; it’s about discovering the magic that happens when classic blocks come together in surprising ways. We’ll delve into the intricacies of assembling these blocks and explore how slight variations in fabric choices and arrangements can transform a simple quilt into a stunning masterpiece.
Exploring the Pattern: A Deeper Look at Design and Technique
One of the most intriguing aspects of the Four-Patch Surprise quilt is how it transforms traditional patterns into a cohesive and visually striking design. By using a combination of Four-Patch and Pinwheel blocks, this quilt creates a dynamic interplay of shapes and colors. Each step in the process is carefully crafted to bring out the best in your fabrics, making this a delightful project for quilters of all levels.
Materials
To bring this beautiful quilt to life, you’ll need the following materials:
- Blue Print Fabric: 1-1⁄8 yards for blocks and pieced inner border
- Light Blue Print Fabric: 1-1⁄8 yards for blocks and pieced inner border
- Rust Print Fabric: 1-1⁄2 yards for blocks and pieced inner border
- Beige Print Fabric: 3 yards for blocks, borders, and binding
- Backing Fabric: 4 yards
- Quilt Batting: 73×80″
- Finished Quilt Top Dimensions: 61-1⁄4 ×72-5⁄8″
- Finished Block Dimensions: 11-3⁄8″ square
Preparing to Quilt: Tips and Initial Considerations
Before diving into the project, take a moment to prepare your workspace and materials. Ensure your fabrics are pre-washed and ironed to avoid any shrinkage or color bleeding. Organize your tools and set up your sewing machine with a fresh needle and a full bobbin. Having everything ready and within reach will make the quilting process smoother and more enjoyable.
When selecting your fabrics, consider the overall color scheme and how the different prints will interact. The combination of blue, light blue, rust, and beige in this quilt creates a harmonious yet vibrant palette. Feel free to experiment with different shades and patterns to make the quilt truly your own. Remember, the goal is to create a surprising and delightful piece that reflects your personal style.

Full Pattern: Click Here
Step-by-Step Instructions
Cutting the Fabrics
- From the blue print fabric, cut:
- Six 2-1⁄2″ x 42″ strips
- Thirty-nine 4-1⁄8″ squares, cutting each diagonally twice to yield a total of 156 triangles
- From the light blue print fabric, cut:
- Six 2-1⁄2″ x 42″ strips
- Thirty-nine 4-1⁄8″ squares, cutting each diagonally twice to yield a total of 156 triangles
- From the rust print fabric, cut:
- 120 of Pattern A pieces
- From the beige print fabric, cut:
- Eight 3″ x 42″ strips for the outer border
- Eight 2-1⁄2″ x 42″ binding strips
- Two 6-5⁄8″ squares, cutting each in half diagonally for a total of four corner triangles
- Forty 4-1⁄2″ squares
- Eighteen each of patterns B and B reversed
Assembling the Blocks
- Create Strip Sets:
- Sew together one blue print 2-1⁄2″ x 42″ strip and one light blue print 2-1⁄2″ x 42″ strip along their long edges to form a strip set. Press the seam allowances towards the blue print strip. Repeat to create six strip sets. Cut these strip sets into 2-1⁄2″ wide segments to produce 80 segments.
- Construct Four-Patch Units:
- Sew two 2-1⁄2″ wide segments together to create a Four-Patch unit. Press the seam allowances in one direction. Each Four-Patch unit should measure 4-1⁄2″ square, including the seam allowances. Repeat to create 40 Four-Patch units.
- Form Four-Patch Blocks:
- Sew two Four-Patch units and two beige print 4-1⁄2″ squares together in pairs. Press the seam allowances towards the beige print squares. Join the pairs to form a Four-Patch block. Press the seam allowances in one direction. Each Four-Patch block should measure 8-1⁄2″ square, including the seam allowances. Repeat to create 20 Four-Patch blocks.
- Make Triangle Units:
- Sew a blue print triangle to a light blue print triangle along their diagonal edges to form a triangle unit. Press the seam allowances towards the blue print triangle. Repeat to create 156 triangle units, setting aside 36 for the pieced inner border.
- Add Rust Print Corners:
- Sew a rust print Pattern A piece to the bottom edge of a triangle unit to create a block corner piece. Press the seam allowance towards the rust print piece. Make a total of 120 block corner pieces, using 80 for the blocks and 40 for the inner border.
- Complete the Pieced Blocks:
- Attach block corner pieces to the opposite edges of a Four-Patch block. Press the seam allowances towards the block corner pieces. Join additional block corner pieces to the remaining edges of the Four-Patch block. Press as before. Each pieced block should measure 11-7⁄8″ square, including the seam allowances. Repeat to create 20 blocks.
Assembling the Quilt Center
- Layout and Sew Blocks:
- Arrange the 20 blocks in five horizontal rows as shown in the Quilt Assembly Diagram. Sew the blocks together within each row, pressing the seam allowances in one direction and alternating directions between rows. Join the rows to form the quilt center. Press all seam allowances in one direction. The quilt center should measure 46″ x 57-3⁄8″.
Adding the Pieced Inner Border
- Assemble Inner Border Units:
- Sew a triangle unit to the edge of a beige print Pattern B piece to form Unit B. Press the seam allowances towards the beige print piece. Repeat to create 18 B units. Similarly, sew a triangle unit to a beige print Pattern B reversed piece to form Unit B reversed. Press the seam allowances towards the triangle unit. Repeat to create 18 B reversed units.
- Create Border Triangles:
- Join a B unit and a B reversed unit to create a border triangle. Press the seam allowances in one direction. Repeat to create 18 border triangles.
- Assemble and Attach Short Inner Border Strips:
- Sew four border triangles and eight block corner pieces together to form a short inner border strip. Press the seam allowances towards the block corner pieces. Each short inner border strip should measure 5-7⁄8″ x 46″. Make two short inner border strips and sew them to the short edges of the quilt center. Press the seam allowances towards the inner border.
- Assemble and Attach Long Inner Border Strips:
- Sew five border triangles, 12 block corner pieces, and two beige print corner triangles together to form a long inner border strip. Press the seam allowances towards the block corner pieces. Each long inner border strip should measure 5-7⁄8″ x 68-1⁄8″. Make two long inner border strips and sew them to the long edges of the quilt center. Press the seam allowances towards the inner border.
Adding the Outer Border
- Cut and Attach Outer Border Strips:
- From the beige print fabric, cut and piece 3″ x 42″ strips to create:
- Two 3″ x 73-1⁄8″ outer border strips
- Two 3″ x 56-3⁄4″ outer border strips
- Sew the shorter strips to the short edges of the quilt center. Then, join the longer strips to the long edges to complete the quilt top. Press the seam allowances towards the outer border.
- From the beige print fabric, cut and piece 3″ x 42″ strips to create:
Completing the Quilt
- Layer and Quilt:
- Layer the quilt top, batting, and backing. Quilt as desired, ensuring even stitching throughout to maintain the quilt’s shape and durability.
- Bind the Quilt:
- Use the beige print 2-1⁄2″ x 42″ strips to bind the edges of the quilt, securing the layers and giving your quilt a polished finish.
Additional Tips
- Precision Cutting and Piecing: Ensure your cuts are accurate and your seam allowances consistent. This will help the blocks align correctly and the quilt to lie flat.
- Pressing Matters: Pressing seam allowances in the same direction or nesting them will help reduce bulk and make assembly easier.
- Experiment with Colors: Don’t hesitate to try different color combinations to make the quilt uniquely yours.
Creating the Four-Patch Surprise quilt is a journey through tradition and creativity. As you piece together each block and see the quilt take shape, you’ll appreciate the timeless beauty of classic patterns brought to life in new ways. I hope this project brings you as much joy and satisfaction as it has brought me. Happy quilting!


