Quilting has always been a passion of mine, a way to blend creativity with a sense of comfort and home. I remember the first time I stumbled upon the beauty of barn quilts during a road trip through the countryside. The vibrant designs painted on the sides of barns captured my heart and imagination. It was then that I knew I wanted to bring this unique art form into my own quilting projects. Fast forward to today, and I’m excited to share with you my step-by-step guide for creating a Mini Barn Quilt.
Bringing Modern Flair to a Traditional Craft
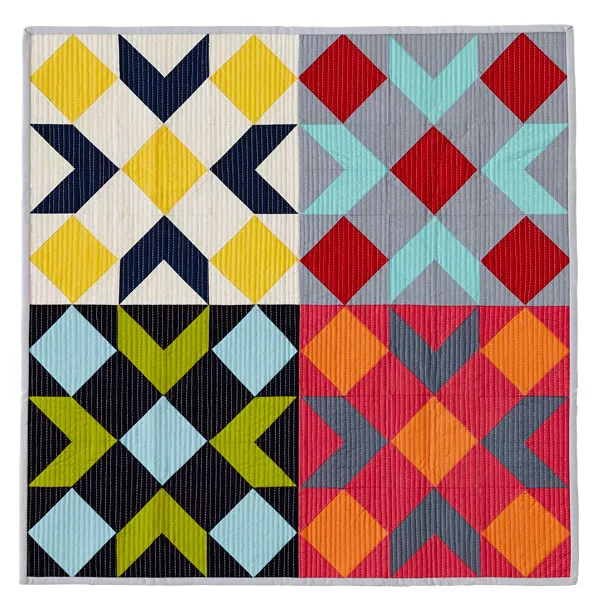
In this project, we’ll be using solid fabrics and vertical line quilting to add a contemporary twist to the classic barn quilt design. Inspired by the timeless charm of barn quilts, this mini version will combine tradition with modern aesthetics, making it a perfect piece for any space.
Detailed Insight and Preparation
Embracing the Beauty of Simplicity
What sets this Mini Barn Quilt apart is its simplicity and elegance. Using solid colors from the Bella Solids collection by Moda Fabrics, this project emphasizes clean lines and bold contrasts. The vertical line quilting further enhances the modern look, while still paying homage to the traditional barn quilt patterns.
Materials
To create this Mini Barn Quilt, you’ll need the following materials:
- 12 fat quarters (18×21″ pieces) of assorted solids: Four each for positions 1, 2, and 3 (blocks).
- 1-1⁄2 yard solid light gray fabric: For binding and backing.
- 34″ square batting: For the quilt interior.
- Finished quilt size: 26″ square.
Cutting the Fabrics
Before we start assembling our blocks, let’s cut our fabrics:
- From each position 1 fat quarter, cut:
- 5 squares (3-1⁄2″).
- From each position 2 fat quarter, cut:
- 10 squares (4″), then cut each in half diagonally to form 20 triangles.
- 16 squares (2-5⁄8″).
- From each position 3 fat quarter, cut:
- 8 rectangles (2-5⁄8×4-3⁄4″).
- From the solid light gray fabric, cut:
- 1 square (34″) for backing.
- 3 strips (2-1⁄2×42″) for binding.
Preparing to Quilt
Before diving into the quilting process, here are some initial tips:
- Seam Allowances: Ensure all measurements include 1⁄4″ seam allowances. Sew with right sides together unless otherwise specified.
- Pressing Seams: Press seams in the directions indicated by arrows on the diagrams. If no direction is specified, press seams toward the darker fabric.

Full Pattern: Click Here
Step-by-Step Instructions and Final Touches
Step-by-Step Instructions
Assemble the Blocks
- Create Square-in-a-Square Blocks:
- Gather five matching position 1 squares, 20 triangles, and 16 squares from position 2, and eight matching position 3 rectangles.
- Sew two triangles to opposite edges of a position 1 square, then add two more triangles to the remaining edges to make a Square-in-a-Square block (see Diagram 1). If necessary, trim the block to 4-3⁄4″ square including seam allowances. Repeat to make five matching blocks.
- Prepare Chevron Units:
- Mark a diagonal line on the wrong side of each position 2 square using a pencil. To prevent fabric from stretching as you draw lines, place 220-grit sandpaper under each square.
- Align a marked square with the top edge of a position 3 rectangle (refer to Diagram 2 for direction). Sew on the drawn line, trim excess fabric leaving a 1⁄4″ seam allowance, and press open the attached triangle.
- Align a second marked square with the bottom edge of the rectangle, stitch, trim, and press to make a left-hand segment. This segment should be 2-5⁄8×4-3⁄4″ including seam allowances. Repeat steps to make four left-hand segments total.
- Following Diagram 3, repeat the process to make four right-hand segments.
- Construct Chevron Units:
- Align long edges and nest seams, sew together a left-hand segment and a right-hand segment to make a chevron unit (refer to Diagram 4). Press the seam open. The chevron unit should be 4-3⁄4″ square including seam allowances. Repeat to make four chevron units total.
- Form the Final Block:
- Referring to Diagram 5, sew together Square-in-a-Square blocks and chevron units in three rows, noting the orientation of the chevron units. Press seams toward the chevron units. Join rows to make a block. The block should be 13-1⁄4″ square including seam allowances. Repeat the steps to make four blocks total.
Assemble the Quilt Top
- Arrange and Sew:
- Lay out the four blocks in two rows as shown in the Quilt Assembly Diagram. Sew together the pieces in each row and press seams in opposite directions.
- Join the rows to make the quilt top. Press the seam in one direction. The quilt top should be 26″ square including seam allowances.
Finish the Quilt
- Layer and Baste:
- Layer the quilt top, batting, and backing. Baste them together to prepare for quilting.
- Quilt:
- Quilt as desired. For this project, I recommend straight vertical lines 1⁄2″ apart, as done by designer Megan Pitz.
- Bind:
- Use the solid light gray binding strips to bind the quilt, ensuring neat and secure edges.
Additional Tips
- Precision Cutting: Accurate cutting of fabric pieces is crucial for achieving clean lines and well-fitted blocks.
- Seam Nesting: Nesting seams helps to reduce bulk and achieve flatter, more precise quilt blocks.
- Pressing Matters: Taking the time to press seams properly as you go can make a significant difference in the overall appearance and ease of assembly.
Creating this Mini Barn Quilt is not just about sewing pieces of fabric together; it’s about connecting with a rich tradition while embracing modern design. As you step back and admire your finished quilt, take a moment to appreciate the journey—from cutting and piecing to quilting and binding. This project is a testament to the enduring charm of barn quilts and a celebration of your creativity and skill.


