As a mother and a quilter, one of my greatest joys is seeing my daughter’s enthusiasm for the things I love. Just like me, she has developed a fascination with bags—each one a canvas for creativity and personal expression. This hand-appliqued petal bag project combines my passion for sewing with her love for carrying her treasures, making it the perfect bonding activity and a useful addition to her collection.
Embracing the Petal Design: Adding a Floral Touch to Your Bag
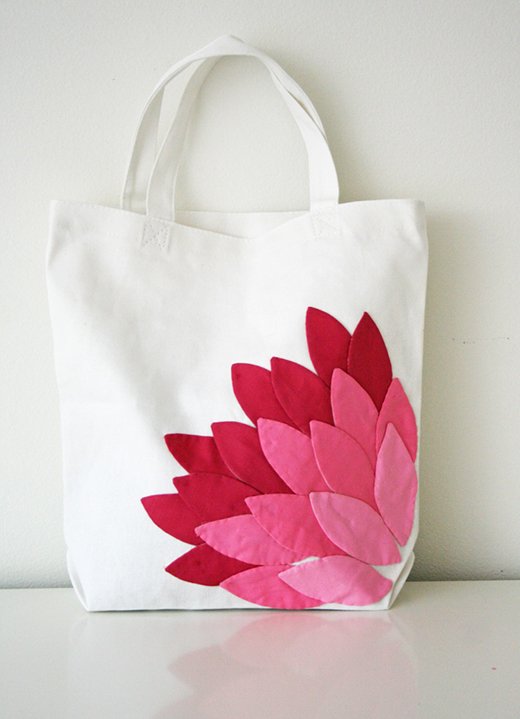
This project is all about adding a burst of color and texture to a simple canvas tote bag. The hand-appliqued petal design transforms a plain bag into a stylish accessory, perfect for carrying books, toys, or anything else your child might need. The layered petals in shades of pink create a stunning, floral-inspired look that is both charming and practical.
Materials: What You Need to Get Started
To create your own hand-appliqued petal bag, you’ll need the following materials:
- Lightweight iron-on fusible interfacing
- Canvas tote bags (13.5″ x 13.5″); usually come in packs of three
- Thread for applique in shades matching your fabric
- Fabric fusion glue
- Three shades of solid pink fabric (light, medium, and dark)
- Petal template (right-click the image and save to your computer, print full page)
- Basic sewing supplies (sewing machine, scissors, rotary cutter, cutting mat, quilter’s ruler, pins, iron, and ironing board)
Preparing Your Petals: Tips for a Smooth Start
Before diving into the applique process, here are a few tips:
- Use Scraps Wisely: This project is great for using up fabric scraps. You’ll need less than 1/8 yard of each color, so fat quarters or leftover pieces work well.
- Precision Cutting: Ensure your petals are accurately cut and neatly turned for the best results.
- Testing Layouts: Lay out your petals on the bag before gluing to finalize your design and avoid last-minute adjustments.

Full Pattern: Click Here
Step-by-Step Instructions: Crafting Your Petal Bag
Making the Petals
- Prepare the Template: Right-click on the petal template image, save it, and print it at full size. Cut out the template.
- Cut the Fabric:
- Trace the petal shape onto the fusible side of the interfacing.
- Cut out enough petals for each color: 3-5 light pink, 6-7 medium pink, and 9-10 dark pink.
- Fuse the Interfacing:
- Place the interfacing, fusible side down, on top of the fabric.
- Sew along the traced lines, then cut out the petals with a 1/8” seam allowance.
- Turn and Press:
- Cut a small slit in the interfacing and turn each petal inside out.
- Use a pin to help turn out the points and press the petals flat with an iron.
Assembling the Bag
- Arrange the Petals:
- Start with the lightest petals in the bottom right corner of the bag.
- Layer the medium and dark petals, slightly overlapping them for a full, fanned-out look.
- Glue the Petals:
- Apply a thin layer of fabric fusion glue to the back of each petal.
- Press the petals onto the bag, working from the outer edge inward to maintain your layout.
- Applique the Petals:
- Once the glue is dry, hand applique the petals to secure them.
- Use invisible stitches, starting from the outermost petals and working your way in.
Additional Tips: Perfecting Your Petal Bag
- Glue Carefully: Use just enough glue to hold the petals in place without making the fabric stiff.
- Applique Gently: Your stitches don’t need to go through all the layers; just enough to hold the petals securely.
- Customization: Feel free to experiment with different colors and petal arrangements to make the bag uniquely yours.
Adding Personal Touches: Making the Bag Truly Special
One of the joys of creating this hand-appliqued petal bag is the opportunity to infuse your own personality into the design. Here are a few ideas to add personal touches and make your bag truly unique:
- Color Variations: While the original design uses shades of pink, you can choose any color palette that speaks to you. Consider using blues for a serene look, greens for a nature-inspired theme, or even a rainbow of colors for a vibrant and cheerful bag.
- Petal Shapes: Don’t feel limited to the petal template provided. You can experiment with different shapes such as leaves, hearts, or geometric patterns. Mixing and matching different shapes can create an eclectic and interesting design.
- Fabric Choices: Using different types of fabric can add texture and depth to your bag. Consider using patterned fabric, batiks, or even repurposing old clothes for a sustainable and sentimental touch.
- Embroidery and Embellishments: Enhance your design with embroidery. You can stitch veins on the petals, add French knots for texture, or embroider your initials for a personal touch. Beads, sequins, and buttons can also add a bit of sparkle and interest.
- Bag Size and Style: If you’re feeling adventurous, you can create bags of different sizes or styles. Smaller bags can be cute accessories, while larger ones can be practical for grocery shopping or beach trips. You can also add pockets or zippers for added functionality.
- Seasonal Themes: Customize the bag to reflect different seasons or holidays. Use warm tones and leaf shapes for an autumn theme, pastels and flowers for spring, or festive colors and motifs for Christmas.
Conclusion: A Bag Full of Love and Creativity
Creating the hand-appliqued petal bag is a delightful project that combines practicality with artistic expression. Whether it becomes your child’s favorite tote for toys and books or a stylish accessory for you, this bag is a testament to the joy of handmade creations. Embrace the process, enjoy the bonding time, and cherish the beautiful results of your efforts.


