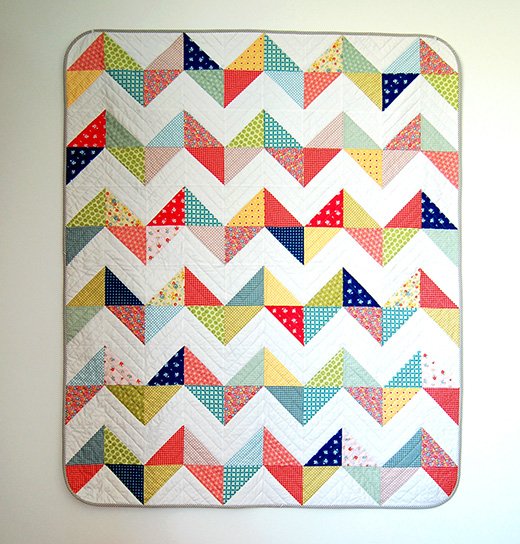
Quilting has always been a form of artistic expression for me, allowing me to combine different fabrics and patterns into a cohesive piece of art. One of the most delightful projects I’ve ever encountered is the Sunny Chevron Quilt, designed by The Piper’s Girls. This quilt, with its bright and cheery colors, reminds me of sunny days and happy moments, making it a perfect addition to any home.
The Sunny Chevron Quilt is an ideal project for both beginner and experienced quilters. Its straightforward construction, using half-square triangles, creates a striking chevron pattern that is both modern and timeless. Today, I’ll guide you through the steps to create this beautiful quilt, whether you choose to make a small throw or a queen-sized bedspread. Let’s embark on this quilting adventure together!
The Joy of Half-Square Triangles
One of the defining features of the Sunny Chevron Quilt is its use of half-square triangles (HSTs). This simple yet versatile block allows for a variety of designs and patterns, making it a favorite among quilters. The method used in this quilt is particularly beginner-friendly, ensuring that your HSTs are accurate and easy to assemble. The result is a vibrant chevron pattern that adds a dynamic flair to your quilt.
Materials and Preparation
Materials Needed
Throw Size Quilt (47” x 57”):
- 15 fabrics in cheery coordinating colors, ¼ yard each or a Fat Eighth
- 1 ¾ yards of off-white fabric (or any desired background color)
- 3 ½ yards of backing fabric (you will need to piece the back)
- A piece of batting a few inches larger than the finished quilt size
- ¾ yard cut into 2 ½” bias strips for the bias binding (striped fabric recommended)
Queen Size Quilt (86” x 95”):
- 15 fabrics in cheery coordinating colors, ½ yard each
- 4 ½ yards of off-white fabric (or any desired background color)
- 5 ½ yards of backing fabric (you will need to piece the back)
- 1 ¼ yards cut into 2 ½” bias strips for the binding
- A piece of batting a few inches larger than the finished quilt size
Cutting the Fabric
For the Throw Size Quilt:
- From your assorted color fabrics, cut 30, 8” squares (2 squares from each fabric).
- From the white background fabric, cut 30, 8” squares.
For the Queen Size Quilt:
- From your assorted color fabrics, cut 90, 8” squares (6 squares from each fabric).
- From the white background fabric, cut 90, 8” squares.
Preparing for the Project: Key Considerations
Before you begin cutting, ensure all fabrics are pressed to eliminate any wrinkles, ensuring precise cuts. Lay out all your materials and tools in an organized workspace. This preparation will make the quilting process smoother and more enjoyable. Also, consider the layout and color placement of your fabrics to achieve the most visually appealing design.

Full Pattern: Click Here
Step-by-Step Instructions
Step 1: Making the Half-Square Triangles (HSTs)
- Pairing the Squares: Form pairs of one white and one colored 8” square, right sides together, and pin. You will need 30 pairs for the throw size and 90 pairs for the queen size.
- Stitching the Squares: Using a ¼ inch seam allowance, stitch around all four sides of each pair. It is efficient to stitch in an assembly line fashion, continuously feeding the pairs into the machine.
- Cutting the Squares: Once stitched, cut each square in half diagonally in both directions using a ruler and rotary cutter. This will yield four HST blocks from each pair.
- Pressing the HSTs: Press the HST blocks open. They should measure approximately 5” square.
Step 2: Constructing the Chevron Pairs
- Forming Pairs: Stitch the HST blocks into pairs. You will need 60 pairs for the throw size and 180 pairs for the queen size. Create two types of pairs: top chevron pairs and bottom chevron pairs.
- Pressing Seams: For the top chevron pairs, press seams to the right. For the bottom chevron pairs, press seams to the left. This will ensure perfect alignment when sewing the rows together.
Step 3: Assembling the Rows
- Laying Out the Pairs: Lay out your pairs on the ground or a design board to decide on the best placement. Each row will consist of 5 pairs for the throw size and 9 pairs for the queen size. You will have 12 rows (6 top and 6 bottom) for the throw size and 20 rows (10 top and 10 bottom) for the queen size.
- Stitching the Rows: Sew the pairs together to form the rows, ensuring that the seams align perfectly.
Step 4: Completing the Quilt Top
- Sewing the Rows Together: Stitch all the rows together to complete the quilt top. Ensure that the seams butt together perfectly for a smooth finish.
- Adding Optional Curved Corners: You can choose to cut a curve into the corners of the quilt or keep it square.
- Basting, Quilting, and Binding: Baste the quilt top to the backing and batting. Quilt as desired, following the chevron pattern for a cohesive look. Finally, bind the edges with your bias strips to complete the quilt.
Additional Tips
- Background Fabric Choices: While off-white is a classic choice, experimenting with black or gray can yield stunning results.
- Bias Binding: Using striped fabric for the binding on the bias adds a playful touch to the quilt’s edge.
- Pressing Seams: Consistent pressing is key to achieving a smooth, professional finish.
The Sunny Chevron Quilt is a delightful project that brings a splash of color and joy to any space. Its simple construction and cheerful design make it perfect for quilters of all skill levels. As you complete this quilt, take pride in your craftsmanship and the vibrant addition you’ve created for your home. Happy quilting!


