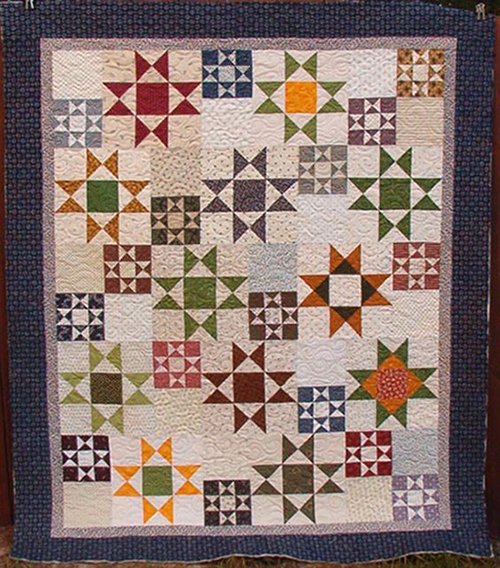
Quilting has always been a passion of mine, a creative outlet that allows me to connect with others and share a piece of my heart. When I moved to South Carolina, I received a set of 12″ Ohio Star blocks from friends on an online quilting email list. These blocks were a mix of colors and patterns, each one unique and special. As I approach my graduation from massage therapy school, I wanted to create something memorable for my classmates, just as I had done for previous graduating classes. This time, it was even more meaningful because it was for my own class.
I decided to use the Ohio Star blocks to create a lap quilt, perfect for a graduation gift. With a variety of colors and designs, this quilt would not only be beautiful but also a symbol of our diverse and vibrant class. The process of making this quilt has been a journey of creativity, reflection, and joy.
The Sparkling Variations of the Ohio Star Quilt
One of the most fascinating aspects of the Ohio Star quilt is its versatility. Each block can be made with different fabrics, creating a patchwork of colors and patterns that bring the quilt to life. This variety adds a spark to the quilt, making each one unique and full of character. In this project, I’ll explore the different variations and techniques used to create the Ohio Star blocks, adding my own personal touch to this timeless design.
Embracing the Charm of Quarter-Square Triangles
A key element in the Ohio Star quilt is the use of quarter-square triangles. These triangles form the star points, giving the quilt its distinctive look. Understanding how to create these triangles is essential for achieving the perfect star. In this section, I’ll delve into the technique of making quarter-square triangles, sharing tips and tricks to ensure precision and beauty in each block.
Materials
To create the Random Ohio Stars quilt, you will need the following materials:
- 12″ Ohio Star Blocks: 12 blocks, received from friends.
- 6″ Ohio Star Blocks: 16 blocks.
- 6″ Plain Shirting Blocks: 16 blocks.
- Fabrics for Star Points and Background: Light and dark fabrics for contrast.
- Borders: 2″ medium blue strips and 5″ indigo strips.
- Thread: Coordinating colors for piecing and quilting.
- Batting: For the quilt sandwich.
- Backing Fabric: Large enough to cover the quilt.
- Quilting Tools: Sewing machine, rotary cutter, ruler, and cutting mat.
- Companion Angle Ruler: Optional, for cutting quarter-square triangles from strips.
Preparing to Quilt: Tips and Insights
Before diving into the quilting process, it’s important to prepare and plan your project. Here are some tips to get started:
- Lay Out Your Blocks: Arrange the blocks on the floor or a design wall to visualize the quilt’s layout. Play with the placement until you find a pleasing arrangement.
- Color Balance: Pay attention to the color balance. Distribute colors evenly to avoid clusters of the same color.
- Precision Cutting: Ensure all pieces are accurately cut, especially the quarter-square triangles. This will make piecing the blocks easier and more precise.
- Pressing Matters: Press your seams carefully, always pressing towards the darker fabric to avoid shadows on the light fabric.
- Chain Piecing: This technique saves time and keeps pieces organized. Sew multiple pieces in a continuous chain without cutting the thread between them.
- Test Blocks: Make a test block to check the measurements and seam allowances before proceeding with the rest of the blocks.
Step-by-Step Instructions: Crafting Your Ohio Stars Quilt
Creating the Random Ohio Stars quilt involves a series of detailed steps to ensure each block comes together perfectly. Here is a comprehensive guide to help you through the process.
Step 1: Cutting Your Pieces
12″ Ohio Star Blocks:
- Light Fabric: Cut (4) 4 1/2″ squares and (2) 5 1/4″ squares. Cut the 5 1/4″ squares diagonally twice to make quarter-square triangles.
- Dark Fabric: Cut (2) 5 1/4″ squares. Cut these squares diagonally twice to make quarter-square triangles.
- Center Square: Cut (1) 4 1/2″ square.
6″ Ohio Star Blocks:
- Light Fabric (Star Points): Cut (2) 3 1/4″ squares. Cut these squares diagonally twice to make quarter-square triangles. Also cut (1) 2 1/2″ square for the center.
- Dark Fabric (Background): Cut (2) 3 1/4″ squares. Cut these squares diagonally twice to make quarter-square triangles. Also cut (4) 2 1/2″ squares for the corners.
Plain Alternate Squares:
- Cut (16) 6 1/2″ squares from shirting or light prints.

Full Pattern: Click Here
Step 2: Piecing the 12″ Ohio Star Blocks
- Make Quarter-Square Triangles:
- Pair light and dark quarter-square triangles with right sides together.
- Sew along the short side of each pair to form half-hourglass units.
- Press the seams towards the dark fabric and trim the excess “dog ears.”
- Form Hourglass Units:
- Pair the half-hourglass units with right sides together, aligning the seams.
- Sew along the long side to form complete hourglass units.
- Press the seams and trim the “dog ears.”
- Assemble the Block:
- Lay out the hourglass units, light squares, and the center square in a 9-patch layout.
- Sew the pieces together in rows, pressing the seams in alternating directions.
- Join the rows to complete the block, ensuring all seams align.
Repeat these steps to create 12 blocks in total.
Step 3: Piecing the 6″ Ohio Star Blocks
- Make Quarter-Square Triangles:
- Pair light and dark quarter-square triangles with right sides together.
- Sew along the short side of each pair to form half-hourglass units.
- Press the seams towards the dark fabric and trim the excess “dog ears.”
- Form Hourglass Units:
- Pair the half-hourglass units with right sides together, aligning the seams.
- Sew along the long side to form complete hourglass units.
- Press the seams and trim the “dog ears.”
- Assemble the Block:
- Lay out the hourglass units, light squares, and the center square in a 9-patch layout.
- Sew the pieces together in rows, pressing the seams in alternating directions.
- Join the rows to complete the block, ensuring all seams align.
Repeat these steps to create 16 blocks in total.
Step 4: Assembling the Quilt Top
- Layout:
- Lay out the 12″ and 6″ blocks on the floor or a design wall, inserting the plain shirting blocks between the 6″ blocks.
- Arrange the blocks to achieve a balanced and pleasing layout.
- Sew Rows:
- Sew the blocks together in rows, pressing the seams in alternating directions for easy assembly.
- Join Rows:
- Join the rows together to complete the quilt top, ensuring all seams align.
Step 5: Adding Borders
- Inner Border:
- Cut and sew 2″ strips of medium blue fabric to the quilt top, mitering the corners if desired.
- Press the seams towards the border.
- Outer Border:
- Cut and sew 5″ strips of indigo fabric to the quilt top, mitering the corners if desired.
- Press the seams towards the border.
Step 6: Quilting and Finishing
- Create the Quilt Sandwich:
- Layer the backing fabric, batting, and quilt top, ensuring all layers are smooth and wrinkle-free.
- Baste the layers together using your preferred method (pins, spray adhesive, or hand basting).
- Quilting:
- Quilt as desired. An edge-to-edge design like “Waterworld” by Willowleaf Studio Designs works well for this quilt.
- Start from the center and work your way out to avoid puckers and tucks.
- Binding:
- Trim the excess batting and backing.
- Cut binding strips, join them into a continuous length, and sew them to the quilt edges.
- Fold the binding over to the back and hand-stitch it in place for a clean finish.
Additional Tips
- Experiment with Colors: Don’t be afraid to try different fabric combinations for the star points and backgrounds. This adds variety and interest to your quilt.
- Use Tools: Consider using a companion angle ruler for cutting quarter-square triangles from strips. This can save time and improve accuracy.
- Stay Organized: Keep your pieces and blocks organized as you sew. Labeling them can help keep track of your progress and ensure nothing gets lost.
- Enjoy the Process: Quilting is as much about the journey as it is about the finished product. Take your time, enjoy each step, and don’t stress about perfection.
Creating the Random Ohio Stars quilt has been a fulfilling experience, blending traditional design with personal touches. This quilt is more than just a project; it’s a celebration of friendship, creativity, and the joy of quilting. As you complete your own Ohio Stars quilt, take a moment to reflect on the memories and emotions stitched into each block. The finished quilt is not just a beautiful piece but a testament to the love and care you put into your craft.


