Ever since I discovered quilting, it has become a deep passion of mine, a way to express creativity and find peace in the rhythm of the stitches. One of the quilts that holds a special place in my heart is the “Clearly Complementary” quilt. This project not only showcases a beautiful blend of colors and patterns but also represents the harmony that quilting brings into our lives. The meticulous process of cutting, piecing, and sewing each block together mirrors the way we piece together memories and experiences in our own lives.
Color Harmony: Exploring the “Clearly Complementary” Quilt
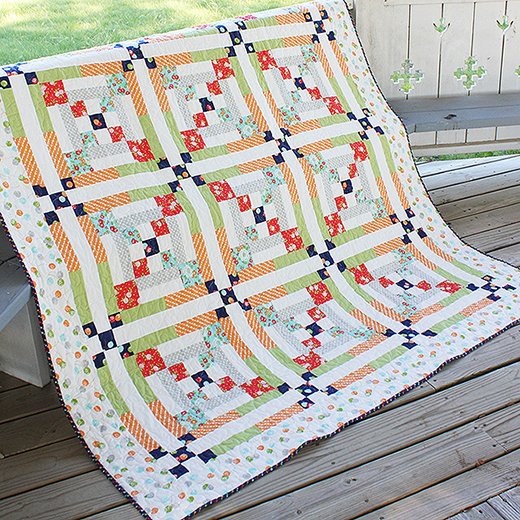
The “Clearly Complementary” quilt is a perfect example of how contrasting colors can come together to create a harmonious and visually stunning piece. This quilt uses a combination of bold florals, playful dots, and classic checks to create a vibrant yet balanced design. Each fabric chosen for this quilt complements the others, resulting in a cohesive and eye-catching pattern. In this section, I’ll guide you through the steps to create your own “Clearly Complementary” quilt, from selecting fabrics to finishing touches.
Perfect Palette: Selecting Your Fabrics
Choosing the right fabrics is crucial for the success of your quilt. The “Clearly Complementary” quilt uses a variety of prints and colors to create its unique look. Here’s what you’ll need:
Materials:
- 2 yards of white dot fabric
- 5/8 yard of navy floral fabric
- 5/8 yard of aqua floral fabric
- 5/8 yard of red floral fabric
- 5/8 yard of gray check fabric
- 7/8 yard of orange print fabric
- 7/8 yard of green dot fabric
- 1 3/8 yards of white floral fabric
- 7/8 yard of navy print fabric
- 5 1/4 yards of backing fabric
Getting Ready: Preparing Your Workspace and Fabrics
Before you begin, it’s essential to prepare your fabrics and workspace. Here are some initial steps to ensure a smooth quilting process:
- Wash and Iron Fabrics: Pre-wash all your fabrics to prevent any shrinkage or color bleeding later on. After washing, iron the fabrics to remove any wrinkles, making cutting more accurate.
- Organize Your Tools: Ensure you have all the necessary tools at hand, including a rotary cutter, cutting mat, rulers, sewing machine, and pins.
- Create a Cutting Plan: Read through the cutting directions carefully and make a plan. Group the fabrics and note the pieces you need to cut from each one.
Full Pattern: Click Here
Step-by-Step Instructions
Cutting Directions
From each fabric, you’ll need to cut specific pieces:
- White Dot Fabric:
- 4 strips, 2 1/2” x Width of Fabric (WOF)
- 31 rectangles, 2 1/2” x 15 1/2”
- 8 strips, 2” x WOF
- 18 rectangles, 2” x 2 1/2”
- Navy Floral Fabric:
- 1 strip, 2 1/2” x WOF
- 20 squares, 2 1/2”
- 80 squares, 2”
- Aqua Floral Fabric:
- 2 strips, 2 1/2” x WOF
- 24 squares, 3 1/2”
- Red Floral Fabric:
- 2 strips, 2 1/2” x WOF
- 24 squares, 3 1/2”
- Gray Check Fabric:
- 8 strips, 2” x WOF
- Orange Print Fabric:
- 4 strips, 6 1/2” x WOF
- Green Dot Fabric:
- 4 strips, 6 1/2” x WOF
- White Floral Fabric:
- 8 strips, 5 1/2” x WOF
- Navy Print Fabric:
- 9 strips, 2 1/2” x WOF (for binding)
Assembling the Quilt Blocks
- Patchwork Blocks:
- Assemble one 2 1/2” aqua floral strip, one 2 1/2” white dot strip, and one 2 1/2” red floral strip. Each unit should measure 6 1/2” x 42”. Repeat this step to make two units.
- Subcut the strips into 2 1/2” x 6 1/2” rectangles. Repeat this step twenty-three more times to make twenty-four rectangles.
- Repeat similar steps with the other fabric combinations to create all necessary patchwork blocks.
- Nine-Patch Units:
- Assemble two 2 1/2” x 6 1/2” aqua/white/red rectangles with one 2 1/2” x 6 1/2” white/navy rectangle to form a nine-patch unit measuring 6 1/2” x 6 1/2”. Repeat this step eleven more times to make twelve units.
Additional Tips for Success
- Seam Allowances: Always use a 1/4” seam allowance unless otherwise noted. Consistent seam allowances are key to ensuring your blocks fit together perfectly.
- Pressing Seams: Press seams as directed in the pattern. Properly pressed seams help your quilt top lie flat and ensure accurate piecing.
Quilting Techniques
Choosing Your Quilting Design
Selecting the right quilting design can enhance the overall look of your quilt. Here are a few popular options:
- Straight Line Quilting: This is a simple and modern option where you quilt straight lines across your quilt. You can space them evenly or vary the distance for a different effect.
- Free-Motion Quilting: For a more intricate design, try free-motion quilting. This allows you to create swirls, loops, and other patterns without the constraints of straight lines.
- Stitch in the Ditch: This method involves quilting along the seams of your blocks, which can emphasize the pieced design of your quilt.
Preparing to Quilt
Before you start quilting, ensure your layers are properly basted together:
- Layering: Lay out your backing fabric on a flat surface, then place the batting on top, followed by your quilt top. Smooth out any wrinkles.
- Basting: Use safety pins, spray adhesive, or hand basting stitches to keep the layers from shifting as you quilt. Start from the center and work your way outwards to ensure even distribution.
Adding a Personal Touch
Customizing Your Quilt
Personalizing your quilt can make it truly unique. Here are some ideas:
- Embroidery: Add embroidered details such as initials, dates, or small motifs that hold special meaning.
- Appliqué: Incorporate appliqué shapes into your quilt design to add dimension and interest.
- Fabric Choices: While the pattern suggests specific fabrics, feel free to choose prints and colors that reflect your personal style or the recipient’s tastes.
Labeling Your Quilt
Adding a label to your quilt is a thoughtful finishing touch. It documents the quilt’s history and makes it a cherished keepsake. Here’s how you can make a label:
- Create the Label: Use a piece of fabric, write your message with a fabric pen, or embroider it.
- Information to Include: Consider adding your name, the date, the occasion, and any special notes.
- Attach the Label: Sew the label onto the back of the quilt, preferably in a corner.
Creating the “Clearly Complementary” quilt is a rewarding experience that not only results in a beautiful finished product but also allows you to hone your quilting skills. As you work through each step, take time to appreciate the process and the joy of creating something with your own hands. This quilt is more than just a collection of fabrics; it’s a testament to your creativity and dedication.


