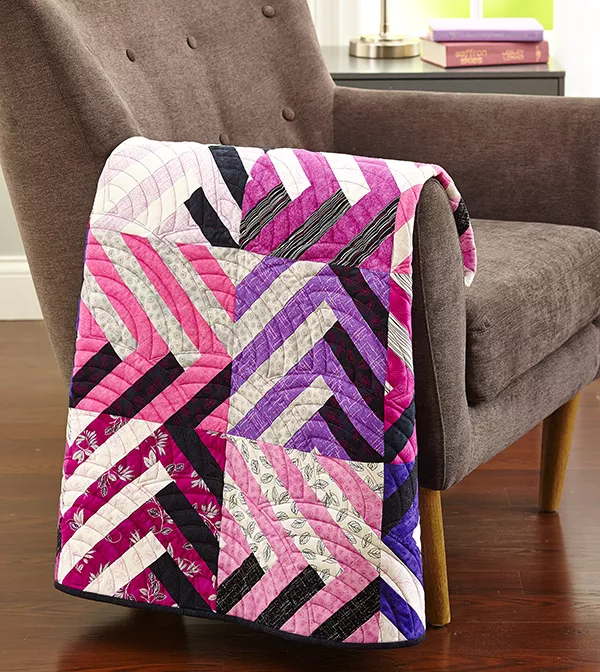
Quilting has always been a passion of mine, offering a unique blend of creativity, precision, and comfort. I remember the first time I stumbled upon a quilt pattern that truly captured my imagination. It was a vibrant, intricate design that stood out in a sea of more traditional patterns. This quilt, named “Purple Play,” reminded me of those early days of discovery. Its bold use of colors and modern aesthetic instantly transported me back to the excitement I felt as a novice quilter, eager to experiment and explore new techniques.
Creating “Purple Play” allowed me to reconnect with that sense of adventure in quilting. The project pushed me to step outside my comfort zone, combining bright purples and pinks with stark black and white neutrals to create a visually striking wall hanging. This quilt is not just a project but a reflection of my journey in quilting, from those early days of trial and error to the confident, creative quilter I am today.
The Bold Elegance of “Purple Play”
“Purple Play” is inspired by the “Pattern Play” design from Pat Bravo of Art Gallery Fabrics. This quilt embraces a narrow color palette to create a bold, modern statement piece. The use of only four colors—two brights (purple and pink) and two neutrals (black and white)—ensures a cohesive yet dynamic visual impact. The interplay of these colors, paired with the geometric design, gives the quilt a contemporary feel that is both playful and sophisticated.
What sets “Purple Play” apart is its ability to balance simplicity and complexity. The straightforward color scheme allows the intricate pattern to shine without overwhelming the viewer. Each block is meticulously pieced together to form a cohesive whole, demonstrating the beauty that can be achieved through careful planning and execution. This project is perfect for those looking to create a striking quilt that combines modern design with traditional quilting techniques.
Exploring the Modern Design of “Purple Play”
The beauty of “Purple Play” lies in its meticulous design and careful selection of fabrics. The quilt uses fabrics from the Lola by Studio 8, Matrix, and Quilting Temptations collections, all from Quilting Treasures. Each fabric was chosen to enhance the overall aesthetic, with the prints adding depth and interest to the solid color blocks. The design also incorporates a variety of strip and rectangle cuts, which are pieced together in a way that highlights the bold color contrasts.
Materials
To create “Purple Play,” you’ll need the following materials:
- 16—1/4-yard pieces of assorted purple and pink prints (for blocks)
- 16—1/4-yard pieces of assorted white prints (for blocks)
- 16—1/8-yard pieces of assorted black prints (for blocks)
- 1/2 yard of solid black (for binding)
- 2 3/4 yards of backing fabric
- 49″ square of batting
- 10 1/2″-square acrylic ruler (optional for precision)
The finished quilt measures 40 1/2″ square, with each block measuring 10″ square. Remember, yardages and cutting instructions are based on 42″ of usable fabric width, and all measurements include 1/4″ seam allowances. Sew with right sides together unless otherwise stated.
Getting Started: Tips and Considerations
Before diving into the project, here are a few tips to ensure a smooth quilting experience:
- Precision is Key: Ensure your fabric cuts are precise. Using an acrylic ruler can help maintain consistency across your pieces.
- Color Placement: Plan your color placement before you start sewing. This can help you visualize the final look and ensure a balanced design.
- Pressing Seams: Press your seams as you go. This not only keeps your blocks neat but also helps with accuracy when piecing them together.
- Consistent Trimming: Trimming your blocks to the same size will give your quilt a uniform appearance. Take your time to ensure all blocks are trimmed correctly.
With these materials and tips in hand, you’re ready to start creating your own “Purple Play” quilt. Let’s move on to the step-by-step instructions to bring this beautiful design to life.

Full Pattern: Click Here
Step-by-Step Instructions
Cutting the Fabrics
- From Assorted Purple and Pink Prints:
- Cut 16 sets of:
- 1—1 7/8″ × 35″ strip
- 1—1 7/8″ × 29″ strip
- 1—2 1/2″ × 5″ rectangle
- Cut 16 sets of:
- From Assorted White Prints:
- Cut:
- 16—1 7/8″ × 35″ strips
- 16—2 1/2″ × 5″ rectangles
- Cut:
- From Assorted Black Prints:
- Cut:
- 16—1 7/8″ × 29″ strips
- Cut:
- From Solid Black:
- Cut:
- 5—2 1/2″ × 42″ binding strips
- Cut:
Assembling the Blocks
- Create Strip Set A:
- Gather a set of pieces (1 7/8″ × 35″ strip, 1 7/8″ × 29″ strip, and 2 1/2″ × 5″ rectangle) from one purple or pink print.
- Sew together the purple or pink 1 7/8″ × 35″ strip and a white print 1 7/8″ × 35″ strip along their long edges to make Strip Set A. Press the seam away from the white print.
- Cut Strip Set A into:
- 2—11″-long A segments
- 1—8″-long A segment
- 1—3″-long A segment
- Create Strip Set B:
- Sew together the purple or pink print 1 7/8″ × 29″ strip and a black print 1 7/8″ × 29″ strip along their long edges to make Strip Set B. Press the seam toward the black print.
- Cut Strip Set B into:
- 2—9″-long B segments
- 1—6″-long B segment
- Piece the Units Together:
- Sew the 3″-long A segment to the 6″-long B segment (Diagram 3). Press the seam toward the B segment.
- Sew the 8″-long A segment to the left-hand edge of the previous unit (Diagram 4). Press the seam away from the A segment.
- Alternately add 9″-long B segments to the top edge and 11″-long A segments to the left-hand edge of the unit (Diagram 5). Always press seams toward B segments and away from A segments.
- Add Rectangles and Trim the Block:
- Sew the purple or pink 2 1/2″ × 5″ rectangle to the top edge of the unit, placing it 3 1/4″ from the left-hand edge. Add a white print 2 1/2″ × 5″ rectangle to the left-hand edge of the unit, placing it 3 1/4″ from the top edge. Press seams toward the rectangles (Diagram 6).
- Trim the unit to 10 1/2″ square, including seam allowances, to complete the block (Diagram 7). Use a precise ruler placement to ensure consistency across all blocks.
- Repeat Steps 1–4 to Make 16 Blocks Total.
Assembling the Quilt Top
- Layout Blocks:
- Lay out the blocks in four horizontal rows, rotating them as desired for a visually pleasing arrangement.
- Sew together the blocks in each row. Press seams in one direction, alternating the direction with each row.
- Join Rows:
- Sew the rows together to form the quilt top. Press seams in one direction.
Finishing the Quilt
- Layer and Baste:
- Layer the quilt top, batting, and backing. Baste the layers together.
- Quilting:
- Quilt as desired. For “Purple Play,” Handi Quilter educator Vicki Hoth added an edge-to-edge Baptist Fan quilting design.
- Binding:
- Bind the quilt with the solid black binding strips.
Additional Tips
- Color Coordination:
- To maintain the bold, modern look of “Purple Play,” be selective with your fabric choices. Stick to the specified color palette to ensure the quilt’s cohesive appearance.
- Precision in Cutting:
- Take your time when cutting fabric pieces. Accurate cuts are essential for the blocks to fit together seamlessly.
- Pressing Matters:
- Pressing seams as you sew can make a significant difference in the final look of your quilt. It helps keep your blocks flat and makes assembly easier.
- Block Trimming:
- Consistent block trimming is crucial for a uniform quilt top. Use a square acrylic ruler to ensure all blocks are trimmed to the same size.
- Practice Makes Perfect:
- If you’re new to quilting, practice the strip sets and block assembly with scrap fabric before cutting into your selected prints. This will help you get comfortable with the process.
Creating the “Purple Play” quilt is a delightful journey into modern quilting. This project challenges you to play with bold colors and precise patterns, resulting in a stunning wall hanging that is both contemporary and timeless. As you piece together each block and see the design come to life, you’ll find a deep sense of satisfaction in your craftsmanship. Quilting is not just about the end product; it’s about the joy of the creative process and the pride in creating something beautiful with your own hands.


