I remember the first time I attempted a complex quilt. I was in my early twenties, full of enthusiasm but lacking the skillset needed for such an intricate task. My initial projects were modest, but as I honed my craft, I began to embrace more challenging patterns. One such quilt that rekindled my passion and pushed my boundaries was the “Twisted Craze” wall hanging by Tracee Doran. This project not only elevated my skills but also deepened my appreciation for the art of quilting.
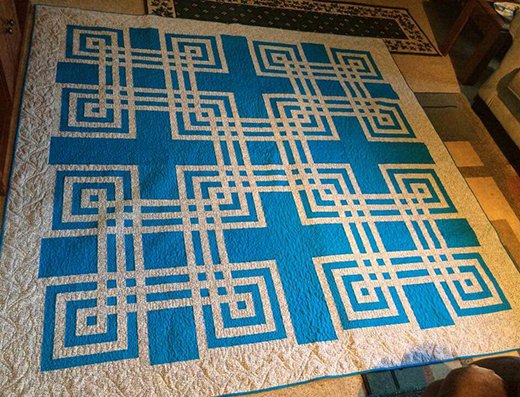
The “Twisted Craze” quilt is a geometric masterpiece that commands attention with its striking design and vibrant contrast. This intermediate-level quilt, with its precise piecing and bold color choices, serves as both a technical challenge and a visual delight. It was through this quilt that I rediscovered the thrill of quilting and the satisfaction of creating something truly beautiful.
Discovering the Art of Contrast
One of the most fascinating aspects of the “Twisted Craze” quilt is its use of contrast to create a dynamic visual effect. By pairing a pale blue solid with a deep navy, the design pops, capturing the eye and drawing viewers into its intricate patterns. This contrast not only highlights the precision required in quilting but also demonstrates how color choices can transform a simple design into a stunning work of art.
Preparing for the Journey
Materials and Preparations
Before diving into the creation of the “Twisted Craze” quilt, it’s essential to gather all the necessary materials and prepare your workspace. Here’s what you’ll need:
- Pale blue solid fabric: 1⅜ yards (for blocks)
- Navy solid fabric: 1⅝ yards (for blocks, piecing, border, and binding)
- Backing fabric: 3 yards
- Batting: Size 50″ x 50″

Full Pattern: Click Here
Cutting Instructions
The success of this quilt lies in precise cutting and piecing. Here are the cutting instructions for each fabric:
Pale Blue Solid:
- 3 strips: 2″ x width of fabric (WOF)
- 8 strips: 2″ x 17″
- 8 strips: 2″ x 14″
- 4 strips: 2″ x 12½”
- 4 strips: 2″ x 11″
- 6 strips: 2″ x 10″
- 8 strips: 2″ x 8″
- 4 strips: 2″ x 6½”
- 4 strips: 2″ x 5″
Navy Solid:
- 5 strips: 2½” x WOF (binding)
- 4 strips: 2″ x 48″, pieced from 5 WOF strips (border strips include extra length for trimming)
- 2 strips: 2″ x WOF
- 1 rectangle: 8″ x 10″
- 4 rectangles: 8″ x 9½”
- 1 square: 8″ x 8″
- 1 rectangle: 6½” x 10″
- 1 rectangle: 5″ x 10″
- 4 strips: 2″ x 14″
- 4 strips: 2″ x 11″
- 4 strips: 2″ x 8″
- 4 strips: 2″ x 5″
- 5 strips: 2″ x 10″
- 4 strips: 2″ x 3½”
Setting the Stage for Success
Before you begin piecing, ensure you have a well-organized workspace. Accurate cutting and consistent seam allowances are crucial for the elements to fit together perfectly. Take your time with each step, and remember that the beauty of quilting lies in both the journey and the finished product.
Step-by-Step Instructions
Creating the Pieced Blocks
- Strip Sets: Begin by sewing together two pale blue and one navy 10″ strips to make a strip set (Diagram I-A). Make one strip set, press in the direction of the arrows, and cut it into four segments, each 2″ wide, to create A segments. Repeat this process to create the remaining strip sets (Diagram I-B), resulting in B-E segments in the required widths and quantities.
- Diagram I-A: Shows the arrangement for the initial strip set.
- Diagram I-B: Illustrates the creation of remaining strip sets and segments.
- Assembling the Blocks: Refer to Diagram II-A and follow the seaming order to sew the segments and strips together to form a pieced block. Repeat this process to make a total of four blocks (Diagram II-B).
- Diagram II-A: Provides the layout and seaming order.
- Diagram II-B: Displays the completed pieced block.
- Piecing the Strips: Using Diagram III-A as a guide, stitch together a navy 8″ x 9½” rectangle with an E segment to create a pieced strip. Make four such strips (Diagram III-B).
- Diagram III-A: Shows the pieced strip assembly.
- Diagram III-B: Illustrates the completed pieced strip.
Assembling the Wall Hanging Top
- Block and Sashing Rows: Sew together two pieced blocks and one pieced strip to form a block row. Create two block rows. Then, stitch together two pieced strips and one navy 8″ square to make a sashing row. Make one sashing row. Assemble the block and sashing rows as shown in the Assembly Diagram.
- Adding Borders: Attach the navy 48″ strips to the sides of the assembled top and trim them even with the top and bottom edges. Then, sew the remaining 48″ strips to the top and bottom, trimming them even with the sides.
Quilting and Finishing
- Final Steps: Layer your quilt top with batting and backing, baste, and quilt as desired. Finally, bind the quilt with navy solid strips to complete your “Twisted Craze” wall hanging.
Additional Tips for Success
- Seam Allowances: Maintaining a consistent ¼” seam allowance is critical for the accuracy of this project.
- Pressing: Always press your seams in the direction indicated in the diagrams to ensure the blocks lie flat and fit together perfectly.
- Patience: Take your time with each step, particularly when piecing and assembling the blocks. Precision is key to achieving the stunning geometric effect of this quilt.
Creating the “Twisted Craze” wall hanging is a rewarding experience that showcases the beauty of contrast and geometric design in quilting. As you complete each step, take pride in the precision and care you put into your work. This quilt is more than just a project; it’s a testament to your skills and creativity. Display your finished quilt proudly, knowing that you have crafted a piece of art that will impress and inspire for years to come.


