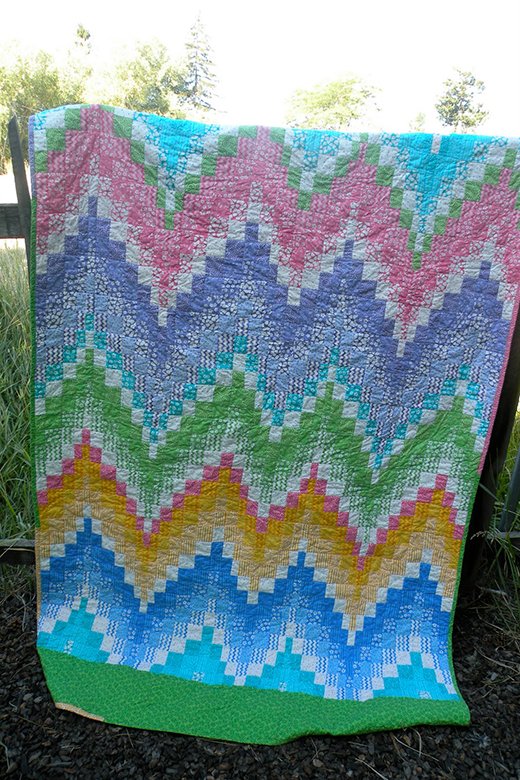
Quilting has always been a way for me to bring a sense of order and beauty out of a seemingly chaotic assortment of fabric pieces. One pattern that particularly embodies this transformation is the Jelly Roll Bargello. The vibrant waves of color in this quilt are both striking and soothing, making it a standout piece in any collection. Today, I’m thrilled to share my Jelly Roll Bargello tutorial with you, designed to help you create a quilt that’s as beautiful as it is functional.
The Dynamic Dance of the Jelly Roll Bargello
The Jelly Roll Bargello is a pattern that turns simple strips of fabric into a mesmerizing zigzag pattern. By using pre-cut jelly roll strips, you can achieve a sophisticated look with minimal cutting and preparation. This quilt is perfect for those looking to make a bold statement with their quilting, while also making a significant dent in their scrap stash. Let’s get started on this exciting journey to create your very own Jelly Roll Bargello quilt.
Materials and Preparation
Crafting Your Color Story
Choosing the right combination of fabrics is essential for the Jelly Roll Bargello. The pre-cut jelly rolls usually come in a beautiful gradient, but you can also mix and match to create a palette that speaks to you. The interplay of colors and the smooth transitions from one hue to another are what give this quilt its dynamic visual appeal.
Materials Needed
To make a twin-sized Jelly Roll Bargello quilt, you will need the following materials:
- 2 jelly rolls (each containing 40 strips, 2.5 inches wide)
- Fabric for borders:
- 1 yard of fabric for the borders
- Cut three strips 8.5 inches wide for the borders
- Cut two pieces 8.5 x 54.5 inches long for the side borders
- Backing fabric:
- 6 yards of fabric (or pieced scraps large enough to cover the back)
- Batting: 58 x 92 inches
- Binding:
- 4 leftover jelly roll strips or additional fabric strips, cut into 2.5 inches wide
- Sewing machine and standard sewing supplies
- Rotary cutter and cutting mat
- Iron and ironing board
- Thread that coordinates with your fabric
Preparing Your Materials
- Choosing Your Fabric Order:
- Start by sorting your jelly roll strips. Most jelly rolls are pre-sorted from lightest to darkest, but feel free to rearrange them to suit your aesthetic preferences.
- Group the strips into sets that create a pleasing gradient. For instance, you might choose 5 or 6 strips of two different colors and add 1 or 2 strips for contrast.
- Piecing the Strip Sets:
- Instead of piecing all 36 strips together at once, divide them into smaller sets. This makes the sewing process more manageable.
- Sew the strips together in pairs, ensuring that the selvages are aligned at one end.
Getting Ready to Sew
Before you begin, make sure your sewing area is well-organized and your sewing machine is ready to go. Have your rotary cutter, mat, and iron on hand. With your fabric strips sorted and your materials prepared, you’re ready to start creating your Jelly Roll Bargello quilt.

Full Pattern: Click Here
Step-by-Step Instructions
Step 1: Piecing the Strip Sets
- Sewing the Strips:
- Sew your jelly roll strips together in pairs, aligning the selvages at the same end.
- Combine these pairs to form longer strips, always starting from the same edge to avoid stretching the fabric.
- Creating the Panels:
- Lay your strip sets flat and ensure the order is to your liking. This is the final chance to rearrange the strips without too much hassle.
- Press the seams as desired. Open seams often work best for this pattern.
Step 2: Cutting the Bargello Strips
- Trimming and Cutting:
- Trim the selvages from the ends of your strip sets to create a straight edge.
- From each set, cut the following strips:
- 4 strips at 2.5 inches wide
- 10 strips at 2 inches wide
- 6 strips at 1.5 inches wide
- Organizing the Strips:
- Sort the strips by size and keep them in their respective groups. This will make the assembly process much smoother.
Step 3: Assembling the Bargello Strips
- Forming the Rings:
- Sew the strips together end-to-end to form one long strip, then join the ends to create a loop or ring.
- Chain piece your strips to speed up the process, creating loops for each size category.
- Creating the Panels:
- Determine the top and bottom squares for each strip using a numbering system (e.g., top is #1, bottom is #36).
- Carefully unpick the seam at the designated point to open the strip into a continuous piece.
- Joining the Panels:
- Following your chosen pattern, sew the strips together, ensuring that the colors transition smoothly to create the bargello effect.
- Press the seams carefully to ensure a flat, even surface.
Step 4: Completing the Quilt
- Adding Borders:
- Once all the panels are sewn together, add the border strips to frame your quilt.
- Sew the side borders first, followed by the top and bottom borders.
- Quilting and Binding:
- Quilt as desired. You can follow the zigzag pattern of the bargello or choose a different quilting design.
- Use the leftover jelly roll strips or the additional fabric strips for the binding.
The Jelly Roll Bargello quilt is a stunning project that showcases the beauty of color transitions and the elegance of a well-organized pattern. With each step, from selecting your fabrics to piecing the strips, you’ll see your quilt come to life in a vibrant dance of color. Reflect on your journey, enjoy the final product, and know that you’ve created a masterpiece from simple jelly roll strips.


