Quilting has always been a profound part of my life, serving as a thread that ties together my memories, emotions, and creativity. I remember the first time I ever saw a Dutchmen’s Puzzle block. I was in a quaint fabric store in a small town, surrounded by bolts of colorful fabric. The intricate design of the block caught my eye and sparked an interest that has since blossomed into a lifelong passion. Today, I want to share with you a project that brings back those fond memories, while also offering a modern twist on a classic quilt pattern. This project is the “It Takes Two” quilt, a piece that beautifully marries tradition and modernity.
Creating a quilt is more than just sewing pieces of fabric together. It’s about the stories, the history, and the love that is stitched into each seam. The “It Takes Two” quilt is a perfect example of this. With its quick-to-piece, big-block design, it’s an excellent project for quilters on the go, offering a fresh, modern take on holiday colors with fabrics from the Bliss collection by Bonnie & Camille for Moda Fabrics. Let’s dive into this beautiful quilt project and explore the joy of creating the “It Takes Two” quilt, something both timeless and contemporary.
Vibrant Harmony: The ‘It Takes Two’ Quilt Guide
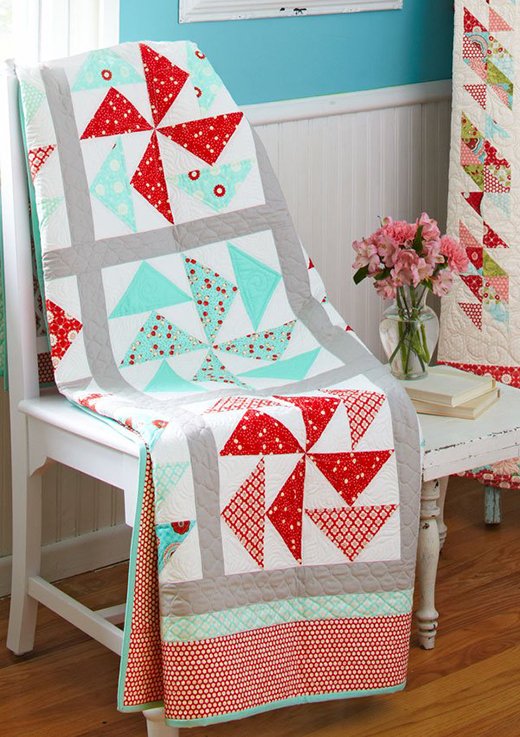
The “It Takes Two” quilt embraces a vibrant yet elegant color palette of turquoise, red, and gray. This combination is not only eye-catching but also versatile, adding a modern flair to traditional holiday decor. The fabrics from the Bliss collection by Bonnie & Camille provide a rich selection of prints and solids that bring the “It Takes Two” quilt to life. These colors are more than just aesthetic choices; they evoke feelings of warmth, celebration, and home, making the “It Takes Two” quilt perfect for holiday gatherings and cozy winter nights.
As you embark on this quilting journey, consider how these colors will interact in your space. Whether draped over a couch, hanging as a wall piece, or wrapped around a loved one, the “It Takes Two” quilt’s color scheme will undoubtedly bring joy and elegance to any setting. The balance of bold and subtle hues in this project highlights the importance of thoughtful color selection in quilting, creating a piece that is both striking and harmonious. The “It Takes Two” quilt not only stands out in its aesthetic appeal but also in its ability to make a statement in any room it graces.

Full Pattern: Click Here
Materials and Preparation: Setting the Stage for Success
Before we begin piecing our quilt, it’s essential to gather all the necessary materials. Here’s a comprehensive list to ensure you have everything you need:
Materials:
- 2-1/2 yards solid white (blocks)
- 7/8 yard solid aqua (blocks, binding)
- 4 assorted aqua prints (fat quarters, each 18×22″ pieces for blocks)
- 4 assorted red prints (fat quarters, each 18×22″ pieces for blocks)
- 1-1/2 yards solid gray (blocks, sashing, inner border)
- 2/3 yard light aqua print (blocks, middle border)
- 1-1/2 yards red-and-white dot (blocks, outer border)
- 4-7/8 yards backing fabric
- 71×87″ batting
Finished Sizes:
- Quilt: 62-1/2×78-1/2″
- Block: 14″ square
Cutting Instructions:
From solid white, cut:
- 192–4″ squares
From solid aqua, cut:
- 8–2-1/2×42″ binding strips
- 8–4×7-1/2″ rectangles
From each assorted aqua print and red print fat quarter, cut:
- 8–4×7-1/2″ rectangles
From solid gray, cut:
- 10–2-1/2×42″ strips for sashing and inner border
- 8–4×7-1/2″ rectangles
- 8–2-1/2×14-1/2″ sashing rectangles
From light aqua print, cut:
- 6–2×42″ strips for middle border
- 8–4×7-1/2″ rectangles
From red-and-white dot, cut:
- 8–5×42″ strips for outer border
- 8–4×7-1/2″ rectangles
Getting Ready: Insights and Tips
Before you start cutting and sewing, ensure your workspace is organized and well-lit. A clean, uncluttered area helps maintain focus and precision. Pre-wash your fabrics to prevent any potential shrinkage or color bleeding. As you cut your fabric pieces, double-check measurements to avoid errors that could affect the final assembly. Gather your tools—rotary cutter, cutting mat, rulers, and a good pair of fabric scissors. Make sure your sewing machine is in good working order, with a fresh needle and plenty of thread on hand.
Stay tuned for the next part where we’ll dive into the step-by-step instructions to bring your “It Takes Two” quilt to life!
Step-by-Step Instructions: Bringing Your Quilt to Life
- Assemble the Flying Geese Units
- Mark the Squares: Use a pencil to mark a diagonal line on the wrong side of each solid white 4″ square.
- Create Flying Geese Units: Align a marked solid white square with one end of a solid aqua 4×7-1/2″ rectangle, ensuring the direction of the drawn line is as shown in Diagram 1. Sew on the drawn line, then trim the excess fabric, leaving a 1/4″ seam allowance. Press the seam open toward the triangle. Repeat this process on the opposite end of the rectangle. Each Flying Geese unit should measure 7-1/2×4″ including seam allowances. Create four matching Flying Geese units from each set of rectangles.
- Repeat with All Rectangles
- Flying Geese for All Colors: Using the same method, create Flying Geese units with the remaining solid aqua, assorted aqua prints, assorted red prints, solid gray, light aqua print, and red-and-white dot 4×7-1/2″ rectangles. You should end up with 96 Flying Geese units in total, divided into sets of four matching units from each fabric.
- Assemble the Dutchmen’s Puzzle Blocks
- Create Flying Geese Pairs: For each Dutchmen’s Puzzle block, take two sets of four matching Flying Geese units. Sew together one Flying Geese unit from each set to make a Flying Geese pair, pressing the seam in one direction. Each pair should measure 7-1/2″ square including seam allowances. Repeat to make four matching Flying Geese pairs for each block.
- Form the Block: Sew the Flying Geese pairs together in pairs, pressing seams in opposite directions. Join the pairs to complete a Dutchmen’s Puzzle block, pressing the final seam in one direction. Each block should measure 14-1/2″ square including seam allowances. Make a total of 12 Dutchmen’s Puzzle blocks.
- Assemble the Quilt Top
- Prepare Sashing and Borders: Cut and piece solid gray 2-1/2×42″ strips to create:
- Two 2-1/2×62-1/2″ inner border strips
- Two 2-1/2×50-1/2″ inner border strips
- Three 2-1/2×46-1/2″ sashing strips
- Layout Blocks and Sashing: Refer to the Quilt Assembly Diagram and lay out the Dutchmen’s Puzzle blocks, solid gray sashing rectangles, and sashing strips in seven rows. Sew the pieces together in each row, pressing seams toward the sashing rectangles.
- Join Rows: Combine the block rows and sashing strips to create the quilt center, pressing seams in one direction. The center should measure 46-1/2×62-1/2″ including seam allowances.
- Add Borders: Attach the long inner border strips to the long edges of the quilt center, followed by the short inner border strips to the remaining edges. Press all seams toward the inner border. Cut and piece light aqua print 2×42″ strips to make two 2×66-1/2″ and two 2×53-1/2″ middle border strips. Sew these to the quilt center, pressing all seams toward the middle border. Finally, cut and piece red-and-white dot 5×42″ strips to create two 5×69-1/2″ and two 5×62-1/2″ outer border strips. Attach these to complete the quilt top, pressing all seams toward the outer border.
- Prepare Sashing and Borders: Cut and piece solid gray 2-1/2×42″ strips to create:
- Finish the Quilt
- Layering: Layer the quilt top, batting, and backing fabric, then baste them together.
- Quilting: Quilt as desired. For example, outline-quilt inside each large triangle in the Flying Geese units, continue the stitching into a spiral in the center of the triangle, quilt an allover meander in the background of each block, and a ribbon design in the sashing and inner border. Finish with continuous diamonds in the middle border and loops in the outer border.
- Binding: Use the solid aqua binding strips to bind the quilt edges, finishing your “It Takes Two” quilt.
Additional Tips: Perfecting Your Quilt
- Consistent Seams: Ensure your seams are consistently 1/4″ throughout the project for accurate block assembly.
- Pressing Matters: Proper pressing after each step helps in aligning pieces accurately, making the final assembly smoother.
- Basting Techniques: Use either spray basting or pin basting to secure the quilt layers together before quilting, preventing any shifting.
- Quilting Patterns: If you’re new to free-motion quilting, practice on small fabric scraps before moving on to the quilt.
- Binding: For a neat finish, consider using a bias binding technique, especially around the corners of your quilt.
Creating the “It Takes Two” quilt is not just about completing a project; it’s about the journey of bringing together colors, patterns, and fabrics to create something truly unique. As you finish the last stitch and step back to admire your work, take a moment to appreciate the skills you’ve honed and the creativity you’ve expressed. This quilt is a testament to your dedication and love for the craft. Display it proudly in your home, or gift it to someone special, knowing that every piece of fabric tells a story and every stitch carries a piece of your heart.


