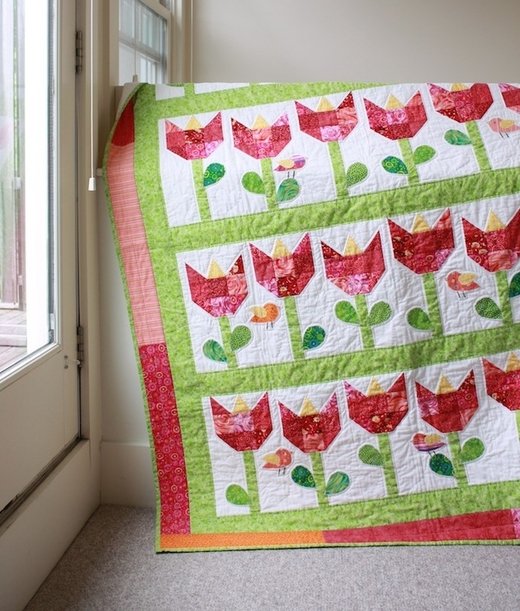
When I first embarked on my quilting journey, one of the most delightful discoveries was how simple shapes could come together to create beautiful, intricate designs. The Tulip Quilt Block is a perfect example of this. The inspiration for this project came from a personal experience I had last year. As a mother, I wanted to create something special for my daughters’ teachers. One teacher, in particular, had a stunning garden at her home, and I thought it would be lovely to gift her flowers that she could keep indoors all year round. Thus, the tulip table runners were born, and they became a cherished project of mine.
Reflecting on those early days, I remember how thrilled I was to design my first quilt block pattern using EQ7. The Tulip Quilt Block was among the first patterns I created, and its simple yet elegant design remains a favorite. It brings back fond memories of exploring new creative possibilities and sharing my passion for quilting with others. Now, I’m excited to share this tutorial with you, hoping it will inspire your creativity and bring joy to your quilting projects.
Blooming Creativity with the Tulip Quilt Block
The Tulip Quilt Block is not just a design; it’s a celebration of springtime and the beauty of nature. Each block measures 6″ x 12.5″, and when combined with simple sashing, it can be transformed into charming table runners or incorporated into larger quilt projects. The versatility of this block allows for endless creative possibilities, making it a delightful addition to any quilter’s repertoire.
Understanding the Tulip Quilt Block Design
The beauty of the Tulip Quilt Block lies in its simplicity and elegance. Each block consists of straightforward geometric shapes that come together to form a stylized tulip. This design is perfect for beginners who want to practice their piecing skills, as well as for experienced quilters looking for a quick and satisfying project.
Materials Needed
Before you start, gather the following materials:
- Assorted fabric scraps for tulip petals and leaves
- Background fabric (light color to make the tulips pop)
- Green fabric for the tulip stems
- Sewing machine
- Rotary cutter and mat
- Quilting ruler
- Thread
- Iron and ironing board
Preparing for Your Tulip Quilt Block Project
To begin, ensure you have all your materials ready and your workspace organized. Here are a few tips to get you started:
- Choosing Fabrics: Select bright, contrasting colors for the tulip petals and a complementary green for the stems. A light-colored background fabric will help your tulips stand out.
- Cutting Accuracy: Use a rotary cutter and quilting ruler to cut your fabric pieces accurately. Precise cutting is crucial for ensuring your blocks come together neatly.
- Pressing Seams: Press your seams as you go to keep your blocks flat and ensure a professional finish.

Full Pattern: Click Here
Step-by-Step Instructions
- Cut Your Fabric Pieces:
- Tulip petals: Cut four 2.5″ x 2.5″ squares and one 4.5″ x 2.5″ rectangle.
- Tulip leaves: Cut two 2.5″ x 2.5″ squares.
- Background fabric: Cut one 4.5″ x 2.5″ rectangle, four 2.5″ x 2.5″ squares, and two 1.5″ x 6.5″ strips.
- Stem: Cut one 1″ x 6.5″ strip.
- Assemble the Tulip Petals:
- Arrange your tulip petal squares in a 2×2 grid.
- Sew the squares together in pairs, pressing seams open.
- Join the pairs to form a 4-patch block, representing the tulip petals.
- Attach the 4.5″ x 2.5″ petal rectangle to the bottom of the 4-patch block.
- Add the Leaves and Stem:
- Sew a 2.5″ background square to each side of the 2.5″ leaf squares.
- Attach these units to either side of the 1″ x 6.5″ stem strip.
- Sew the stem and leaf unit to the bottom of the tulip petal section.
- Complete the Block:
- Sew the 4.5″ x 2.5″ background rectangle to the top of the tulip petal section.
- Attach the 1.5″ x 6.5″ background strips to each side of the block.
- Press the entire block flat, ensuring all seams are neat and smooth.
Additional Tips
- Chain Piecing: To save time, try chain piecing multiple blocks at once. This technique allows you to sew pieces together in a continuous chain without stopping to cut the thread.
- Color Coordination: Experiment with different color combinations for a vibrant and varied quilt. Consider using a consistent background fabric to tie all the blocks together.
- Personal Touches: Add embroidered details or applique elements to personalize your tulip blocks. This can add an extra layer of creativity and uniqueness to your project.
Conclusion
The Tulip Quilt Block is a delightful way to bring the beauty of spring into your home. Its charming design captures the essence of blooming tulips, adding a touch of elegance and freshness to any quilt project. Whether you choose to create a single block for a mini quilt, piece together multiple blocks for a vibrant table runner, or incorporate it into a larger quilt, the Tulip Quilt Block is sure to brighten both your space and your spirits.
Working on this pattern is not just about the end result but also about the joy of the process. As you piece together each tulip, you’ll find satisfaction in watching your quilt blossom into a beautiful creation. I hope that making these tulip blocks brings you as much happiness and fulfillment as it has brought me. Embrace the vibrant colors, enjoy the meticulous sewing, and let your creativity flourish. Happy quilting!


