When I first discovered the art of quilting, I was immediately drawn to the vibrant patterns and intricate designs. One particular design that caught my eye early on was the Rose Star block. Its delicate, flower-like appearance seemed complicated at first glance, but as I delved deeper into English paper piecing, I realized it was simpler than it looked. The journey to mastering the Rose Star block has been a rewarding one, filled with moments of discovery and creative satisfaction.
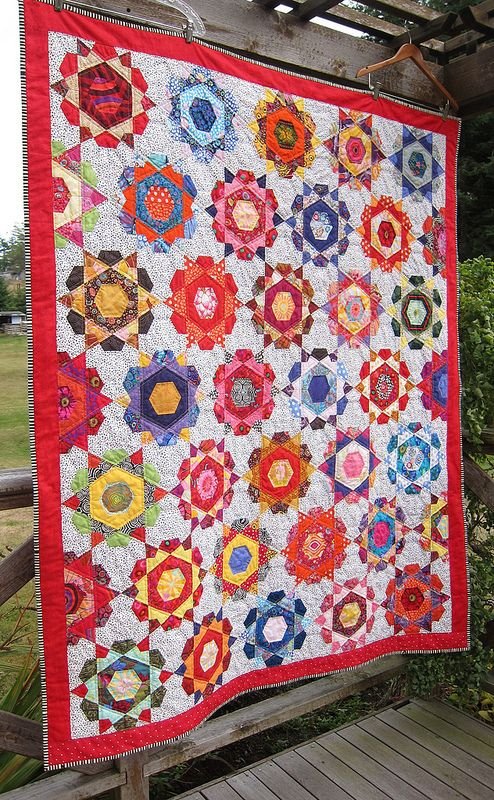
I remember searching for a design for a mini quilt I wanted to make for my friend Mary. In my quest, I stumbled upon Eileen’s beautiful quilt on her blog, “My Quilting Porch”. Her blocks were larger than what I had in mind, but they were the perfect inspiration. After much trial and error, I figured out that the Rose Star block is essentially made up of dissected hexagons, which made the process much easier to handle. Now, I’m excited to share this tutorial with you, hoping it will bring you as much joy as it has brought me.
Discovering the Beauty of the Rose Star Block
The Rose Star block is not only visually stunning but also a wonderful project for quilters of all levels. It involves a combination of hexagons, petal shapes, and kite shapes, creating a mesmerizing floral design. This block is perfect for using a mix of vintage and new fabrics, allowing for endless creativity in color and pattern combinations. Whether you’re hand quilting or using a sewing machine, the Rose Star block can be adapted to fit your style and preferences.
The Intricacies of the Dissected Hexagons
One of the most fascinating aspects of the Rose Star block is the way it transforms simple hexagons into a complex, flower-like pattern. By dissecting hexagons and combining them with petal and kite shapes, you can create a dynamic and intricate design. This method may seem daunting at first, but with a bit of practice, you’ll find it both manageable and rewarding.
Materials Needed
Before we dive into the step-by-step instructions, let’s gather all the materials you’ll need for this project:
- Fabric (a mix of vintage and new fabrics is ideal)
- Paper templates (hexagon, petal, and kite shapes)
- Cardboard (for making templates, if desired)
- Scissors
- Needle and thread (pale grey or white works well)
- Ruler
- Pencil
- Sewing machine (optional)
Getting Started: Tips and Considerations
To begin, you’ll want to decide on the size of your hexagons. For this tutorial, I used hexagons that measured 3 inches across from point to point. You can find hexagon shapes online and print them, or you can draw them yourself. Additionally, Kreatives von mir has shared a helpful template on Flickr, drawn on squared paper, which can be very useful.
Cut out your fabric pieces roughly 1/4 inch larger than your paper templates. Tack the fabric to the templates with large stitches, ensuring the corners are secure. Before you start sewing, lay out your pieces to make sure you like the composition. Don’t hesitate to experiment with different fabric combinations – sometimes clashing fabrics can create a stunning effect.

Full Pattern: Click Here
Step-by-Step Instructions
- Prepare Your Templates: Begin by printing or drawing your hexagon, petal, and kite shapes. If you prefer, you can create cardboard templates to make tracing easier.
- Cut Out Fabric Pieces: Cut your fabric pieces approximately 1/4 inch larger than the templates. This extra fabric will be used to tack the pieces to the paper templates.
- Tack the Fabric to the Templates: Using large stitches, tack the fabric to the paper templates, securing the corners as you go. This will hold the fabric in place while you sew the pieces together.
- Assemble the Pieces: Start by sewing the petal shapes to the sides of the hexagon. Use a whip stitch, holding the pieces together and stitching over the edges until you run out of thread. Continue this process, sewing the kite shapes to the petal shapes, and so on, until your block is complete.
- Check Your Progress: As you sew, periodically check your progress against the original drawing to ensure the pieces are forming the correct pattern. This will help you avoid any mistakes and keep your project on track.
- Remove the Paper Templates: Once your block is complete, remove the paper templates from the inside pieces. Keep the outer edge papers in place until you have sewn the block into your desired project.
Additional Tips
- Experiment with Colors and Fabrics: Don’t be afraid to try different fabric combinations. Mixing vintage and new fabrics can create a unique and beautiful quilt.
- Use the Right Thread: Choose a thread color that blends well with your fabric. Pale grey or white works well for most fabrics.
- Take Your Time: Read through the instructions a few times before starting, and don’t rush the process. Enjoy the journey of creating your Rose Star block.
Creating the Rose Star block is a wonderful way to explore the art of English paper piecing and create a stunning quilt. As you work through this project, take time to appreciate the intricate design and the beauty of your fabric choices. Whether you’re making a single block or an entire quilt, the Rose Star block is sure to bring joy and satisfaction to your quilting journey.


