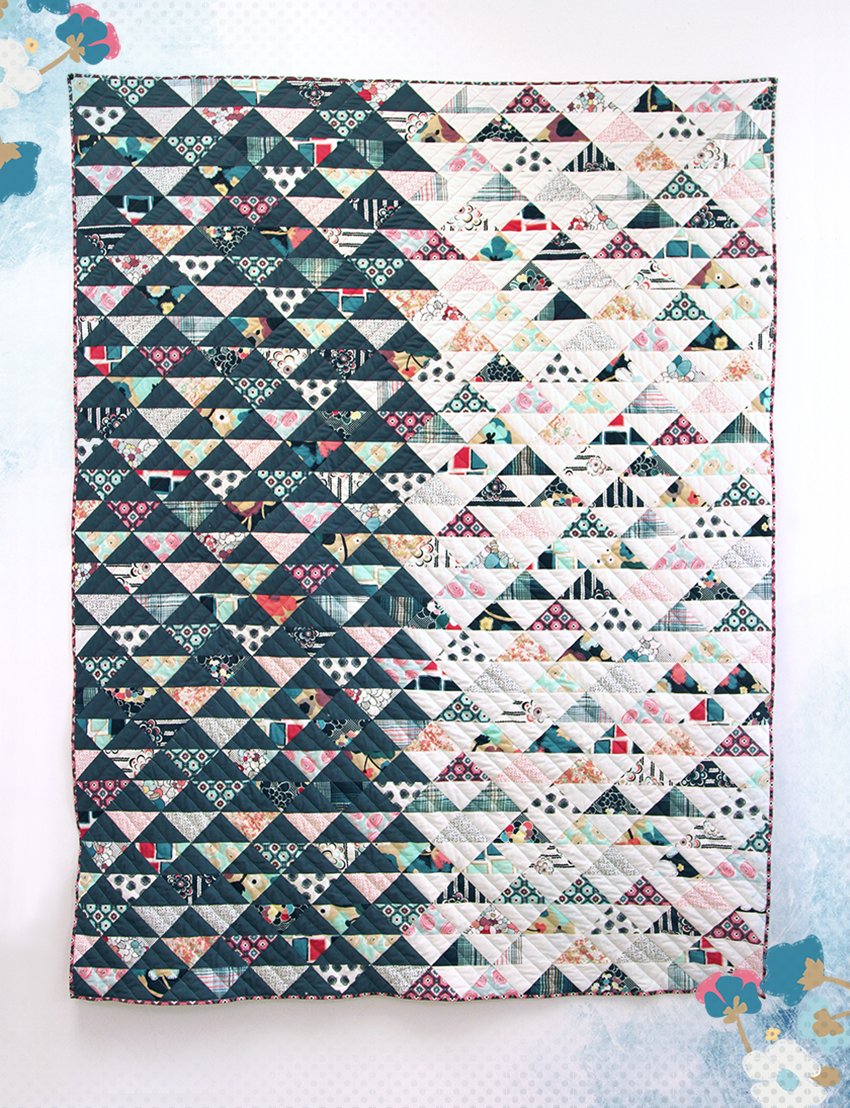
From a young age, I have always been fascinated by the intricate designs and meticulous craftsmanship of quilts. Growing up in a household filled with vibrant fabrics and a constant hum of the sewing machine, my love for quilting was inevitable. One of the most rewarding projects I’ve ever undertaken is the Daring Reflection Quilt. This quilt not only embodies a bold and dynamic design but also represents a journey of creativity and patience.
The Daring Reflection Quilt, with its striking combination of colors and patterns, holds a special place in my heart. It is a project that pushes the boundaries of traditional quilting, allowing for personal expression through the selection of various fabric prints. In this tutorial, I’ll guide you through each step of creating your own Daring Reflection Quilt, sharing tips and insights along the way.
Embracing Bold Choices: The Essence of the Daring Reflection Quilt
The Daring Reflection Quilt is not just a quilt; it is an expression of bold choices and creative freedom. What makes this quilt unique is the liberty it gives you to mix and match different prints, resulting in a design that is as unique as the quilter behind it. The process of creating half-square triangles (HST) with assorted Dare fabrics allows you to experiment with colors and patterns, making each quilt a one-of-a-kind masterpiece.
The Magic of Half-Square Triangles: A Key Element
Half-square triangles (HST) are the cornerstone of the Daring Reflection Quilt. These versatile units form the basis of the quilt’s dynamic design, offering endless possibilities for arranging and rearranging the blocks. The beauty of HST lies in their simplicity and the visual impact they create when combined in various patterns. In this section, we will delve into the technique of creating perfect HSTs and explore different ways to use them in your quilt.

Full Pattern: Click Here
Materials Needed
To create the Daring Reflection Quilt, you will need the following materials:
- 1¼ yards of PE-454 (solid fabric)
- 1¼ yards of PE-408 (solid fabric)
- 2½ yards of assorted Dare fabrics prints (for this tutorial, we’ll use pink Dare fabrics)
- Binding: 3/8 yard of PE-408
- Backing: 3 yards of DAR-54301 (backing fabric)
- Batting: Enough to cover the 78” by 60” quilt top
Preparing to Quilt: Tips and Considerations
Before diving into the construction of the Daring Reflection Quilt, it’s essential to prepare your workspace and materials. Here are a few tips to ensure a smooth quilting experience:
- Pre-Wash Fabrics: Pre-wash all your fabrics to prevent any shrinkage or color bleeding after the quilt is completed.
- Cutting Accuracy: Take your time to cut the squares accurately. Precision in cutting ensures that your HSTs align perfectly.
- Seam Allowance: Maintain a consistent ¼” seam allowance throughout the project. This consistency is crucial for the blocks to fit together correctly.
- Organization: Keep your cut pieces organized. Label the different fabric squares and triangles to avoid any mix-ups during the construction process.
- Ironing: Press your fabric pieces well to ensure they lay flat and smooth, making it easier to sew and assemble the quilt.
Now that you are prepared, let’s move on to the detailed step-by-step instructions for creating your Daring Reflection Quilt.
Step-by-Step Instructions
Step 1: Cutting the Fabric
- Cutting the Solid Fabrics:
- Take the ninety (90) 4” by 4” squares of PE-454 and cut each square in half diagonally to create two triangles. You will end up with a total of 180 triangles.
- Repeat the same process with the ninety (90) 4” by 4” squares of PE-408, yielding another 180 triangles.
- Cutting the Dare Fabrics:
- Take the one-hundred and eighty (180) 4” by 4” squares of assorted Dare Fabrics and cut each square in half diagonally to create two triangles. You will have a total of 360 triangles.
Step 2: Creating the Half-Square Triangles (HST)
- Combining PE-454 and Dare Fabrics:
- Take one triangle from PE-454 and one triangle from the assorted Dare fabrics.
- Place them right sides together, aligning the edges.
- Sew along the long edge with a ¼” seam allowance.
- Press the seam open or to one side, depending on your preference.
- Repeat this process for all 180 triangles from PE-454 and 180 triangles from the assorted Dare fabrics to create 180 HST units.
- Combining PE-408 and Dare Fabrics:
- Take one triangle from PE-408 and one triangle from the assorted Dare fabrics.
- Place them right sides together, aligning the edges.
- Sew along the long edge with a ¼” seam allowance.
- Press the seam open or to one side.
- Repeat this process for all 180 triangles from PE-408 and 180 triangles from the assorted Dare fabrics to create another 180 HST units.
Step 3: Assembling the Quilt Top
- Arranging the HST Units:
- Lay out the HST units according to your desired design. The original pattern suggests a specific arrangement, but feel free to experiment with different layouts to make your quilt unique.
- To keep things organized, label each row alphabetically (e.g., Row A, Row B, etc.).
- Sewing the Rows:
- Start sewing the HST units together row by row.
- Maintain a consistent ¼” seam allowance and press the seams as you go.
- Once all the rows are completed, sew the rows together to form the quilt top.
- Press the entire quilt top to ensure all seams lay flat.
- Trimming the Quilt Top:
- After assembling the quilt top, turn it at a 45° angle.
- Trim the edges to achieve a final quilt top size of 78” by 60”.
Step 4: Quilt Assembly
- Layering the Quilt:
- Place the backing fabric on a large surface with the wrong side facing up. Stretch it out and secure it with masking tape.
- Place the batting on top of the backing fabric.
- Place the quilt top on top of the batting, right side up. Smooth out any wrinkles.
- Basting the Quilt:
- Pin all layers together using safety pins or baste with long stitches using basting thread.
- Start from the center and work your way towards the edges.
- Quilting:
- Quilt the layers together, starting from the center and moving outwards.
- Choose quilting motifs that suit your style. This is a great opportunity to add personal flair to your quilt.
- Trimming Excess Fabric and Batting:
- Once quilting is complete, trim any excess fabric or batting, ensuring the quilt is squared.
Step 5: Binding the Quilt
- Preparing the Binding:
- Cut enough strips of fabric 1½” wide to make a final strip 280” long.
- Join the strips together end-to-end to create one long binding strip.
- Attaching the Binding:
- Start sewing the binding strip to the middle of one side of the quilt, right sides together. Leave a 5” tail at the beginning.
- Sew with a ¼” seam allowance, stopping ¼” before each corner. Remove the quilt from the machine and fold the binding at a 45° angle, then fold it back down along the next edge to create a mitered corner.
- Continue sewing, repeating the mitered corner technique at each corner.
- Finishing the Binding:
- When you reach the starting point, leave another 5” tail. Join the two loose ends of the binding with a straight seam and trim the excess.
- Turn the binding to the back of the quilt and hand stitch it in place using a blind stitch.
Additional Tips
- Chain Piecing: To speed up the process, use chain piecing techniques when sewing HST units together.
- Consistent Pressing: Consistently pressing seams open or to the side throughout the project helps in aligning blocks and achieving a flat quilt top.
- Design Wall: Use a design wall to lay out your HST units. This allows you to experiment with different arrangements and ensures you are happy with the design before sewing.
Creating the Daring Reflection Quilt is a rewarding experience that combines creativity with precision. As you piece together each half-square triangle and watch the bold design emerge, you’ll find a sense of accomplishment and joy in your work. This quilt is not only a beautiful addition to your home but also a testament to your dedication and artistic expression. Enjoy the process, and happy quilting!


