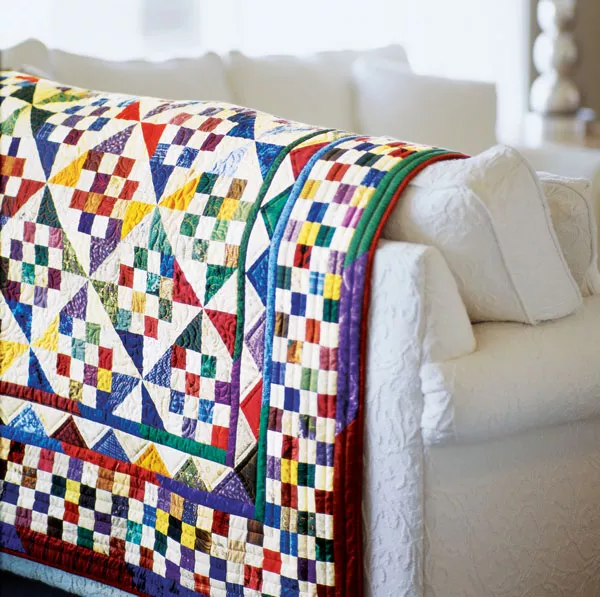
When I first started quilting, I was immediately drawn to the way simple patterns could create complex and visually striking designs. The ability to play with colors and shapes to produce something unique fascinated me. One of the first projects I tackled was a traditional quilt with a modern twist, where careful placement of colors created an illusion of movement and depth. This quilt, called “Make Your Point,” reminds me of that early project.
It uses straightforward blocks arranged in a way that makes them appear set on point, a technique that continues to inspire me. The intricate dance of light and dark fabrics in “Make Your Point” captures that same sense of wonder I felt when I saw my first quilt come together. Quilting has always been more than just sewing pieces of fabric together for me; it’s a way to express creativity and bring joy to others. I remember spending hours in my sewing space, experimenting with different color combinations and layouts. Each quilt is a journey, and “Make Your Point” is a perfect example of how the journey can lead to a beautiful and satisfying destination.
The process of selecting fabrics, cutting them into precise pieces, and sewing them together is meditative and rewarding. With each stitch, the quilt grows, transforming from a simple idea into a tangible piece of art. “Make Your Point” is not just a quilt; it’s a testament to the artistry and craftsmanship that quilting embodies. The beauty of the “Make Your Point” quilt lies in its clever use of color and block arrangement. By carefully placing the colors, this design tricks the eye into seeing the blocks as if they are set on point, adding a dynamic and intricate look to the quilt without the extra effort of on-point construction.
Make Your Point: Color Placement and Design
The illusion is achieved through the use of two primary blocks: the 16-Patch and the Pinwheel. By alternating these blocks and selecting contrasting dark and light fabrics, the quilt achieves a stunning visual effect. The dark and light fabrics create a sense of depth and movement, making the quilt appear more complex than it actually is. This design is perfect for using up scraps and experimenting with different fabric combinations, making each quilt unique. The “Make Your Point” quilt allows for personal expression through fabric choice, ensuring that no two quilts will ever be exactly alike. This adaptability and potential for creativity are what make this quilt pattern a timeless favorite.

Full Pattern: Click Here
Materials and Preparation
Before diving into the step-by-step instructions, it’s essential to gather all the necessary materials and prepare your fabrics. Here’s what you’ll need for the “Make Your Point” quilt:
Materials:
- 5-1⁄4 yards of assorted dark prints (for 16-Patch blocks, Pinwheel blocks, dogtooth border, and diagonally pieced borders)
- 4-1⁄4 yards of assorted light prints (for 16-Patch blocks, Pinwheel blocks, and dogtooth border)
- 3⁄4 yard of red print (for binding)
- 5-1⁄3 yards of backing fabric
- 84×96″ piece of quilt batting
Finished Sizes:
- Quilt top: 77-1⁄2×89-1⁄2″
- 16-Patch block: 6″ square
- Pinwheel block: 6″ square
Cutting Fabrics: To make the best use of your fabrics, cut the pieces in the following order:
From assorted dark prints:
- 38 strips, 2×42″
- 400 inches of 2-1⁄2″-wide strips in various lengths (for outer border)
- 340 inches of 1-1⁄2″-wide strips in various lengths (for inner and middle borders)
- 340 inches of 1-1⁄8″-wide strips in various lengths (for inner and middle borders)
- 16 squares, 5-1⁄2″, cut diagonally twice for 64 triangles
- 98 squares, 3-7⁄8″
From assorted light prints:
- 38 strips, 2×42″
- 15 squares, 5-1⁄2″, cut diagonally twice for 60 triangles
- 98 squares, 3-7⁄8″
From red print:
- 9 strips, 2-1⁄2×42″ for binding
Before starting the “Make Your Point” quilt, ensure your fabrics are pre-washed and ironed to avoid any shrinkage or color bleeding later on. Take time to organize your fabrics by color and print intensity. This will make it easier to follow the pattern and ensure the final design pops with contrast and harmony.
Step-by-Step Instructions
1. Assemble the 16-Patch Blocks:
- Align two dark print 2×42″ strips and two light print 2×42″ strips, alternating the colors. Sew them together to make a strip set. Press seams toward the dark prints.
- Repeat to make a total of 19 strip sets. Cut each strip set into 2″-wide segments to yield 396 pieces.
- Lay out four segments to form a 16-Patch block. Sew the segments together and press seams in one direction. The block should measure 6-1⁄2″ square. Make a total of 98 16-Patch blocks.
2. Assemble the Pinwheel Blocks:
- Mark a diagonal line on the wrong side of the light print 3-7⁄8″ squares.
- Pair each marked light print square with an unmarked dark print square. Sew 1⁄4″ on each side of the drawn line. Chain-piece for efficiency.
- Cut each pair apart on the drawn line to create two triangle units. Press open to make triangle-squares, each measuring 3-1⁄2″ square.
- Sew four triangle-squares together in pairs, then join the pairs to form a Pinwheel block. Make 49 Pinwheel blocks.
3. Assemble the Quilt Center:
- Lay out 50 16-Patch blocks alternately with 49 Pinwheel blocks in 11 horizontal rows.
- Sew the blocks together in each row, pressing seams toward the Pinwheel blocks. Join rows to complete the quilt center. The center should measure 54-1⁄2×66-1⁄2″.
4. Add the Borders:
- Inner Border: Sew together dark print 1-1⁄2″ and 1-1⁄8″ strips diagonally to make the inner border strips. Attach these to the quilt center, pressing seams toward the center.
- Dogtooth Border: Lay out and sew light and dark triangles together to form dogtooth border strips. Attach these to the quilt center.
- Middle Border: Repeat the process for the middle border using remaining 1-1⁄8″ and 1-1⁄2″ strips.
- 16-Patch Border: Arrange and sew remaining 16-Patch blocks to form border strips. Attach these to the quilt center, adding extra 2″ segments as needed.
- Outer Border: Sew dark print 2-1⁄2″ strips diagonally to form outer border strips. Attach these to the quilt center to complete the top.
5. Finish the Quilt:
- Layer the “Make Your Point” quilt top, batting, and backing. Quilt as desired. Bind the edges using the red print 2-1⁄2×42″ strips.
Creating the “Make Your Point” quilt is a rewarding experience that combines simplicity with visual complexity. By carefully selecting fabrics and following these detailed instructions, you’ll achieve a stunning quilt that showcases your skills and creativity. Each step of the process is an opportunity to learn and enjoy the art of quilting, culminating in a beautiful piece that you can be proud of.
The “Make Your Point” quilt is not just about assembling fabric pieces; it’s about telling a story through your choice of colors and patterns. As you place each block and stitch each seam, you are crafting a narrative that reflects your unique style and vision. The illusion created by the “Make Your Point” design adds a layer of sophistication and elegance to the quilt, making it a standout piece in any collection.
Moreover, the “Make Your Point” quilt is a testament to the timeless appeal of quilting. It brings together traditional quilting techniques with a modern twist, making it a perfect project for both novice and experienced quilters. The satisfaction of seeing the quilt come together, block by block, and the joy of completing a project that is both beautiful and functional cannot be overstated.


